
Getting Started
Skapi is a serverless backend API for web applications.
To build a full-stack web application, create a project and connect it to your HTML or JavaScript code. If an AI coding agent writes that code for you, set the agent up right after creating the project; it takes care of the rest.
Creating a Project
- Sign up at skapi.com if you do not have an account yet.
- Log in and Create a new Project. If you are not signed in, the page sends you to log in first and brings you back to the project form once you are in.
- Give your project a name, an optional description and a region, and click Continue.
- Choose a plan and proceed.
An account that already has projects can also click + New Project on its project list.
Your new project opens on its Settings page. The Information card holds the Project ID, the value every example in this documentation calls <Project ID>. Click it to copy it.
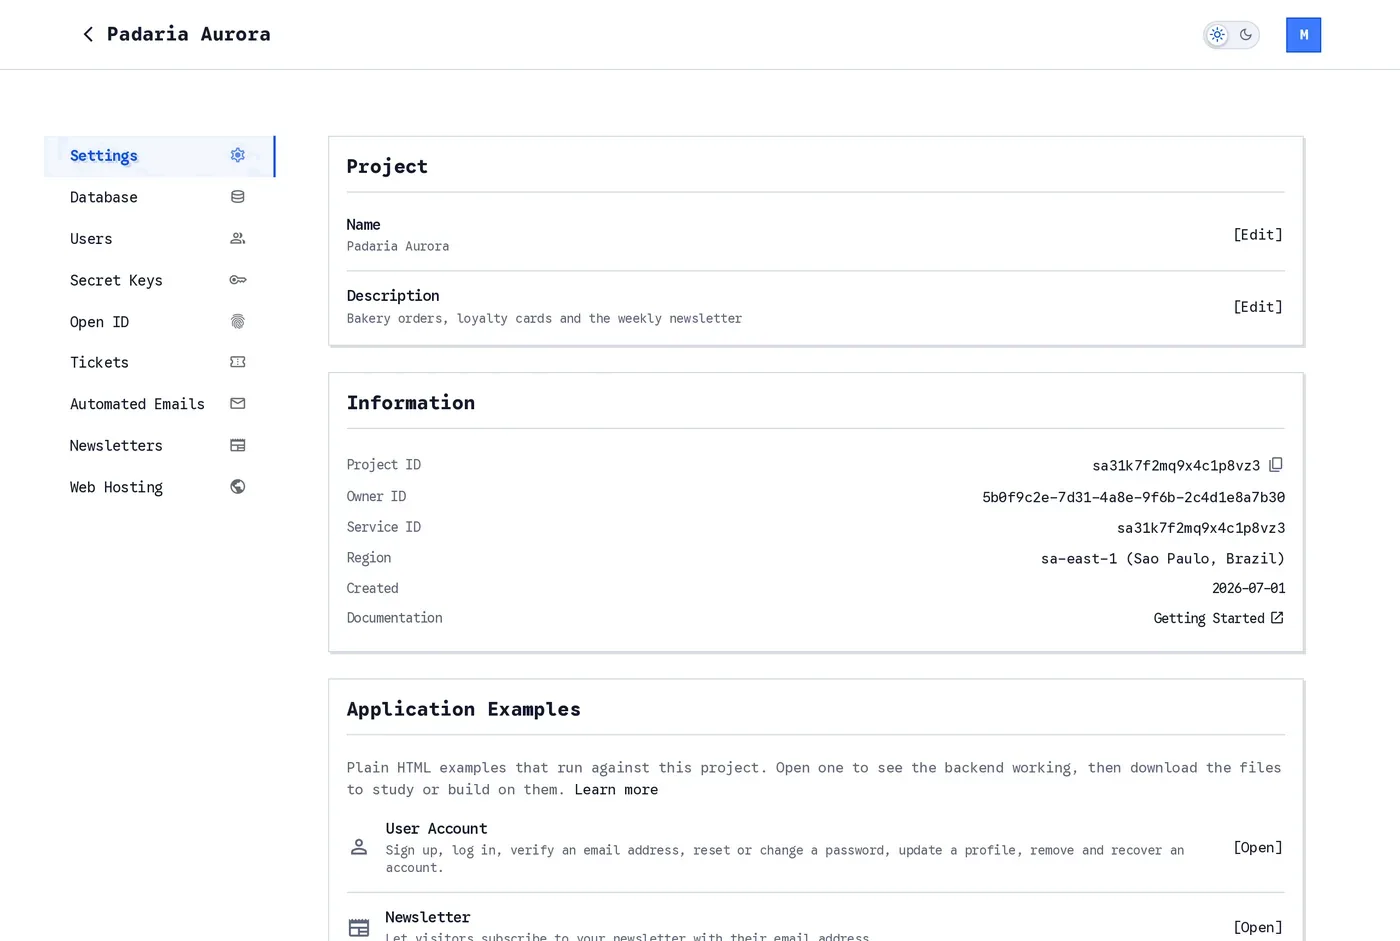
The Settings page of a project. The Project ID is on the Information card.
The same page has two shortcuts worth knowing from day one: Application Examples opens ready-made HTML pages that already run against your project (see Full Examples), and For AI Agents downloads the base prompt for your AI coding tool (see Setting up AI Agents below).
For BunnyQuery users
BunnyQuery projects are fully compatible with Skapi. Your project will appear in both your BunnyQuery and Skapi project lists.
If you write the code yourself, continue with Working on the Codebase. If an AI coding agent writes it, set the agent up first.
Setting up AI Agents
Skapi works smoothly with AI coding tools, such as Claude Code, Codex CLI, Gemini CLI, GitHub Copilot, Cursor and Windsurf.
There are two ways an AI agent can help you build on Skapi, and they work well together:
- A base prompt in your project teaches the agent how to write code against the Skapi API.
- The Skapi MCP server lets the agent work on your project itself: your database, your settings, your tickets, your secret keys and more, signed in as you.
Download the base prompt for your tool
Every tool reads the same file under its own name. Pick your tool, and the file downloads with the name it expects. Put it in the root of your project.
- Claude CodeCLAUDE.md
- Codex CLI / OpenCodeAGENTS.md
- Gemini CLIGEMINI.md
- GitHub Copilotcopilot-instructions.md
- Cursor.cursorrules
- Windsurf.windsurfrules
Browsers drop the leading dot from a download name, so .cursorrules and .windsurfrules are saved as cursorrules and windsurfrules. Add the dot back after saving.
You can also download the plain SKAPI.md and rename it yourself.
The file is small on purpose, about 25 KB: the rules, a map of this documentation and an index of every SDK method, each linking to its page. The agent reads a page when it builds the feature, from https://docs.skapi.com/md/ (every page of this site is there as raw markdown, at the same path), so a session carries only the pages it needs. If your agent cannot fetch urls, allow it access to docs.skapi.com, or connect the Skapi MCP server: its readDocs tool returns the same pages. A tool that indexes one document can take the whole documentation as a single file, SKAPI-full.md; it is too large to paste into a chat.
Your project's Settings page at skapi.com offers the same downloads under For AI Agents, next to the opening prompt with your project ID already filled in. Click [Download] on the row of your tool, and click the prompt to copy it.
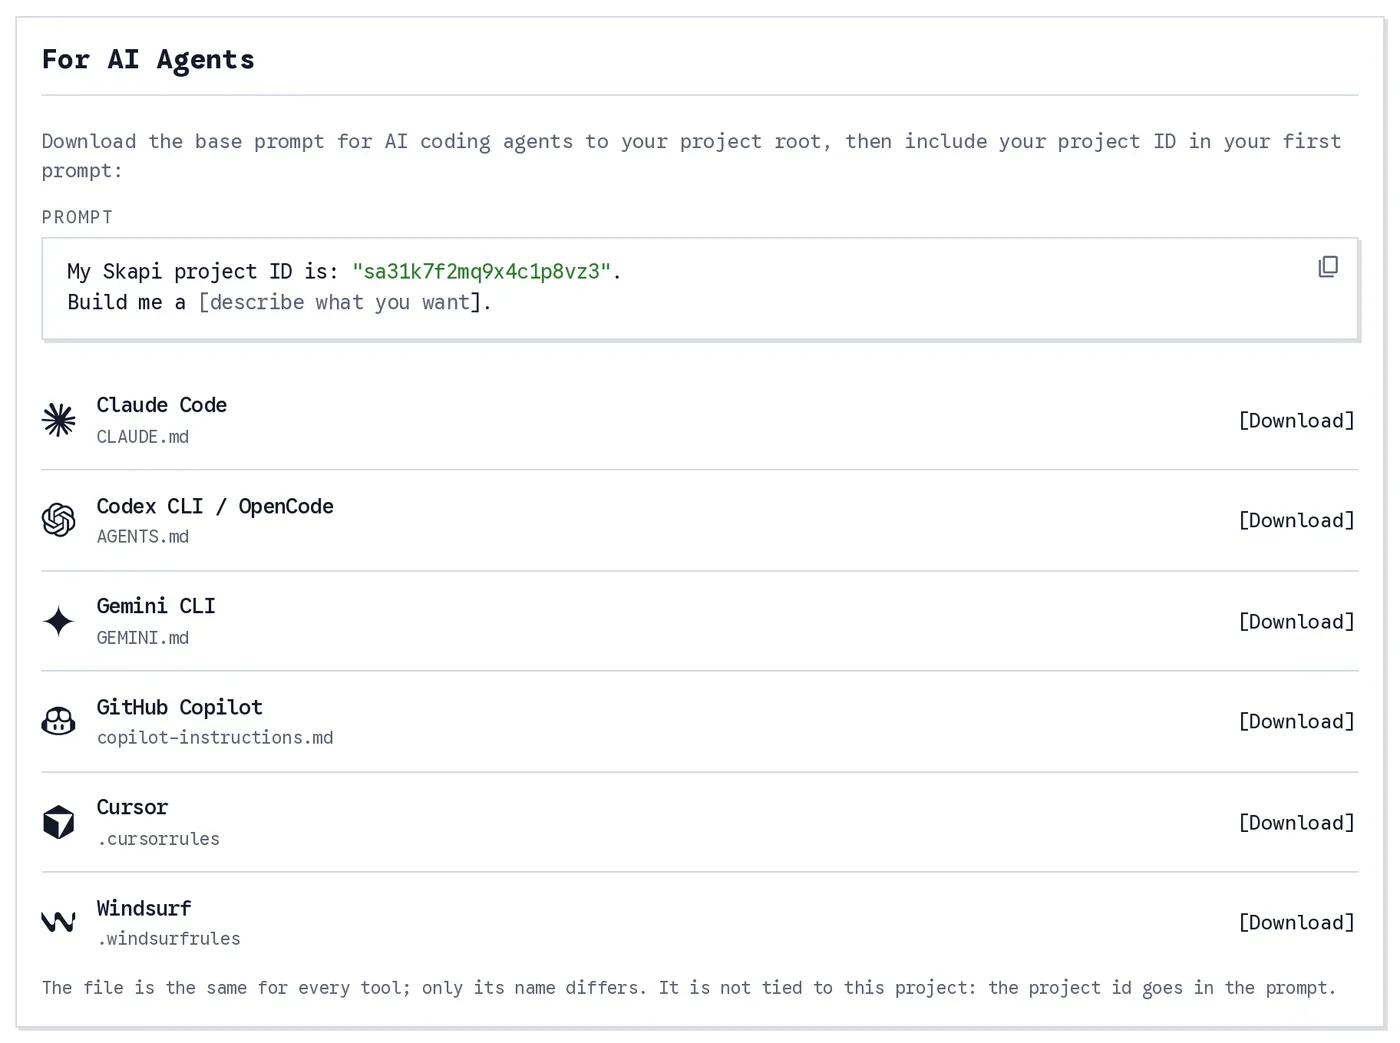
The For AI Agents card on the Settings page. The file is the same for every tool; only its name differs.
Start writing prompts
When you run your AI coding agent, start with a prompt like this:
My Skapi project ID is: "<Project ID>".
Build me a [describe what you want].
Replace the placeholder <Project ID> with your actual project ID before running your prompt. The Project ID is on the Information card of your project's Settings page (see Creating a Project).
Connecting the Skapi MCP server
Connecting the MCP server is optional. The base prompt above is all an agent needs to write your application's code, and your application never talks to the MCP server.
What the server adds is the administrative side of a project, the work you would otherwise do by hand on the Skapi dashboard: it connects the agent to your Skapi projects, signed in as you, so it can register the tickets and secret keys an integration needs, set up OpenID sign-in, change the project's settings, publish the website, read and fix records, and manage the project's users, from invitations to access groups. Each of those becomes a sentence in a prompt instead of a form. Skip this section if you only want help writing code, and come back when a feature needs something set up on the project.
Add this MCP endpoint to your AI platform:
Choose OAuth. No client ID or client secret is needed.
Sign in with your Skapi account when the platform asks. The server answers nothing until you have signed in, so a platform that lists it as needing authentication is waiting for that sign-in; see Signing in.
Any platform that speaks MCP works. The endpoint is the same everywhere; only the place you put it differs.
Coding agents
Each of these opens your browser to sign you in with your Skapi account the first time the agent uses the server. Leave any client ID or client secret field empty.
claude mcp add --transport http skapi https://mcp.broadwayinc.computercodex mcp add skapi --url https://mcp.broadwayinc.computer
codex mcp login skapigemini mcp add --transport http skapi https://mcp.broadwayinc.computer{
"mcpServers": {
"skapi": {
"url": "https://mcp.broadwayinc.computer"
}
}
}{
"servers": {
"skapi": {
"type": "http",
"url": "https://mcp.broadwayinc.computer"
}
}
}{
"mcpServers": {
"skapi": {
"serverUrl": "https://mcp.broadwayinc.computer"
}
}
}| Platform | Where it goes | Signing in |
|---|---|---|
| Claude Code | The command above. Add --scope user to have the server in every project. | claude mcp list shows the server as Needs authentication until you sign in. Run claude mcp login skapi, or /mcp in a session, pick skapi and choose Authenticate. |
| Codex CLI | The command above writes [mcp_servers.skapi] with url into ~/.codex/config.toml. | codex mcp login skapi |
| Gemini CLI | The command above writes httpUrl into .gemini/settings.json. Add -s user to have the server in every project. | Automatic. /mcp auth skapi in a session starts it again. |
| Cursor | .cursor/mcp.json in the project, or ~/.cursor/mcp.json for every project. The Customize page manages the same list. | Prompted in the browser |
| VS Code with GitHub Copilot | .vscode/mcp.json, or Command Palette, MCP: Add Server. | Prompted in the browser on first connection |
| Windsurf, now Devin Desktop | ~/.config/devin/mcp_config.json, opened from the MCPs entry of the Cascade panel's menu. The Devin CLI also takes devin mcp add skapi https://mcp.broadwayinc.computer. | Prompted in the browser, or devin mcp login skapi |
Chat platforms on the web
A web platform has no command line, so the server is added in its settings instead, usually on a page called Connectors, Integrations, Apps or MCP servers. Look for an option to add a custom or remote server, paste the endpoint, leave the client ID and secret empty, and sign in when it asks.
- Claude (claude.ai, the desktop app and Cowork): Customize > Connectors, then Add custom connector. Paste the endpoint and click Add. On Team and Enterprise plans an organization owner adds it under Organization settings > Connectors, and every member clicks Connect.
- ChatGPT: turn on Developer mode under Settings > Security and login, open chatgpt.com/plugins, click +, give it a name and paste the endpoint as the connection. In a chat, choose Developer mode from the + menu and pick it. Available on the paid plans.
Other platforms follow the same pattern. Zed, JetBrains AI Assistant, Cline, Kiro and Amp all take a remote MCP server by URL from their settings page or their config file. Wherever a platform asks for a transport, choose Streamable HTTP; wherever it asks how to authenticate, choose OAuth.
Then tell the agent which project to work on:
Use my Skapi project "<Project ID>".You can also ask it to list your projects and pick one. If you have no project yet, the agent will tell you so and give you the link to the project form on skapi.com; the MCP server does not create projects.
Signing in
The server signs you in with OAuth, using your Skapi account. Your platform registers itself with the server and proves each sign-in with PKCE, so there is no client ID or client secret to enter anywhere.
- Nothing works before you sign in. The server refuses every request that carries no sign-in, the first connection included. That refusal is what makes a platform open the sign-in page, and until you finish it the platform shows the server as needing authentication and the agent sees none of its tools.
- The sign-in renews itself. The platform refreshes it in the background while you use it. If the agent has not used the server for about 30 days, the platform asks you to sign in again.
- The agent acts as you. It reaches only the projects and data your account can reach; see What the MCP server can do for you.
If a tool answers Unauthorized, or the platform reports an incompatible authorization server, it is holding a connection made before the current sign-in. Sign in again: in Claude Code run claude mcp login skapi, elsewhere use the platform's reconnect or authenticate option, or remove the server and add it again.
Signing in without a browser
The sign-in above opens a browser. On a machine that has none, over SSH, in a container or in continuous integration, or on a platform that only takes a fixed header, there are two ways in.
A command-line sign-in that prints a link. Claude Code and Codex CLI can sign in without opening a browser themselves:
claude mcp login skapi --no-browser
codex mcp login skapi
Each prints a URL. Open it on any device where you can sign in to Skapi, finish, and paste the address it returns back into the terminal. Claude Code needs a real terminal for this, so over SSH connect with ssh -t.
An access token you set as a header. For anything else, including a script, a scheduled job, or a platform that offers only a header field, use an access token. The MCP server has a page that issues them:
https://mcp.broadwayinc.computer/connect
Open it in any browser (https://www.skapi.com/mcp is a shortcut to the same page). It runs the same Skapi sign-in a platform would open, then lets you create tokens. The steps:
Open the page and sign in with your Skapi account.
Click Create token, and optionally label it so you can tell your machines apart.
Copy the token. It starts with
skmcp_and is shown once, right then, never again.Give it to your platform as the
Authorization: Bearerheader. For Claude Code:shclaude mcp add --transport http skapi https://mcp.broadwayinc.computer \ --header "Authorization: Bearer skmcp_YOUR_TOKEN"In a config file the token goes in a
headersentry ("Authorization": "Bearer skmcp_YOUR_TOKEN") on the server, or, for Codex CLI, inbearer_token_env_var. The/connectpage prints the whole entry for Claude Code, Codex CLI, Gemini CLI, Cursor, VS Code and Windsurf.
The token acts as you, with everything your account can reach, for as long as that sign-in lasts or until you revoke it. Return to the same page any time to see your tokens and revoke one. A platform set up with a token never opens the sign-in page; when you revoke the token it reports the server as unauthorized until you give it a new one. Keep the token as secret as a password.
What the MCP server can do for you
Everything below runs with the permissions of the signed-in account, so the agent can only reach what you can, and every change it makes is one you could have made on the dashboard yourself. Your Skapi account, the project owner, gets all of it. An admin of the project (a user in access group 90 ~ 99) who signs in through the server gets the user management tools, under the same rules the app applies to admins; see Admin Permissions.
- Users. Search the project's users, and manage their accounts the way the dashboard's Users page does: send, resend, cancel and list invitations, create accounts, grant access groups, update profiles, and block, unblock or delete accounts. The agent asks before it blocks or deletes. An invitation is an e-mail and counts as one of the project's monthly e-mail sends, resends included; see Inviting Users and Managing Users.
- Tickets. Register the endpoints that accept a webhook from your payment provider, a link, or a signed-in request, with their conditions, placeholders, actions and error handling, and read their logs afterwards. See Registering a Ticket.
- Secret keys. Store the API keys of the third-party services your project calls, so your front end never holds them, and limit the URLs each key may be sent to. See Secret Keys.
- OpenID loggers. Set up sign-in through an external identity provider, including the profile request, the header it needs and a condition on who may sign in, such as one e-mail domain. See OpenID Login.
- Database. Read, search, create, update and delete records. List tables, tags, indexes and unique IDs, and find any of them by how its name starts or ends. It can also read the files attached to a record and give you a download link for them, but it cannot attach a file to a record or remove one: a record sent with files to attach or remove is refused and not saved, while the other records in the same request are still saved. Attach and remove a record's files in the Skapi dashboard (Database page) or with the SDK. Deleting a record still deletes the files attached to it, as it does everywhere else.
- Project settings. Turn sign-ups or inquiries on and off, restrict anonymous writes, and change the other settings of the project.
- Hosting. Register a web address, then upload, edit and delete the files of your project's website.
- E-mails (project owner only). Compose an automated e-mail template, of any type, or a newsletter, and upload it as e-mail HTML or as plain text, with the same checks the dashboard makes (e-mail HTML, the type's required placeholders, the size). An uploaded template is added to its list and is never put in use by the agent; an uploaded newsletter is saved without sending. The owner chooses the template, or sends the newsletter, on the dashboard, or a ticket's Send e-mail or Send newsletter action names it. See Uploading a template and Uploading a newsletter.
The ticket, secret key and OpenID logger pages of this documentation each show the dashboard forms these tools fill in for you. A few prompts to start with:
Save this API key as a secret named "weather_api", usable only for https://api.weather.example: <your key>.
Create a ticket that saves each incoming webhook payload to the "orders" table, readable by admins only.
Register a Google OpenID logger for this project, and let in only addresses that end with "@mycompany.com".
Show me what my "orders" ticket received today.
Make every record in the "posts" table private.
Write a welcome e-mail for my shop, in my brand's tone, and upload it as the welcome template.
Compose this month's newsletter about the new autumn menu and save it to the public list without sending it.
The agent picks the tools, asks when something is missing, and reports what it changed.
When a project is at a limit of its plan (users, monthly e-mail sends, newsletter subscribers, storage or bandwidth), the agent is told which limit, and is given the link to the project's plan page, where the project owner upgrades. The server itself never changes a plan, and never creates or deletes a project; see Plans and Limits.
With the project created and the agent set up, the rest happens in your code: continue with Working on the Codebase.