
OpenID Login
Skapi supports OpenID authentication through configurable OpenID Loggers.
What is OpenID?
OpenID is an authentication standard that lets users sign in with an identity provider (for example, Google) instead of creating a separate password for every app.
Login with OpenID Profile
If you have access to an OpenID provider API, you can register an OpenID Logger in your Skapi project settings.
An OpenID Logger is a project setting
Registering, updating, deleting and listing OpenID Loggers belong to the project owner's Skapi account, and to Skapi staff when you ask Skapi for help. An admin of your project, access group 99 included, is refused with INVALID_REQUEST and Only the project owner can change project settings. The same holds for the Secret Keys a logger uses.
Although providers differ in details, the overall process is:
- You redirect the user to the provider's login page.
- The provider authenticates the user.
- The user is redirected back to your app.
- Exchange the returned authorization code for an access token with
forwardRequest()and a stored Secret Key. - Call
openIdLogin()with the token.
Google OAuth Example
This example shows how to implement Google OAuth authentication.
1. Set Up Google OAuth Service
Go to the Google Cloud Console and create your OAuth app.
Follow Google's setup instructions, and make sure your redirect URL points back to your web app.
2. Set Up Link to Google Login
After setting up OAuth in Google Cloud Console, create a button that sends users to Google's OAuth login URL with the parameters registered for your app.
<button onclick="googleLogin()">Google Login</button>
<script>
    const GOOGLE_CLIENT_ID = '1234567890123-your.google.client.id';
    const REDIRECT_URL = window.location.origin + window.location.pathname; // URL user to redirect back to on successful login.

    function googleLogin() {
        const state = crypto.randomUUID();
        const authURL = new URL('https://accounts.google.com/o/oauth2/v2/auth');

        authURL.searchParams.set('client_id', GOOGLE_CLIENT_ID);
        authURL.searchParams.set('redirect_uri', REDIRECT_URL);
        authURL.searchParams.set('response_type', 'code');
        authURL.searchParams.set('scope', 'https://www.googleapis.com/auth/userinfo.profile https://www.googleapis.com/auth/userinfo.email');
        authURL.searchParams.set('prompt', 'consent');
        authURL.searchParams.set('state', state);
        authURL.searchParams.set('access_type', 'offline');

        window.location.href = authURL.toString();
    }
</script>
3. Register a Secret Key
After a successful Google login, the user is redirected back to your page with a code query parameter.
You must exchange this code for an access token. Because this step requires a client secret, store the secret in Skapi and request the token with forwardRequest().
To register a secret key in Skapi:
In the project page, click on the Secret Keys menu.
Click + Register Secret.
In the form, enter:
- Name: A key identifier. For this guide, use ggltoken.
- Secret Value: The exact client secret from your Google OAuth app.
Click Register.
For more information about registering a secret key, see Secret Keys.
After registering the client secret, run the following code on the redirect page to exchange the authorization code for an access token:
// Page user has redirected to

const GOOGLE_CLIENT_ID = '1234567890123-your.google.client.id';
const REDIRECT_URL = window.location.origin + window.location.pathname;
const urlParams = new URLSearchParams(window.location.search);
const code = urlParams.get('code');

const tokenResponse = await skapi.forwardRequest({
    code,
    client_id: GOOGLE_CLIENT_ID,
    client_secret: '$CLIENT_SECRET',
    redirect_uri: REDIRECT_URL,
    grant_type: 'authorization_code'
}, {
    secretName: 'ggltoken',
    url: 'https://oauth2.googleapis.com/token',
    method: 'POST',
    headers: {
        'Content-Type': 'application/json'
    }
});
const ACCESS_TOKEN = tokenResponse?.access_token;
4. Register Your OpenID Logger in Skapi
To log users into your Skapi project with the token, you must register an OpenID Logger.
The logger configuration tells Skapi how to request user profile attributes from the OAuth provider and which attribute to use as the unique account identifier.
- Log in to skapi.com and open the project.
- From the side menu, click Open ID. The page lists the loggers the project has, with their Logger ID, Username Key, Request URL and Method.
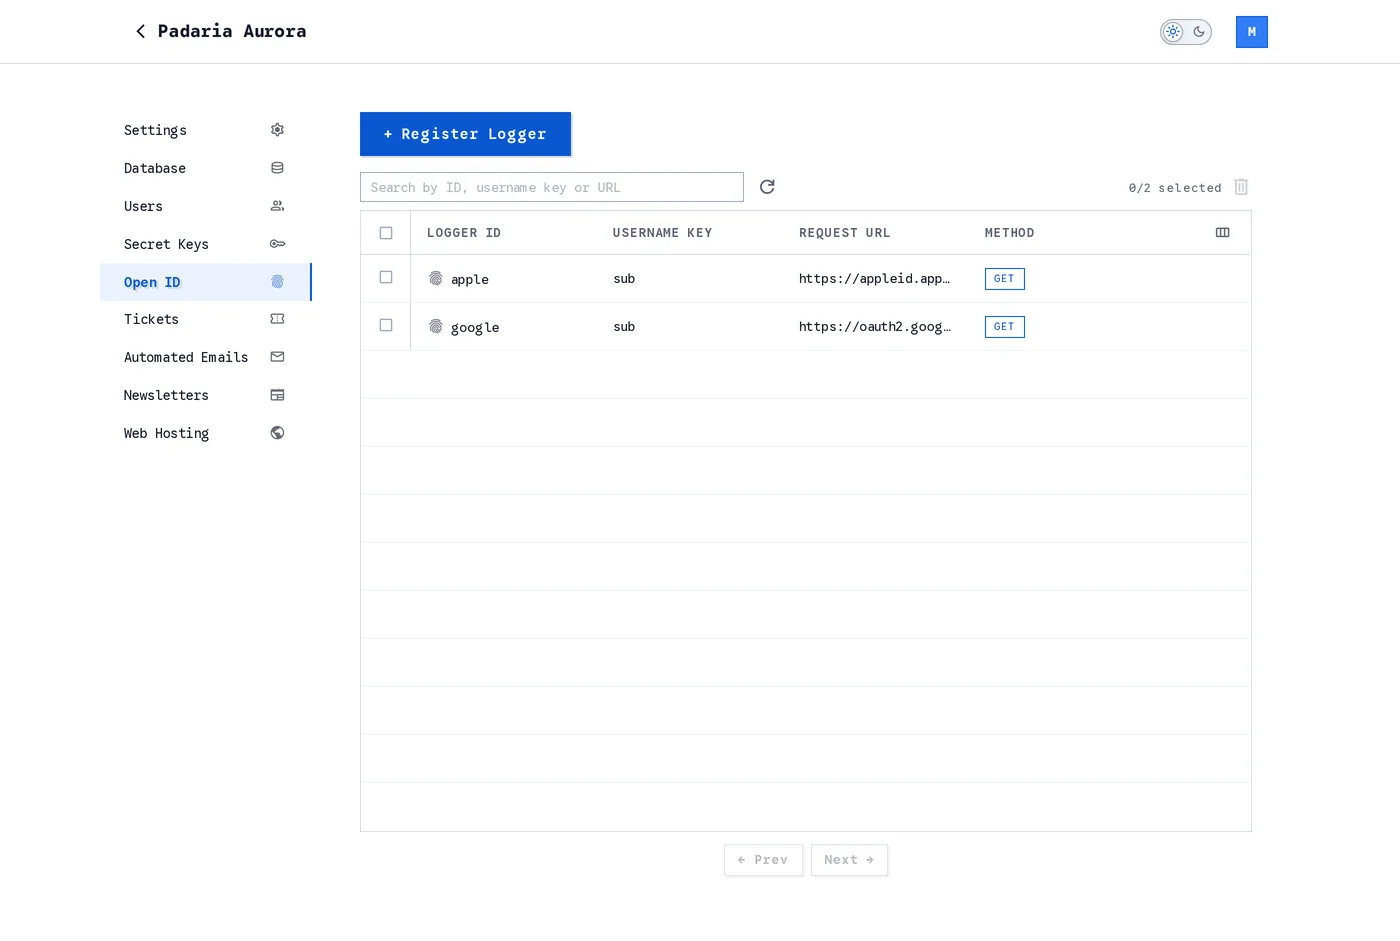
The Open ID page. Click a row to open a logger. Tick rows and use the delete icon to remove them.
Click + Register Logger.
Fill in the form:
Logger ID: The name your app passes to
openIdLogin(). You can use any name, and it cannot change later. For this guide, use google.Username Key: The attribute of the provider's profile response that becomes the user's unique username. It cannot change later. For this example, use email.
Request URL: The endpoint that returns the user's profile.
$TOKENin the URL is replaced by the OpenID token at sign-in. For this example, usehttps://www.googleapis.com/oauth2/v3/userinfo.Method:
GETorPOST, as the API requires. For this example, useGET.Header [JSON]: Request headers as JSON.
$TOKENis replaced here too. Use:{ "Authorization": "Bearer $TOKEN" }Get Parameters [JSON] or Post Body [JSON]: Query parameters for
GET, or the request body forPOST, as JSON. Leave it blank for this example.Condition: Optional. Only users whose profile attribute meets the condition can sign in through this logger. Attribute is the profile attribute to compare, Condition is the comparison, and Value is what it is compared with. On text,
>=means the attribute starts with the value and<=means it ends with it, soemail<=@mycompany.comlets in only that e-mail domain. Leave them blank for this example.
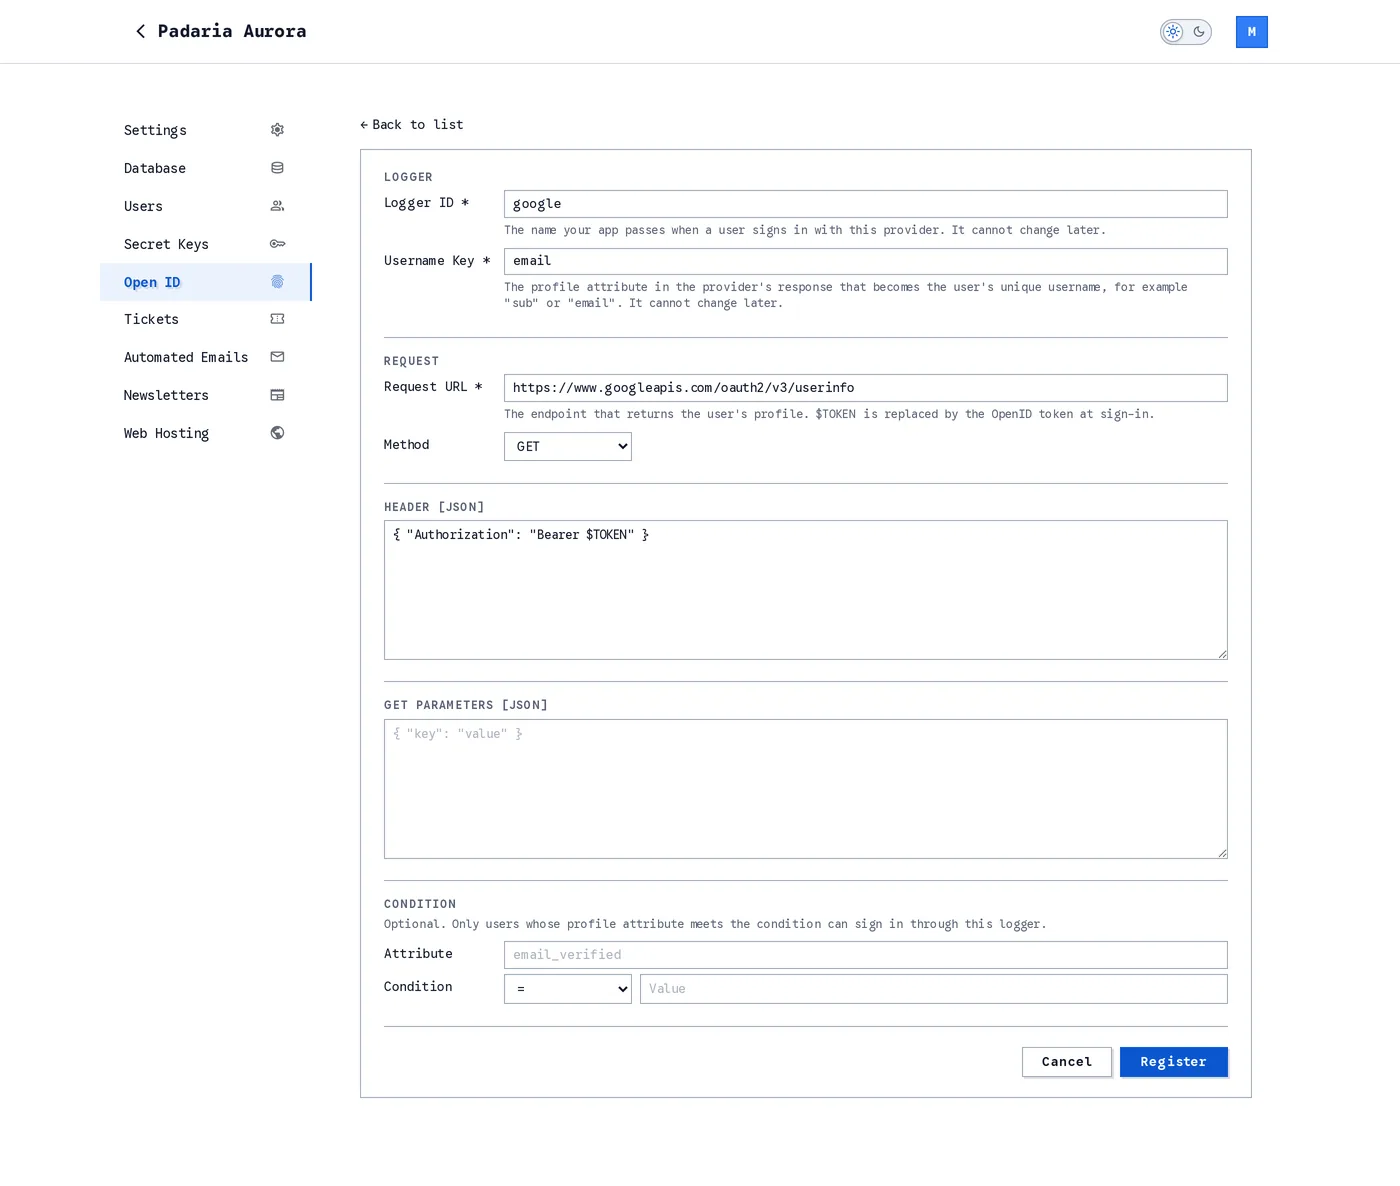
The logger form filled in for this example.
- Click Register.
To change a logger later, click its row on the Open ID page, edit the request fields and click Update. The Logger ID and the Username Key are fixed once registered. Delete at the bottom of the form removes the logger, and users who signed in through it lose access to the project.
Let an AI agent do it
The Skapi MCP server can register, update and delete OpenID loggers for you from an AI agent, along with the secret key the token exchange uses. See Connecting the Skapi MCP server.
Now call openIdLogin() with the logger ID and the access token to sign in (or create) the user.
In this example, the logger ID is google.
skapi.openIdLogin({ id: 'google', token: ACCESS_TOKEN }).then(user => {
    // User has logged in!
});
openIdLogin(event?: SubmitEvent | params): Promise<{ userProfile: UserProfile; openid: { [attribute: string]: string } }>
Wrapping up: All in one page
This example shows the entire flow in one page. After the user signs in with Google and is redirected back to your app, use forwardRequest() to exchange the authorization code for an access token.
Then call openIdLogin(event?: SubmitEvent | params): Promise<{ userProfile: UserProfile; openid: { [attribute: string]: string } }> to sign the user in to your Skapi project.
<button onclick="googleLogin()">Google Login</button>
<script>
    const GOOGLE_CLIENT_ID = '1234567890123-your.google.client.id';
    const REDIRECT_URL = window.location.origin + window.location.pathname;

    function googleLogin() {
        const state = crypto.randomUUID();
        const authURL = new URL('https://accounts.google.com/o/oauth2/v2/auth');

        authURL.searchParams.set('client_id', GOOGLE_CLIENT_ID);
        authURL.searchParams.set('redirect_uri', REDIRECT_URL);
        authURL.searchParams.set('response_type', 'code');
        authURL.searchParams.set('scope', 'https://www.googleapis.com/auth/userinfo.profile https://www.googleapis.com/auth/userinfo.email');
        authURL.searchParams.set('prompt', 'consent');
        authURL.searchParams.set('state', state);
        authURL.searchParams.set('access_type', 'offline');

        window.location.href = authURL.toString();
    }

    async function handleOAuthCallback() {
        const urlParams = new URLSearchParams(window.location.search);
        const code = urlParams.get('code');

        if (!code) {
            return;
        }

        try {
            const tokenResponse = await skapi.forwardRequest({
                code,
                client_id: GOOGLE_CLIENT_ID,
                client_secret: '$CLIENT_SECRET',
                redirect_uri: REDIRECT_URL,
                grant_type: 'authorization_code'
            }, {
                secretName: 'ggltoken',
                url: 'https://oauth2.googleapis.com/token',
                method: 'POST',
                headers: {
                    'Content-Type': 'application/json'
                }
            });

            if (!tokenResponse?.access_token) {
                throw tokenResponse;
            }

            const ACCESS_TOKEN = tokenResponse.access_token;

            await skapi.openIdLogin({ id: 'google', token: ACCESS_TOKEN });

            window.history.replaceState({}, document.title, REDIRECT_URL);

            // User has now logged in. Do whatever you want from here...
            alert('Login Success!');
        }
        catch (error) {
            console.error('Google OAuth login failed:', error);
            alert('Login failed. Please try again.');
        }
    }

    handleOAuthCallback();
</script>
Merging an OpenID Account with a Previous Account
In some cases, you may want to merge a user's OpenID account with an existing account. Accounts created by admins are merged like any other account that matches (see below which accounts match): an account made with createAccount(), or an invited account once its invitation is accepted. A matching account that is still waiting for its signup confirmation, or whose invitation has not been accepted yet, cannot be merged: openIdLogin() fails with INVALID_REQUEST and The account needs to be confirmed., with or without merge.
To enable merging, set your OpenID Logger ID to by_skapi. Then, when calling openIdLogin, use the merge option to control what gets merged. Set merge: true to merge the OpenID account into the existing account (its password is replaced and no profile attributes are copied), or pass an array of OpenID attribute names, such as ["name"], to merge and also copy those attributes.
For example, to merge and also copy the user's "name" attribute:
skapi.openIdLogin({ id: 'by_skapi', token: ACCESS_TOKEN, merge: ["name"] });DANGER
After a merge, the user can no longer log in with a password. This action cannot be undone.
Merge only matches the account whose original login identifier is the OpenID account's login ID, for example an account created without a username using the same email. It never matches an account through its email login: an account created with a username that uses the same email, or an account whose email was changed to that address later, is not merged into.
What happens to such an account depends on whether it has verified that address. If it has, the email login is one it was granted, and openIdLogin() fails with EXISTS and The login ID of this OpenID account is already used by another account., with or without merge. If it has not, that email login is removed and a new OpenID account is created for the address, so two accounts of your project then carry the same email address. See openIdLogin() and Login IDs.
TIP
You can first attempt login without the merge parameter and only prompt the user to merge if the account already exists:
skapi.openIdLogin({ id: 'by_skapi', token: ACCESS_TOKEN })
    .catch(err => {
        if (err.code === 'ACCOUNT_EXISTS') {
            if (confirm('An account already exists. Merge them now?')) {
                return skapi.openIdLogin({ id: 'by_skapi', token: ACCESS_TOKEN, merge: true });
            }
        }
        throw err; // Re-throw if not handled
    });