
Automated Emails
When the user signup, reset password, or change email, subscribes to public newsletters, get invited to your project, the system will send an automated email to the user. You can customize the email template of these automated emails by sending your templates to the email endpoints.
E-Mail endpoints can be found in your Automated Emails page in your Skapi admin page.
Register an email alias first
Automated emails are sent from your project's email alias, so a template can only be set once the project has one. Register it in your project's Settings page. Until then the Automated Emails page asks you to register it, and a template sent to an endpoint is not saved: Skapi replies to your address with a notice saying that an email alias is needed. Templates you already set keep being sent.
Your address must pass the sender trust check
Skapi only accepts a template from an address whose mail passes SPF, DKIM and DMARC, the checks that prove an email really comes from the address it names. Mail that fails any of them, or comes from a domain that publishes none of them, is treated as suspicious and is not processed. Skapi replies to your address with a notice that lists each check and its result. If you get that notice, ask your email provider, or whoever manages your domain, to check the trust settings (SPF, DKIM and DMARC) of your address, then send it again. Addresses at the large email providers usually pass these checks already.
Templates and the sending address are project settings
Setting or deleting a template, and choosing the address your automated emails are sent from, belong to the project owner's Skapi account, and to Skapi staff when you ask Skapi for help. An admin of your project, access group 99 included, is refused with INVALID_REQUEST and Only the project owner can change project settings.
A template is set by sending it from the project's email address, the project owner's, to the endpoint the Automated Emails page shows. Mail from any other address is not processed. When that address passes the sender trust check below, Skapi replies to it that only the project owner can set templates.
In the Automated Emails page, select an email type you want to set the template.
Signup Confirmation
Sent when a user signs up with
signup_confirmationon insignup(), or when they callresendSignupConfirmation(). It carries the link that activates the account.Welcome E-Mail
Sent at a user's first login if their email address is already verified, for example after a confirmed signup, an accepted invitation, or a first
openIdLogin().Verification E-Mail
Sent with a one-time code by
verifyEmail()for an unverified email address. A phone number is verified by a text message instead, whose wording is the project's SMS text.Forgot Password E-Mail (the Password reset tab)
Sent with the password reset code by
forgotPassword(). The reset code always comes by email, never by text message, so this is the only template a password reset uses.Invitation E-Mail
Sent by
inviteUser()andresendInvitation(), with the generated password and the link that accepts the invitation. You can also invite users from theUserspage in your admin page in Skapi website.Newsletter Subscription
Sent when a visitor who is not logged in subscribes to your public newsletter, with a link to confirm the subscription.
Custom Email
Sent by a ticket's Send e-mail action to the address the ticket names, with the values the ticket fills in. See Custom e-mails.
The tabs on the page are named Signup, Welcome, Verification, Password reset, Invitation, Newsletter and Custom; on a narrow screen they are a select. Once you select one, the page shows:
- Set Template: the template setter, the email endpoint that takes templates for the selected type. Click the address to copy it, or click [Compose] to open a new message to it in your mail app. Every type has its own address.
- Placeholders: the placeholders the selected type fills in, split into Required and Optional.
- Current template: the subject of the template in use, or
Built-in default, and when this type of email is sent. [Preview] opens it.
Below them is the list of the templates you have sent for that type: the subject, the Template ID (which a ticket's Send e-mail action names for a custom template; the column copies it with a click and can be hidden with the column picker) and when it was received. On every tab but Custom, the template your project sends carries an In use chip next to its subject.
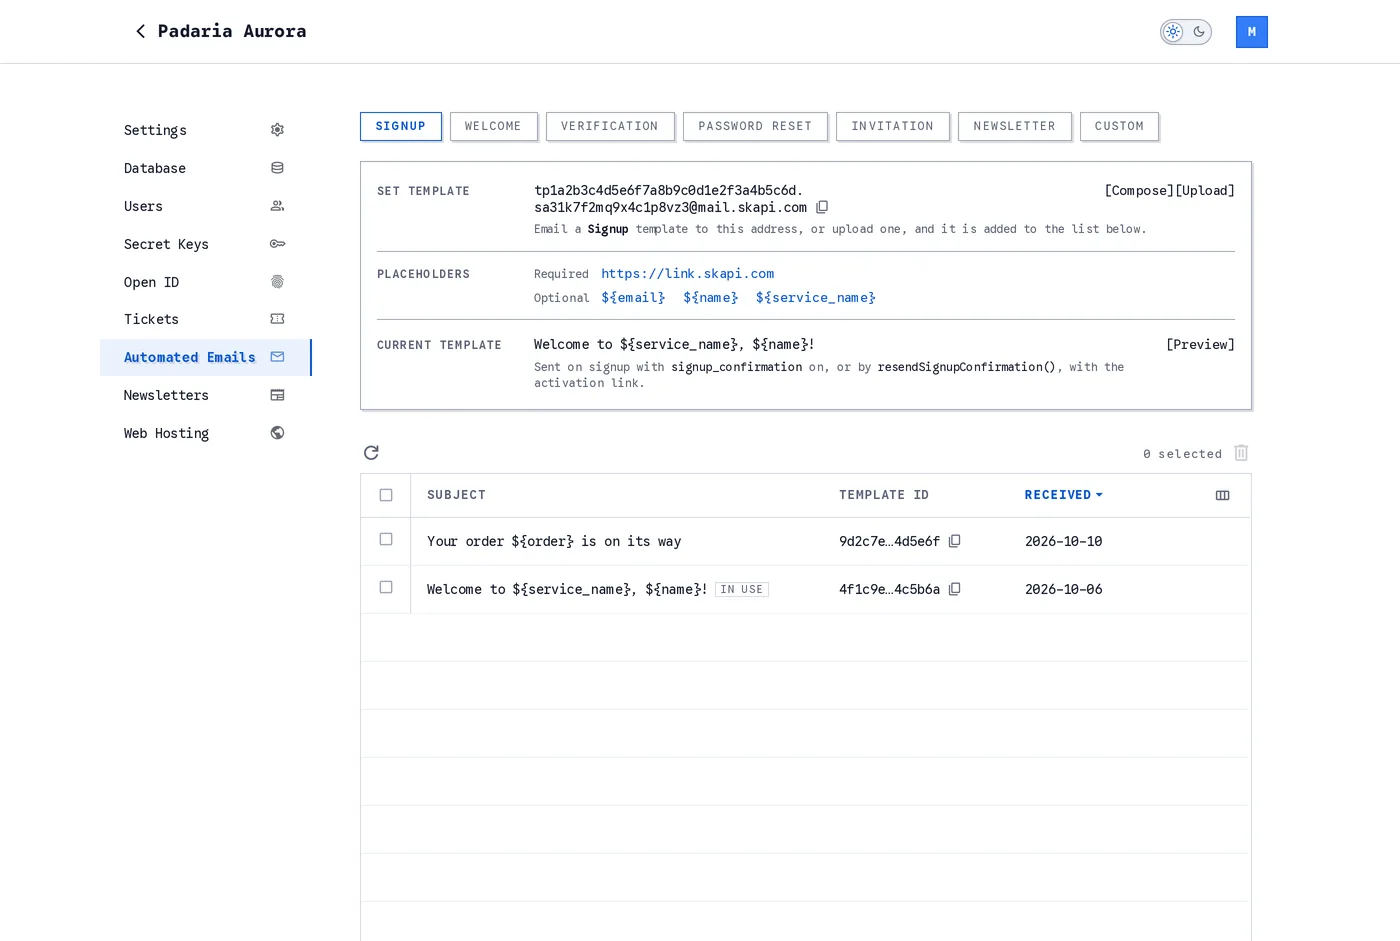
The Automated Emails page. The Set Template address takes templates for the selected tab.
The Password reset tab is where the e-mail that carries the password reset code is set. Its one required placeholder is ${code}; until you set a template of your own, the current template is the built-in default, and the row under it says when the mail goes out: by forgotPassword(), always by e-mail, to the account's login e-mail.
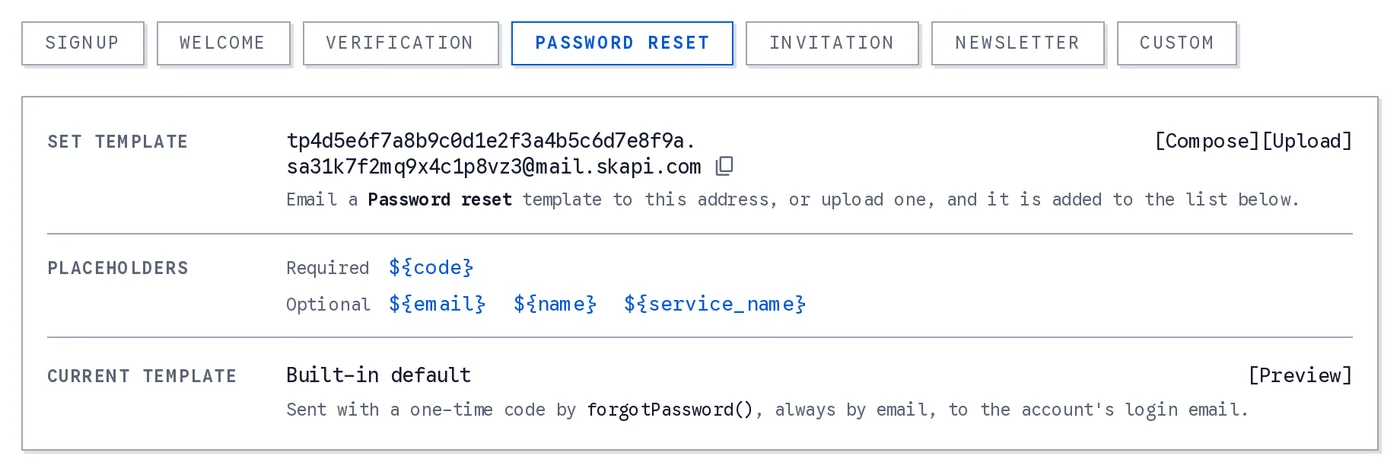
The Password reset tab. The code placeholder is required; the built-in default is used until you set a template.
Placeholder information
Hover over a placeholder, or move to it with the keyboard, to see what it turns into for the selected type. Click it to copy it, then paste it into your template.
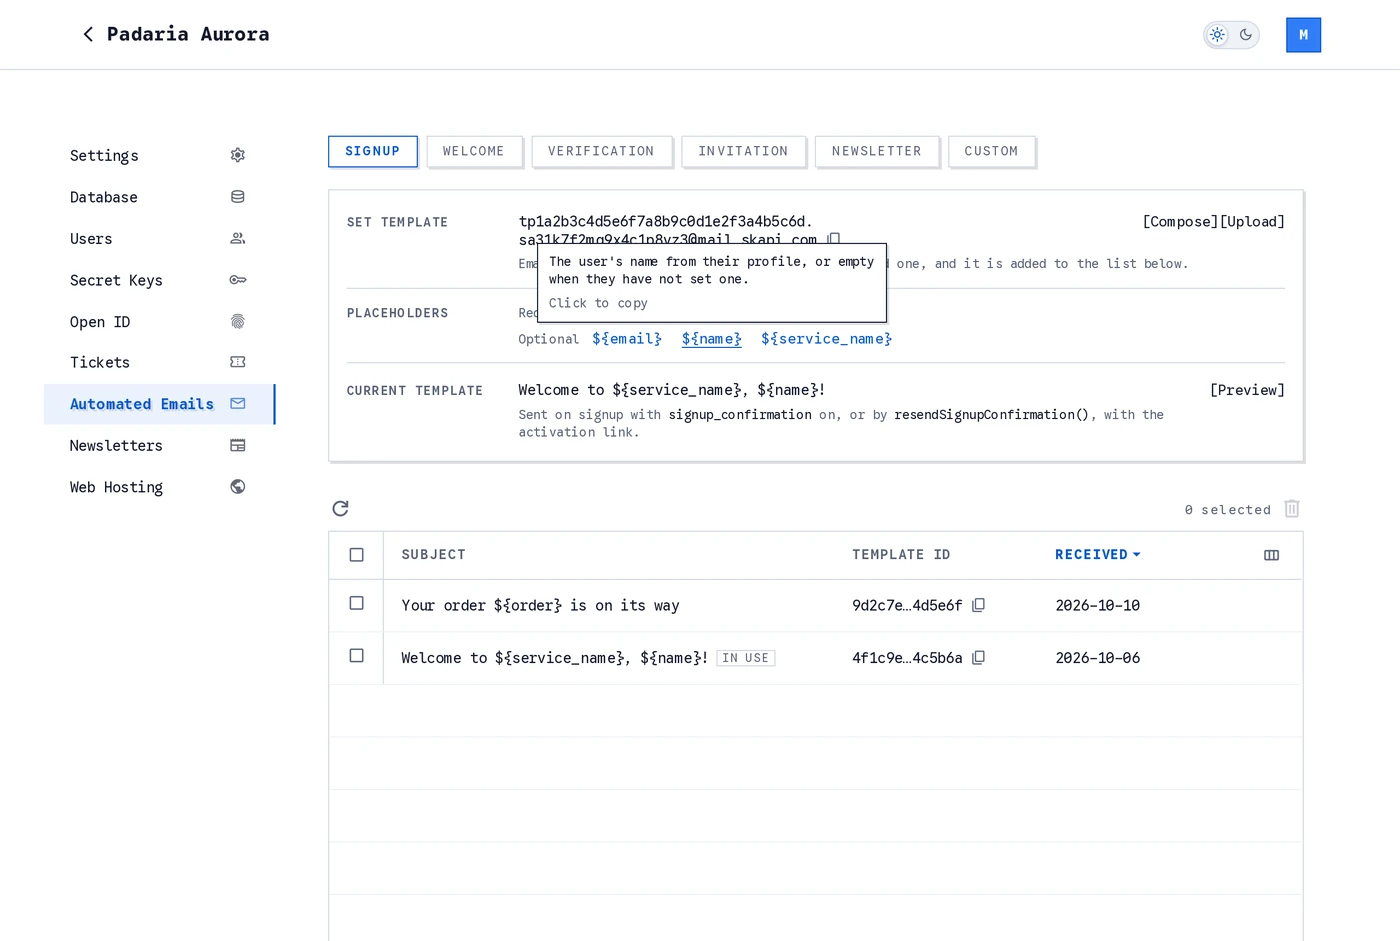
Every placeholder explains itself and copies with one click.
See Template Placeholders for the full list per type.
Choosing the template in use
Every template you send is added to the list of its type, newest first, with its subject and when it was received. Sending a template never changes the one in use: whichever tab's address you send to, the template is only listed, and nothing changes until you choose it here. The In use chip marks the one your project sends. To switch, click the row of another template to open its preview, check it, and click Use as Signup Confirmation template (the button names the type) under the preview; a confirmation follows. On the template in use the button reads In use.
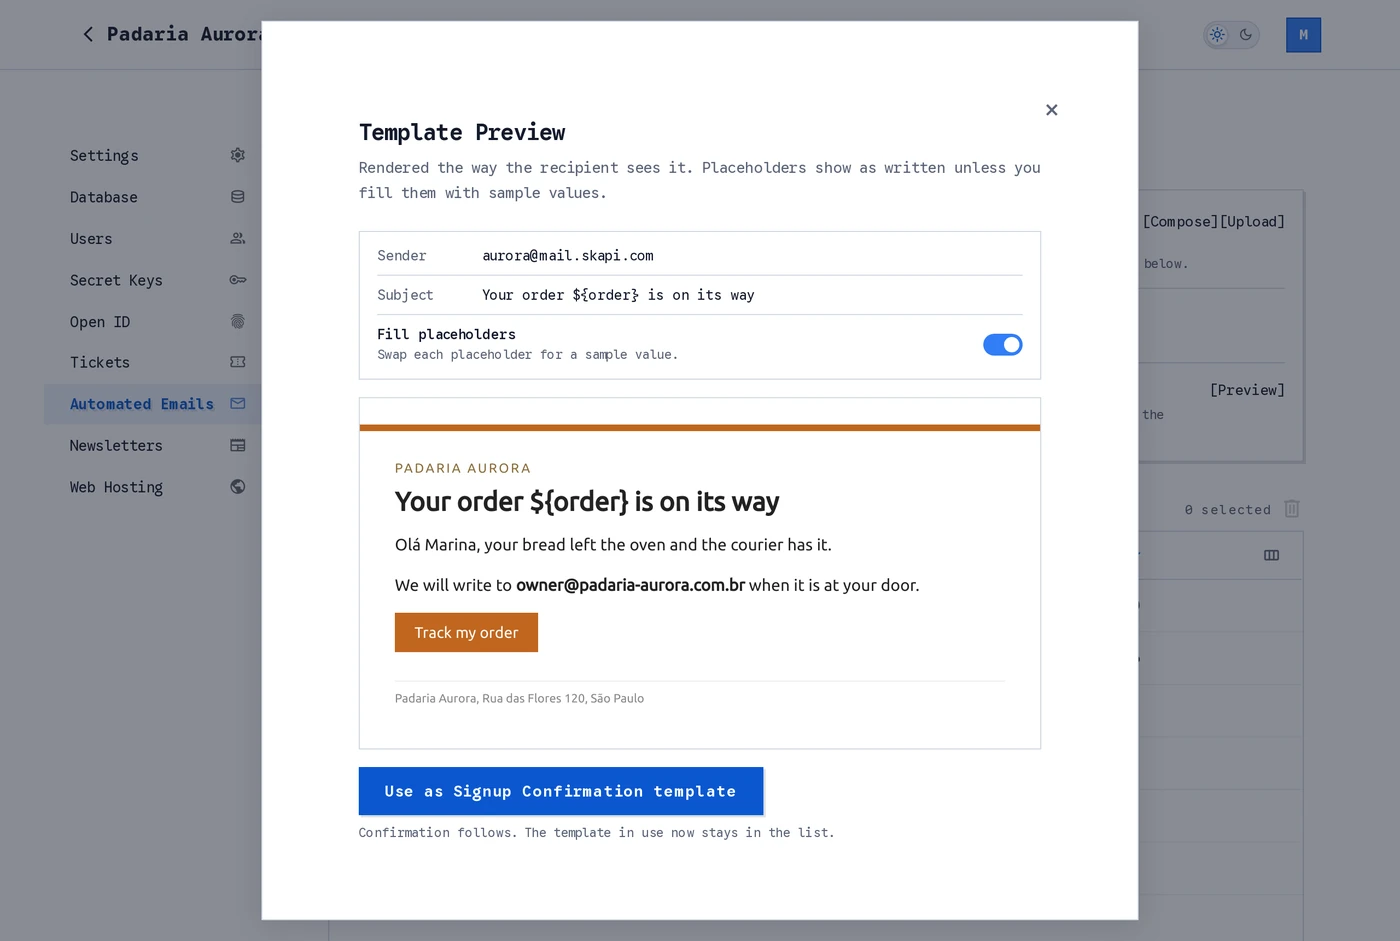
Choose a template from its preview, where you can see what you are choosing.
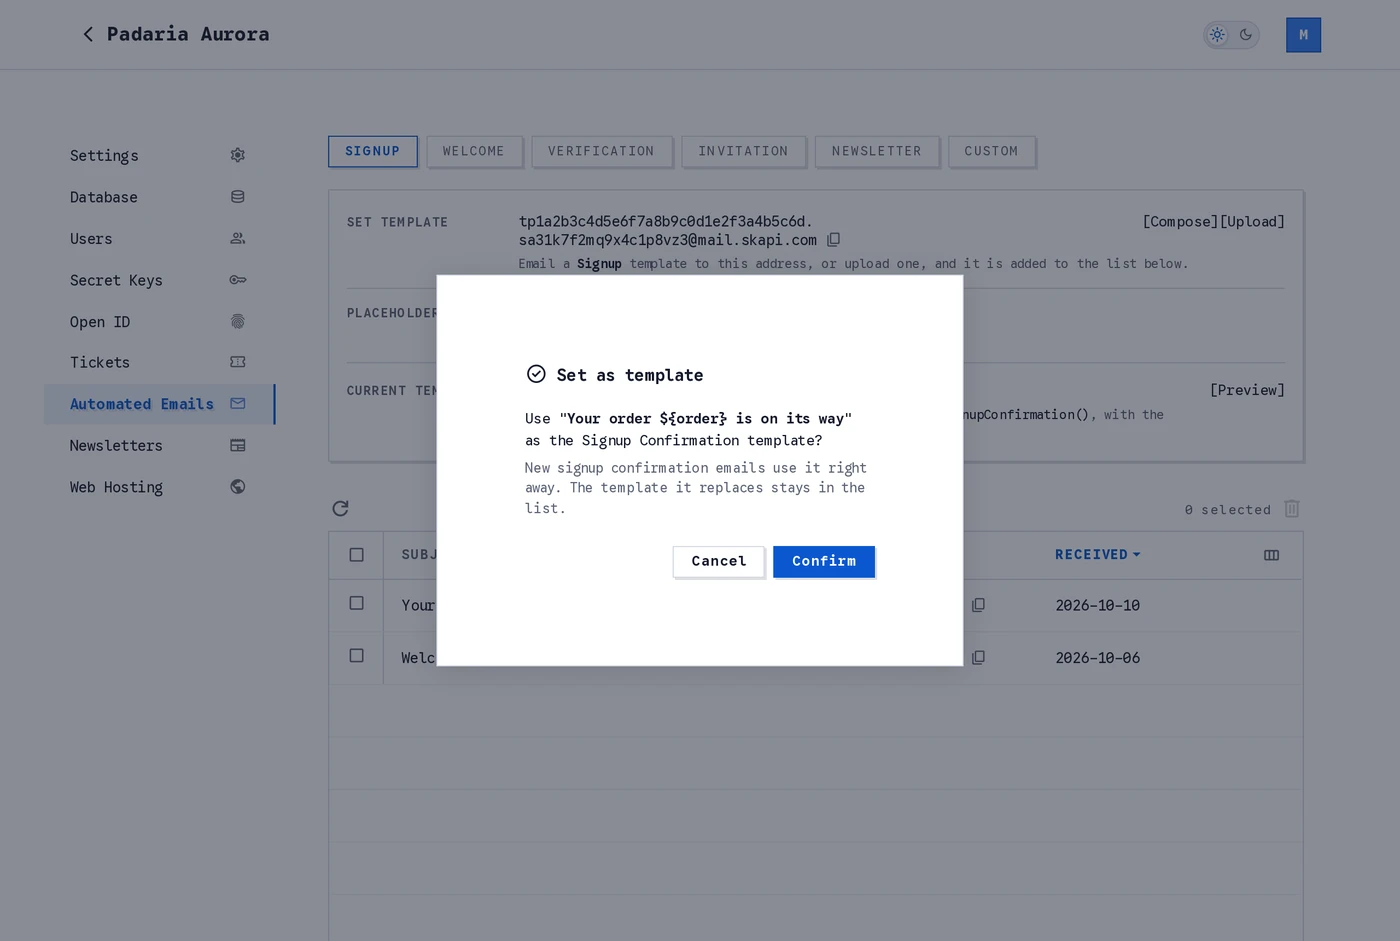
New emails of this type use the chosen template right away. The template it replaces stays in the list.
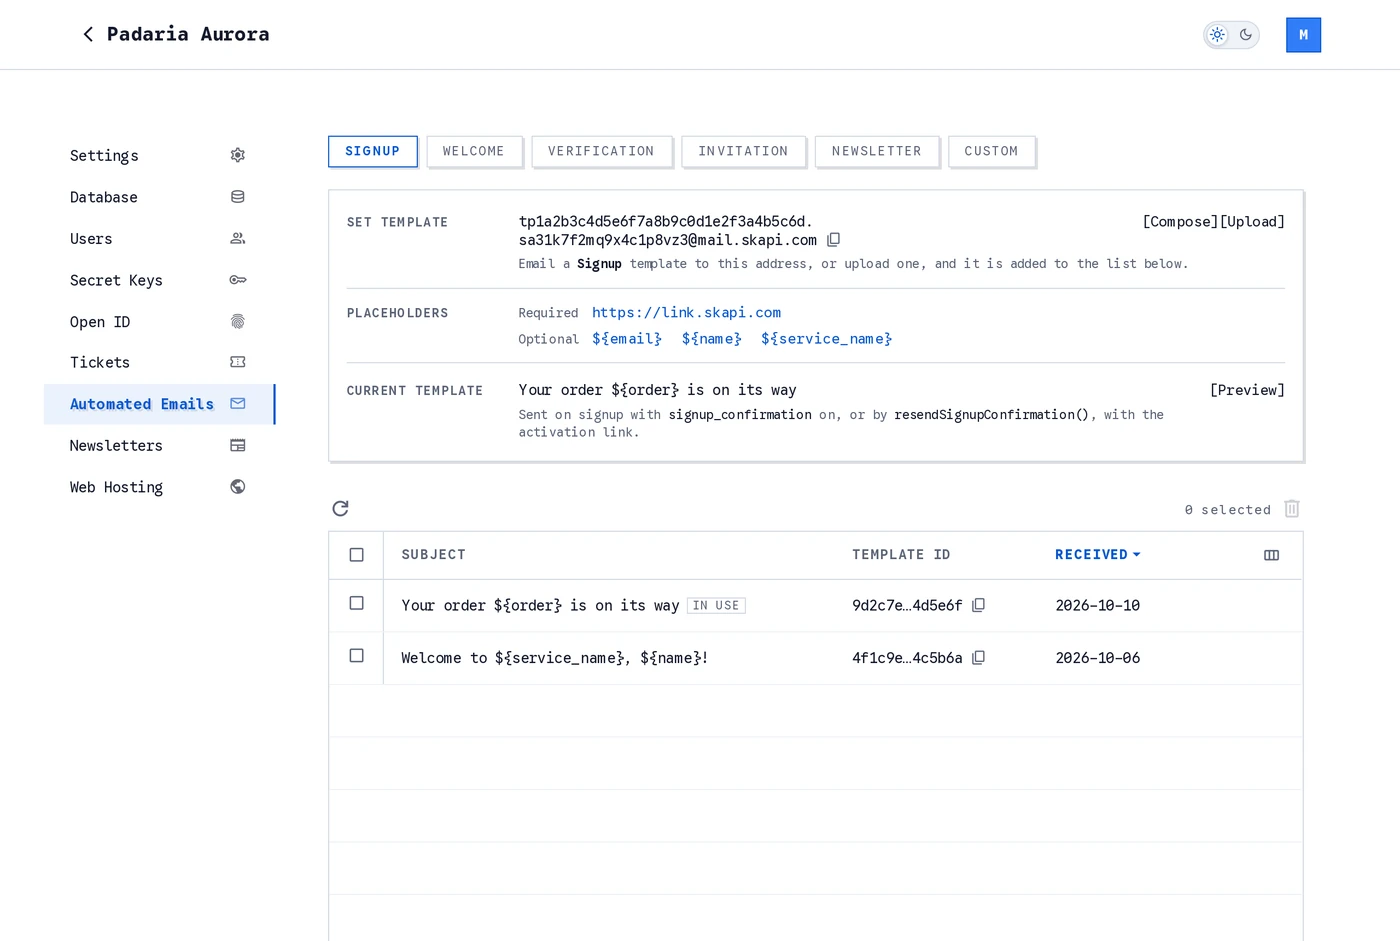
The chosen template is marked In use, and Current template shows its subject.
To remove templates, tick their rows and click the trash icon. Deleting the template in use sends that type back to the built-in default.
Opening a template
Click a row of the list, or [Preview] on the Current template row, to open the template the way a recipient sees it. Under the preview, the button chooses the template for the tab's type of email, or reads In use on the one already chosen. Fill placeholders is on when the preview opens, and swaps every placeholder, in the subject and in the body, for a sample value taken from your own account and project.
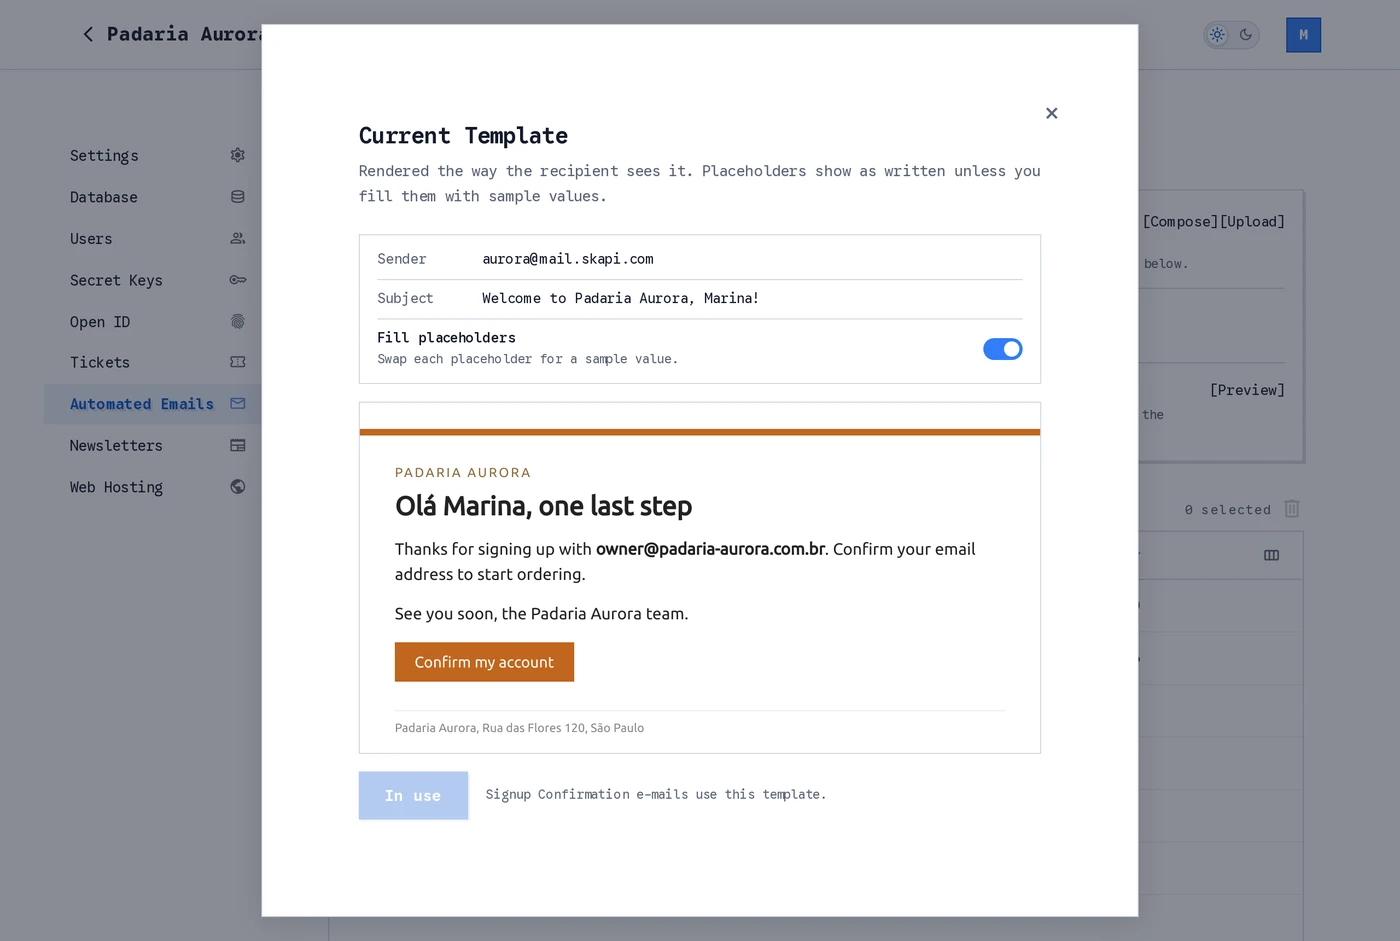
Fill placeholders on: the email as a user would receive it.
Turn Fill placeholders off to see the template as you wrote it, with every placeholder in place. This is the quickest way to check that a template carries the placeholders its type needs.
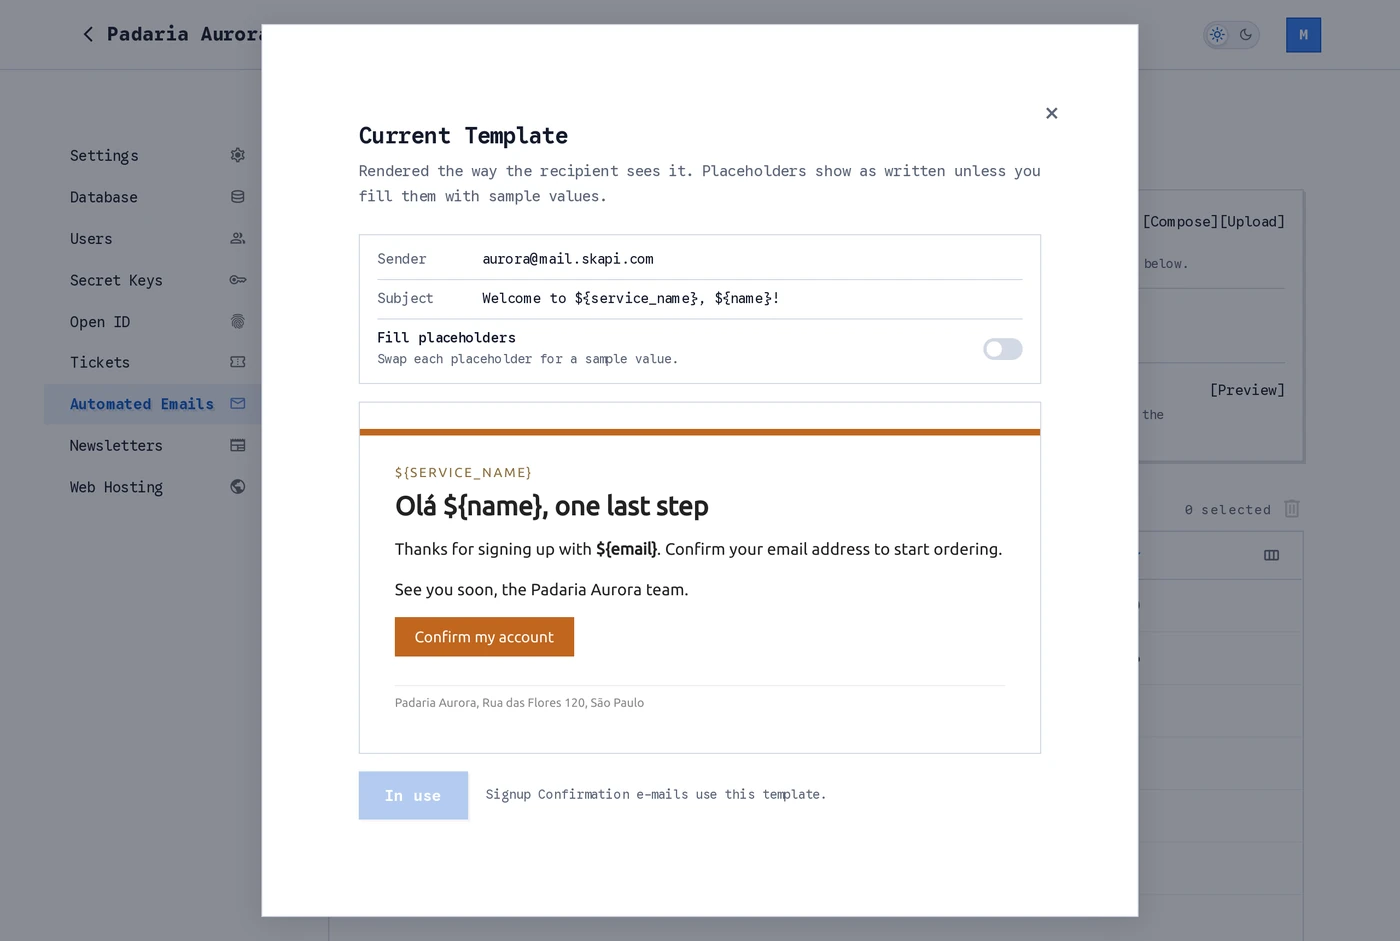
Fill placeholders off: the raw template.
Sending a template
Following example shows the format for email endpoints:
tpxxxxxxxxxxxxxxxxxxxxxxxxxxxxxxxx.xxxxxxxxxxxxxxxxxxxx@mail.skapi.comEndpoints in the older xxxxxxxxxxxxxxxxxxxx-tpxxxxxxxxxxxxxxxxxxxxxxxxxxxxxxxx@mail.skapi.com format keep working, so a saved address does not need to be updated.
To customize the email template, write it as an ordinary email in your own mail app and send it to the endpoint address:
- Put the Set Template address of the type in To. [Compose] fills it in for you.
- Write the subject and the body. The subject of your email becomes the subject of the automated email, and both can hold placeholders.
- For the types that carry a link, select the link text and set its URL to
https://link.skapi.com, using your mail app's insert link or edit link tool. - Send it from your project's email address.
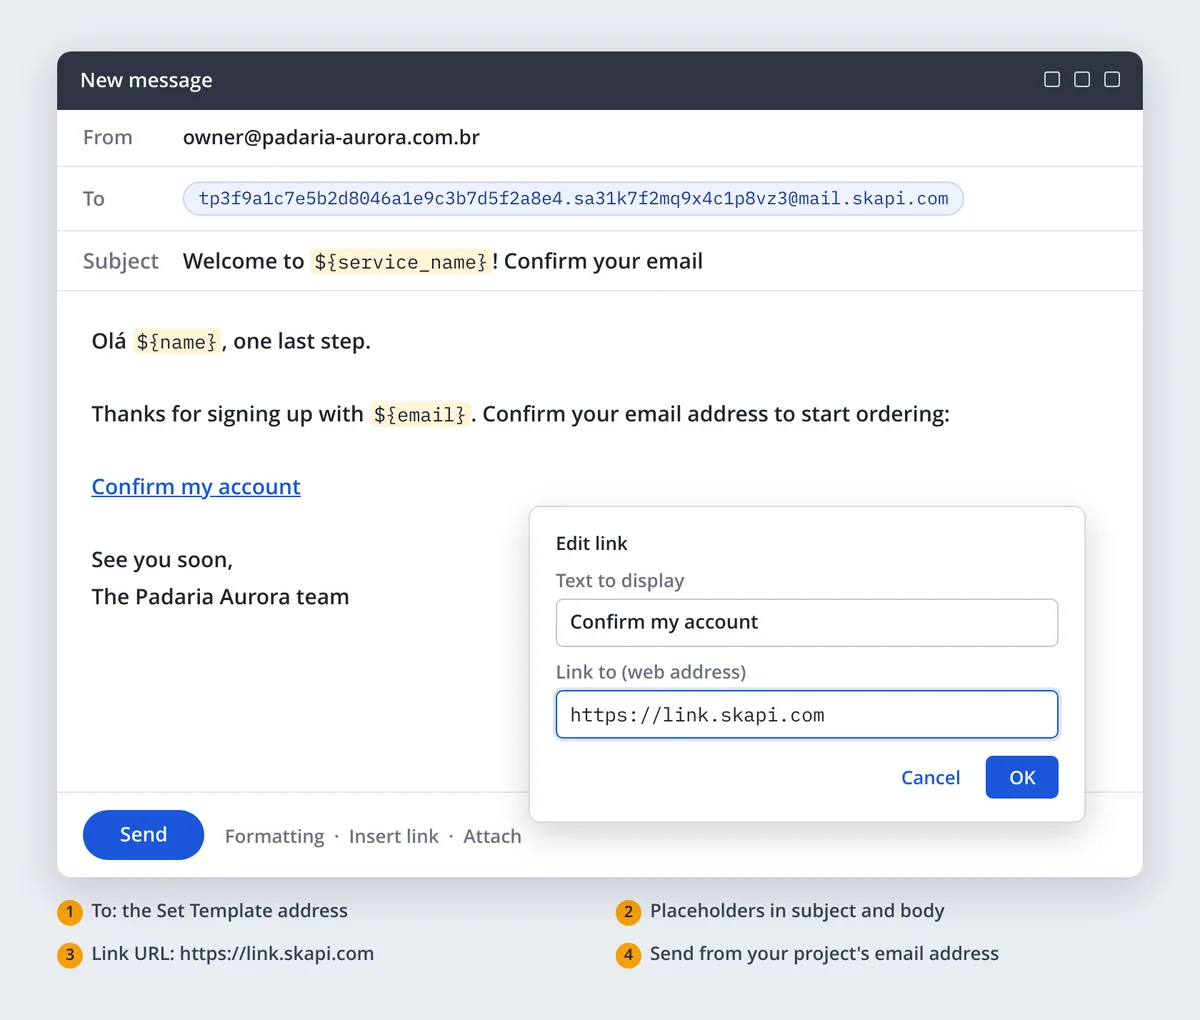
Composing a signup confirmation template. Any mail app with a link tool works the same way.
Skapi checks the template when it arrives (see When a template is rejected) and replies to you by email. A template that passes is added to the list for its type: choose it there to use it.
DANGER
- DO NOT share your email endpoint address with anyone. This endpoint is unique to your project and should be kept private.
- You must use the same email address that you used to signup to Skapi.
Uploading a template
A template does not have to come by e-mail. [Upload], next to [Compose] on the Set Template row, takes it from your computer, as an HTML file or as plain text:
- Give the template a subject. It can hold placeholders, like a mailed subject.
- Pick the body:
- HTML file: an
.htmlfile saved from your mail or page editor. It is stored as it is, inline styles and images included. The HTML must be e-mail HTML, the kind every mail client renders: text with markup in it, no<script>, and every element that has to be closed closed where it should be. A page that leans on scripts or on external stylesheets does not work as an e-mail. - Plain text: typed in, or loaded from a
.txtfile. It goes out as a simple HTML e-mail: each blank line starts a paragraph, and web addresses become links, so the link placeholder written ashttps://link.skapi.combecomes a clickable link.
- HTML file: an
- A template of a type that has required placeholders must contain all of them, in either form: the signup confirmation and the newsletter confirmation need the link, the verification and forgot password e-mails
${code}, the invitation the link,${email}and${password}. - The dialog checks all of this as you go, the way the backend checks a mailed template: the subject, the required placeholders, the size (up to 240 KB; inline images do not count) and the HTML. A problem is named with its line; Upload stays off until it is fixed. A placeholder the type never fills in is pointed out as a warning, because it would go out empty. [Preview] shows the body with sample values.
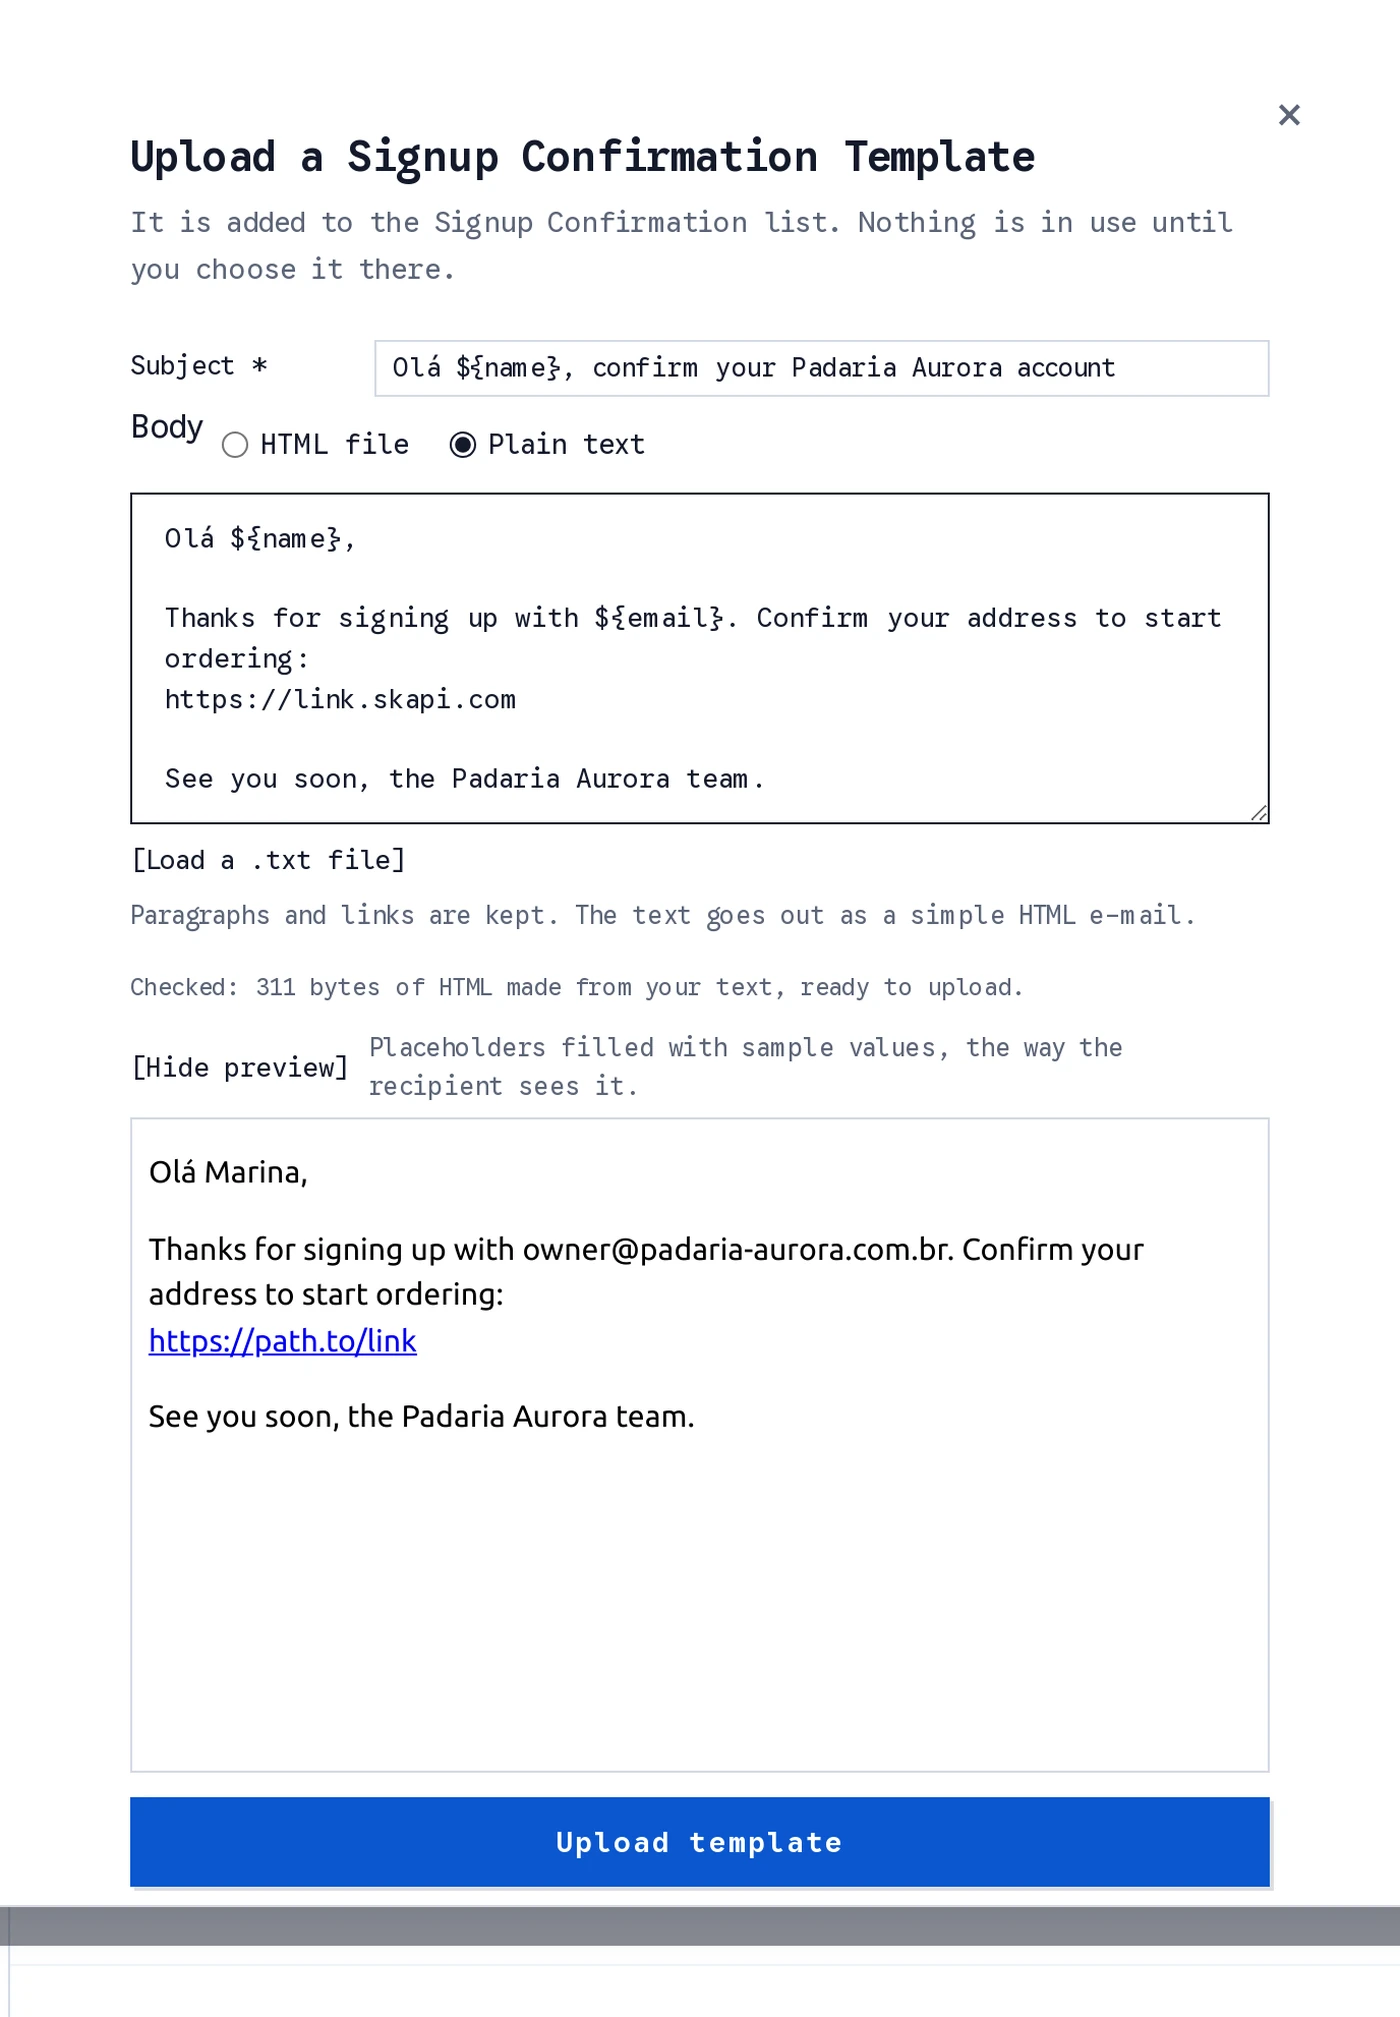
A signup confirmation template from plain text, checked and previewed.
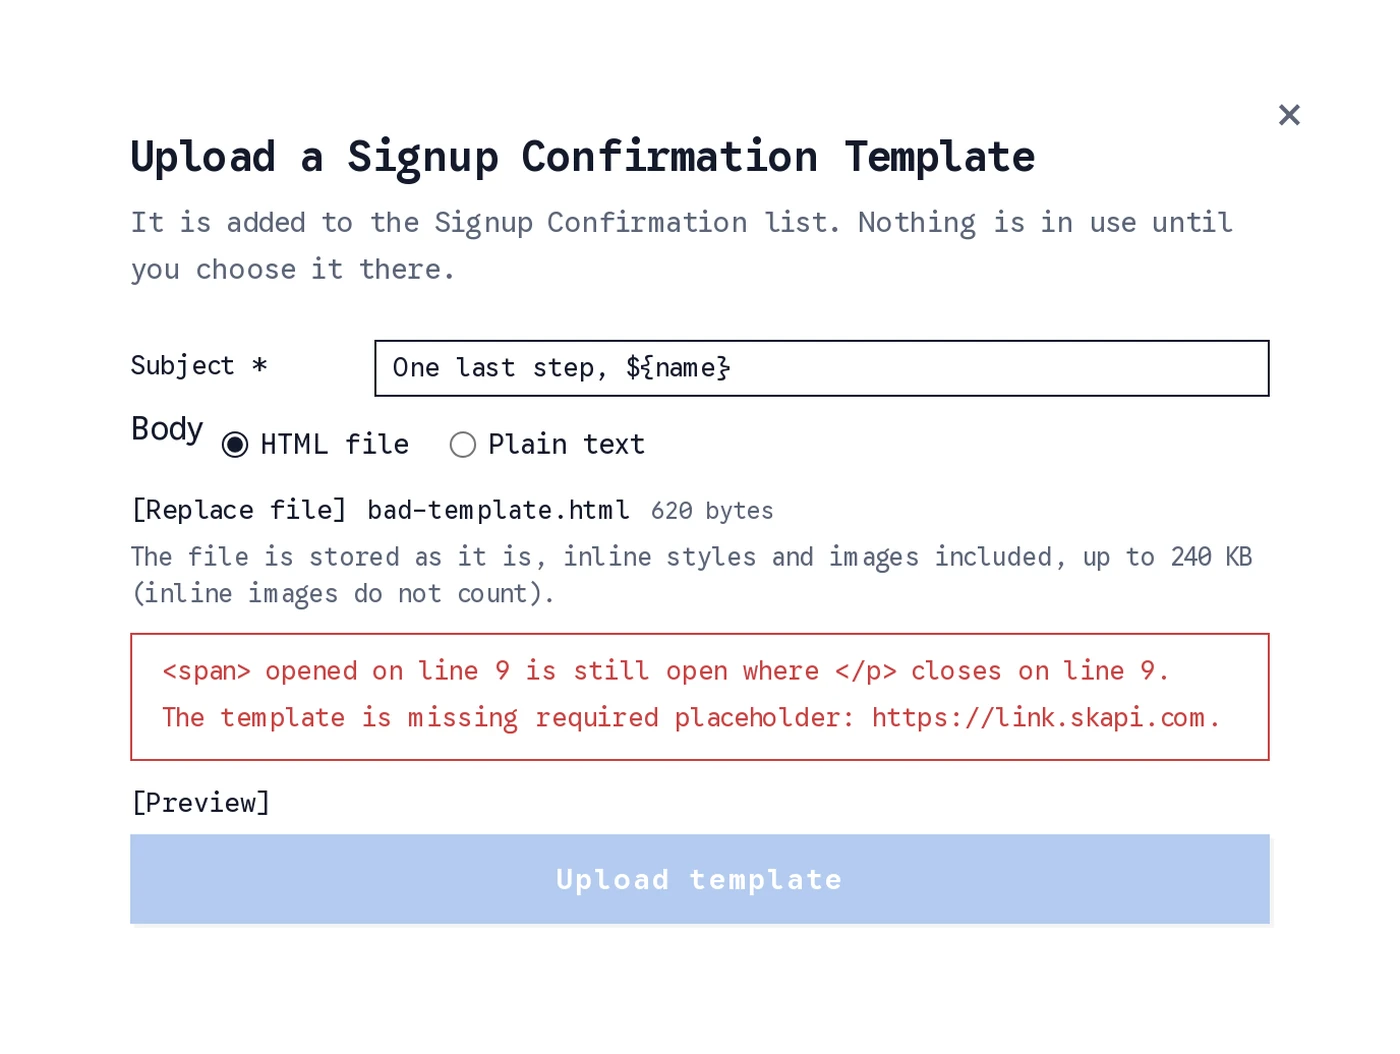
A file the checks refuse. The backend makes the same checks again and answers with the same sentences.
An uploaded template is stored exactly as a mailed one, in the list of its type with a Template ID. It is not in use until you choose it there, like any other. On the Custom tab the upload is the template a ticket's Send e-mail action names.
From an AI agent. The Skapi MCP server's manageEmailTemplates tool lets the project owner's agent compose a template and upload it the same way, as e-mail HTML or plain text, under the same checks, and list the templates of a type. It is available to the project owner's account only, and it never puts a template in use: you choose it on this page.
Custom e-mails
The Custom tab holds templates that no event sends on its own: a ticket sends them, with its Send e-mail action, to the address the ticket names. An order confirmation, a receipt, a notice to a member who just unlocked something: anything a webhook or a signed-in call should trigger.
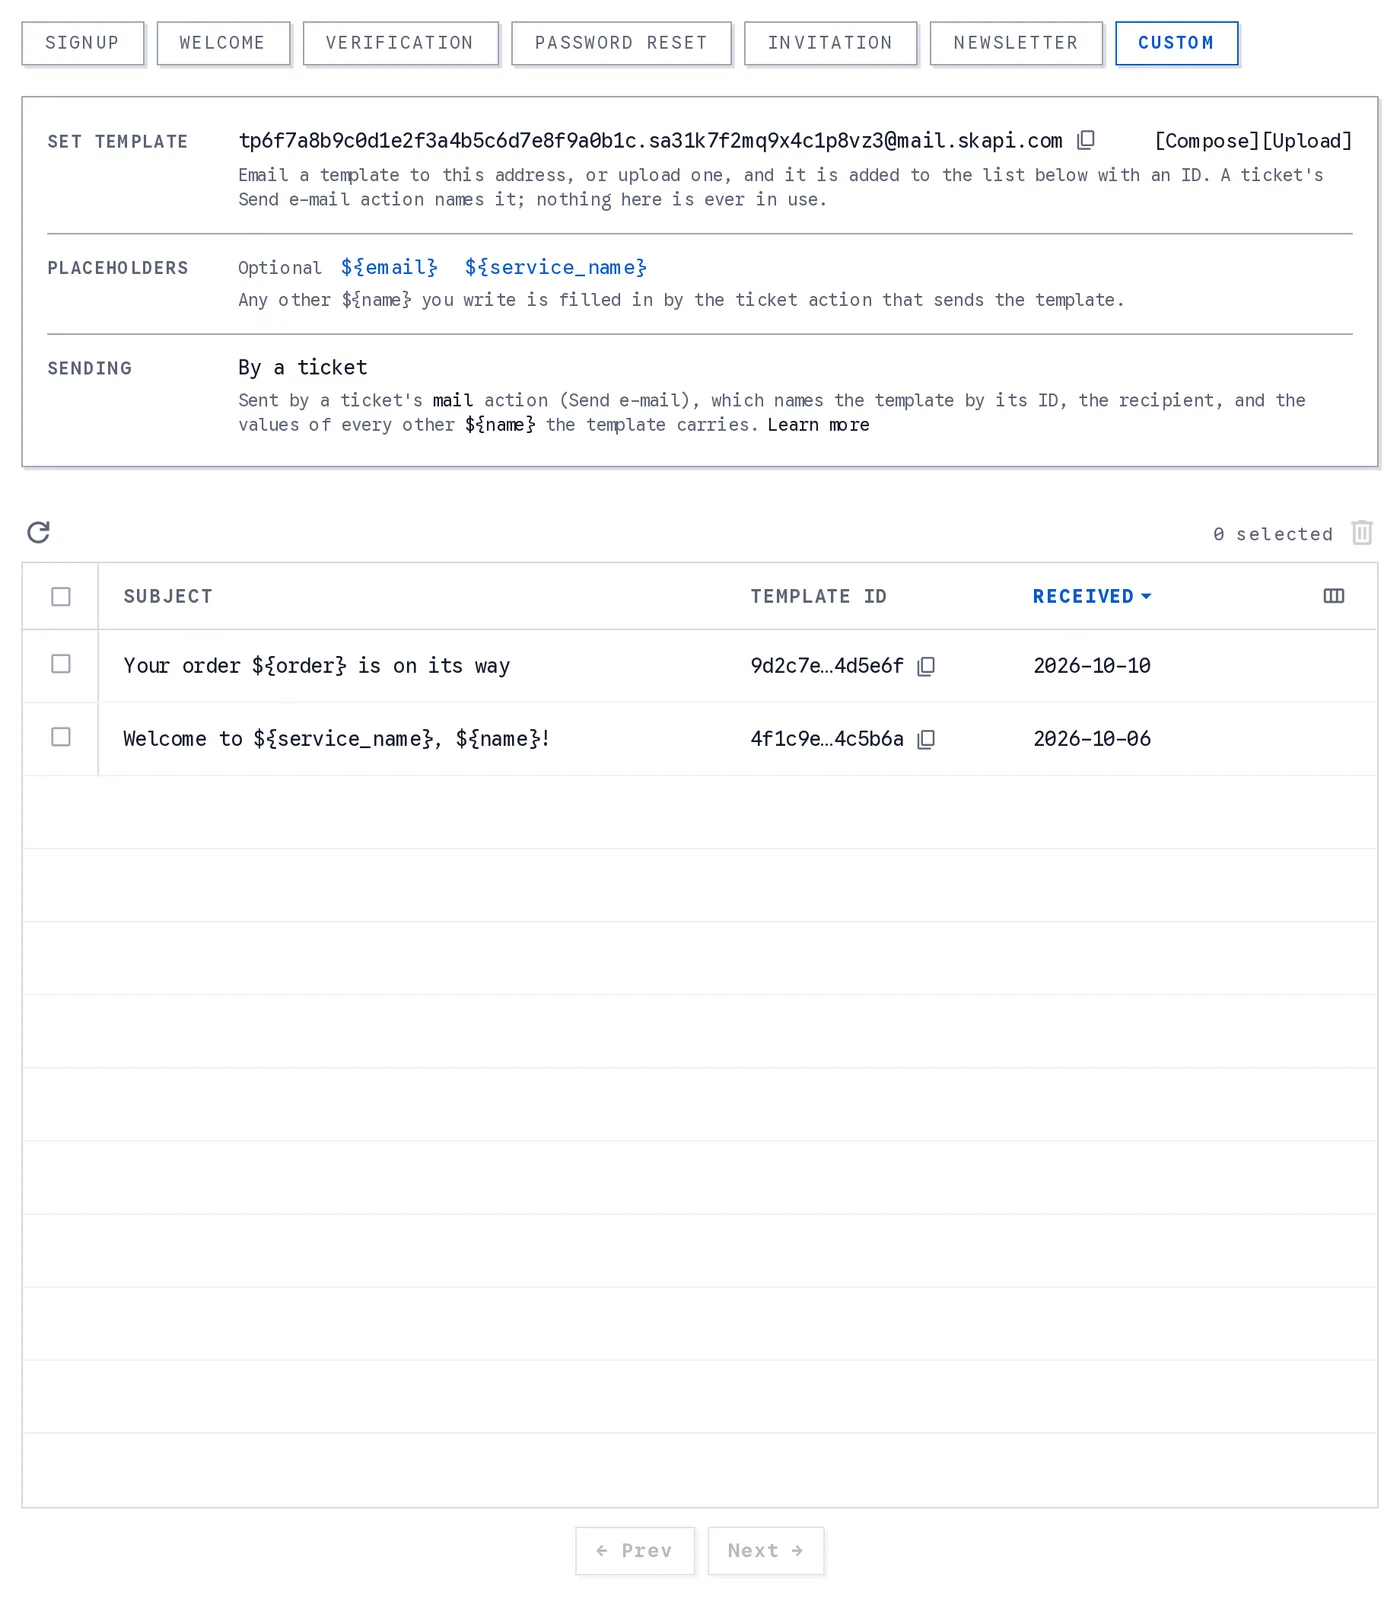
The Custom tab. Every template has a template ID, which a Send e-mail action names.
- Send a template to the tab's Set Template address the way you send any other, from your project's email address. The reply names its template ID, and the list shows the ID next to the subject with a button that copies it.
- No template carries an In use chip and the preview offers no Use as button: a custom template is never the current template of anything, and nothing is sent until a ticket names it. The tab keeps up to 100 templates; the next one is refused with a reply. Delete templates you no longer need by ticking their rows and clicking the trash icon. A ticket whose template was deleted fails that action when it runs.
- Placeholders.
${service_name}and${email}, the recipient, are filled in by default. Any other${name}you write, such as${order}or${name}, is filled in by the ticket, which gives the values underplaceholders; a name the ticket does not give stays as written. None is required. - Each e-mail a ticket sends counts as one e-mail send of the month, like a newsletter to one subscriber. See Sending limits.
Overriding the template for a single call
The template you set in the Automated Emails page is your project's template: every e-mail of that type uses it. Some methods also take a template option that replaces it for one call only, which is useful when a single flow needs different wording, branding, or a different language from the rest of your project.
Each value is the message_id of a template you have already sent to the e-mail endpoint. Open the Automated Emails page and select the e-mail type: every template you have uploaded is listed there with its message_id.
The e-mail that actually goes out is chosen in this order:
- the
message_idpassed in thetemplateoption of the call - your project's template for that e-mail type
- Skapi's built in default
Methods that accept it:
| Method | Argument | Type |
|---|---|---|
signup() | options.template | { signup_confirmation?: string; welcome?: string } |
verifyEmail() | options.template | { verification?: string } |
forgotPassword() | options.template | { forgot_password?: string } |
openIdLogin() | params.template | { welcome?: string } |
Every value is an optional non empty string. Any other type, including an empty string, throws INVALID_PARAMETER. Keys you leave out simply fall through to your project's template, so you can override the welcome e-mail while leaving the signup confirmation alone.
Each key names a template of its own type: verification a Verification E-Mail template, forgot_password a Forgot Password E-Mail template. The SMS text has no per-call override: verifyPhoneNumber() always sends the project's SMS text, and a template option passed to it has no effect.
WARNING
option.template.signup_confirmation requires option.signup_confirmation to be set on the same call. Without it there is no confirmation e-mail to apply the template to, and the call throws INVALID_PARAMETER.
Overriding the signup confirmation and welcome e-mails:
skapi.signup(
    { email: 'user@email.com', password: 'password' },
    {
        signup_confirmation: true,
        template: {
            signup_confirmation: 'signupconfirmationtemplateidxxxxxxxxxxxx',
            welcome: 'welcometemplateidxxxxxxxxxxxxxxxxxxxxxxx'
        }
    }
).then(res => {
    console.log(res); // SUCCESS: The account has been created. User's signup confirmation is required.
});
Overriding the verification e-mail. verifyEmail() with no code issues a new one, so the template applies there; when you pass the code back to verify it, no e-mail is sent and the option is ignored:
skapi.verifyEmail(undefined, {
    template: { verification: 'verificationtemplateidxxxxxxxxxxxxxxxxxx' }
}).then(res => {
    console.log(res); // SUCCESS: Verification code has been sent.
});
Overriding the forgot password e-mail, which carries the password reset code. The id is that of a template sent to the Password reset tab's Set Template address, not a verification one:
skapi.forgotPassword(
    { email: 'user@email.com' },
    { template: { forgot_password: 'forgotpasswordtemplateidxxxxxxxxxxxxxxxx' } }
).then(res => {
    console.log(res); // SUCCESS: Verification code has been sent.
});
If the message_id given for a verification or forgot password e-mail cannot be found in your project, or names a template of another type, Skapi does not fail the call: it falls back to your project's template of that type, or to the built-in default when none is set, and the e-mail is still sent.
Built-in defaults
A type with no template in use sends Skapi's built-in default, in your project's name. The three messages that carry a code have these defaults:
| Message | Subject | Body |
|---|---|---|
| Verification E-Mail | [${service_name}] Verification code | Your verification code is ${code} |
| Forgot Password E-Mail | [${service_name}] Password reset code | Your password reset code is ${code} |
| Phone verification SMS | none | [${service_name}] Your verification code is ${code} |
Deleting the template in use, or clearing the SMS text, sends that message's default again.
The SMS text for phone verification
A phone number is verified by a text message, not an email, so its wording is not a template you send to an address: it is one line of text the project owner sets on the dashboard. Open the project, click Automated Emails, open the Verification tab and find the box Phone verification SMS. Type the text and click Save; Reset to default clears it.
${code}is required: it is where the verification code goes.${service_name}is optional and becomes your project's name. No other placeholder is filled in.- The text is at most 160 characters, one SMS segment. Control characters other than a line break are removed.
- An empty string clears the setting, and the built-in default is sent again.
- Project owner only, like every other template, and set on the dashboard only. There is no per-call override:
verifyPhoneNumber()always sends this text.
Template Placeholders
E-Mail templates take placeholders: text that Skapi replaces with a value when the email is sent. Each email type fills in its own set. A required placeholder must appear in the template, or the template is rejected when it arrives. An optional one is filled in wherever you use it.
| Email type | Required | Optional |
|---|---|---|
| Signup Confirmation | https://link.skapi.com | ${email}, ${name}, ${service_name} |
| Welcome E-Mail | none | ${email}, ${name}, ${service_name} |
| Verification E-Mail | ${code} | ${email}, ${name}, ${service_name} |
| Forgot Password E-Mail | ${code} | ${email}, ${name}, ${service_name} |
| Invitation E-Mail | https://link.skapi.com, ${email}, ${password} | ${name}, ${service_name}, ${username} |
| Newsletter Subscription | https://link.skapi.com | ${email}, ${service_name} |
| Custom Email | none | ${email}, ${service_name}, and any ${name} of your own that the ticket fills in |
${service_name}: Name of your project.${name}: User's name from the profile. If the user has not set their name, it will be replaced with empty string.${email}: The address the e-mail is sent to: the user's email address, or the address a subscription confirmation goes to.
A placeholder's value is always inserted as text. A user's name, email address or password can hold any characters, and characters such as <, > and & show exactly as the user typed them, so a value can never add a link, an image or any other markup to your template. In the subject line, a line break in a value becomes a space.
The newsletter subscription confirmation is sent to an email address rather than to a user account, so it has no ${name}; its ${email} is that address.
In the Automated Emails page, hover over a placeholder to see what it turns into for the selected type, and click it to copy it. See Placeholder information.
The link placeholder
Signup confirmation, invitation and newsletter subscription emails carry a link. Put https://link.skapi.com in your template as the URL of a link, and Skapi replaces it with the real link when the email is sent.
When a template is rejected
Skapi checks every template it receives before saving it. A template is rejected when:
- it is missing one or more of the required placeholders for its type, or
- its HTML is larger than 240kb. Images and attachments are stored separately and do not count toward this.
A rejected template is not saved and does not appear in the template list. Skapi replies to the address that sent it with an email that names the template type and the subject, and lists every required placeholder that was missing and what each one is for. Add the missing placeholders and send the template again to the same endpoint.
A template that passes gets a reply saying it has been uploaded. It is not used until you select it in the Automated Emails page.
A template uploaded from the dashboard goes through the same checks, in the dialog before it is sent: a missing placeholder, HTML that is not e-mail HTML, or a body over the size is named there, and the upload does not start until it is fixed.
Required Placeholders for signup confirmation email
When sending signup confirmation email, you must include a link with https://link.skapi.com as its URL in your email content. The placeholder URL https://link.skapi.com will be replaced with the actual link that confirms the user's signup.
Select the link text in your mail app, open its insert link or edit link tool, and set the web address to https://link.skapi.com. The example in Sending a template does exactly this, with ${service_name} in the subject and ${name} and ${email} in the body.
Required Placeholders for verification email
When sending verification email, you must include ${code} placeholders in your email content. The ${code} placeholder will be replaced with the verification code that the user can use to verify their email.
Example:
Your verification code is: ${code}Required Placeholders for password reset email
When sending the password reset email, you must include the ${code} placeholder in your email content. The ${code} placeholder will be replaced with the code the user enters to set a new password. Without a template of this type, the built-in default is sent (see Built-in defaults).
Example:
Your password reset code is: ${code}Required Placeholders for invitation email
Below are the required placeholders for invitation email.
https://link.skapi.com: Link to accept the invitation.${email}: Invited person's login email.${password}: Temporary password for the invited person.
When user clicks on the link, they will be able to login with the temporary password.
You can invite users to your project from the user page in your project page in Skapi website.
Optional placeholders
These are not required. A template that leaves them out keeps working exactly as before.
${name}: The invited person's name. Worth including to make the e-mail less anonymous.${username}: The account's permanent login username, when the invitation was created with one. For an invitation with no username it renders the invited person's e-mail address instead, which is that account's login ID, so a line such asSign in with ${username}reads correctly either way. It is never empty. A resent invitation renders the same value, except for an invitation sent before the backend started keeping the plain username with the invitation, whose resend renders the e-mail address.
Once an account invited with a username accepts the invitation, the e-mail address the invitation was sent to logs it in as well as the username, because accepting verifies the address, so ${email} is correct for it too. The address does not log the account in while the invitation is pending, and if it is already a login ID another account of the project was granted by the time the invitation is accepted, email login is not enabled and only the username logs the account in. See Login IDs.
Required Placeholders for public newsletter subscription confirmation email
When user subscribes to your public newsletters user receives subscription confirmation email. The subscription confirmation email contains a link to confirm the subscription.
You must include a link with https://link.skapi.com as its URL in your email content. ${service_name} and ${email}, the address being subscribed, are the other placeholders this email fills in.