Full API Documentation Download
Getting Started
Welcome to Skapi, this guide will walk you through importing the Skapi library into your project, creating a service, and connecting your application to your Skapi server.
1. Create a service
- Signup for an account at skapi.com.
- Login and go to My Services page.
- Enter your new service name and click 'Create'.
2. Initialize the Skapi library
Skapi is compatible with both vanilla HTML and webpack-based projects (ex. Vue, React, Angular... etc). You need to import the library using the <script> tag or install via npm.
For HTML projects
For vanilla HTML projects, import Skapi in the script tag, and initialize the library.
<!-- index.html -->
<!DOCTYPE html>
<script src="https://cdn.jsdelivr.net/npm/skapi-js@latest/dist/skapi.js"></script>
<script>
    const skapi = new Skapi('service_id', 'owner_id');
</script>
For SPA projects
To use Skapi in a SPA projects (such as Vue, React, or Angular), you can install skapi-js via npm.
$ npm i skapi-jsThen, import the library into your main JavaScript file.
// main.js
import { Skapi } from 'skapi-js';
const skapi = new Skapi('service_id', 'owner_id');

export { skapi }

// Now you can import skapi from anywhere in your project.
WARNING
Be sure to replace 'service_id' and 'owner_id' in new Skapi() with the actual values of your service.
3. Get connection info
When the client has successfully connected to the Skapi server, the getConnectionInfo() method will return the connection information.
<!-- index.html -->
<!DOCTYPE html>
<script src="https://cdn.jsdelivr.net/npm/skapi-js@latest/dist/skapi.js"></script>
<script>
    const skapi = new Skapi('service_id', 'owner_id');
</script>
<script>
skapi.getConnectionInfo().then(info => {
    console.log(info);
    /*
    Returns:
    {
        service_name: "Your Service Name",
        user_ip: "Connected user's IP address",
        user_agent: "Connected user agent",
        user_locale: "Connected user's country code",
        version: 'x.x.x' // Skapi library version
    }
    */
   window.alert(`Connected to ${info.service_name}`);
});
</script>import { skapi } from '../location/of/your/main.js';
skapi.getConnectionInfo().then(info => {
console.log(info);
/*
Returns:
{
service_name: "Your Service Name",
user_ip: "Connected user's IP address",
user_agent: "Connected user agent",
user_locale: "Connected user's country code",
version: 'x.x.x' // Skapi library version
}
*/
window.alert(`Connected to ${info.service_name}`);
});:::
Working with HTML forms
Skapi is capable of handling HTML onsubmit event directly by passing SubmitEvent to the first argument of the Skapi methods.
Skapi's form handling simplifies the process of handling form submissions in web applications, allowing users to easily process and send form data without the need to handle it manually.
For this example, we will be using skapi.mock() method to send a request to the Skapi service and ping back the response.
Here is an example of using a <form> with Skapi:
<form onsubmit="skapi.mock(event).then(r => alert(r.hello)).catch(err => alert(err.message))">
  <input name="hello" placeholder="Say Hi">
  <input type="submit" value="Mock">
</form>
Above example is equivalent to the following code:
<input id="hello" placeholder="Say Hi">
<button onclick="runMock()">Mock</button>
<script>
  async function runMock() {
    let helloMsg = document.getElementById("hello").value;

    try {
      let r = await skapi.mock({ hello: helloMsg });
      alert(r.hello);
    }
    catch (err) {
      alert(err.message);
    }
  }
</script>
Nested values and arrays
You can pass nested values and arrays by using the [] syntax in the name attribute. Depending on the input type, the resolved data will be structured accordingly.
If the key name inside the [] is a number, Skapi will resolve the value as an array.
<form onsubmit="skapi.mock(event).then(r => console.log(r))">
    <input name="user[name]" placeholder="Name"><br>
    <input name="user[age]" type="number" placeholder="Age"><br>
    Skills:<br>
    <input name="user[skills]" type="radio" value="JavaScript"> JavaScript<br>
    <input name="user[skills]" type="radio" value="Python"> Python<br>
    IDE:<br>
    <input name="user[ide]" type="checkbox" value="Vim">Vim<br>
    <input name="user[ide]" type="checkbox" value="Emacs">Emacs<br>
    Check:
    <input name="check[]" type="checkbox">
    <input name="check[]" type="checkbox">
    <br>
    <input type="submit" value='Mock'>
</form>
The above example will resolve to the following structure:
{
  user: {
    name: string,
    age?: number,
    skills?: "JavaScript" | "Python",
    ide?: "Vim" | "Emacs" | <"Vim" | "Emacs">[]
  },
  check: boolean[]
}
As you can see, Skapi provides convenient form data handling by structuring user input data based on the input type and the name attribute.
Number inputs will be resolved as numbers, radio inputs will be resolved as chosen value, and checkbox inputs will be resolved as boolean or string if value is given.
If multiple inputs share the same name with out using [] syntax, Skapi will try to convert the values in to an array.
Using Input Elements, Textarea, and Select Elements
Skapi can also handle various input elements, including text, number, radio, checkbox, textarea, and select elements.
<input name="my_message" id="message_input">
<button onclick="skapi.mock(document.getElementById('message_input'))
  .then(r => {
    alert(r.my_message);
  })">Mock</button>
As shown in the example above, we are using the id attribute to reference the input element and pass it to the Skapi method.
This is useful when you want to handle single user input from a specific input element.
Using the action attribute in the <form> element
If you specify a URL in the action attribute of the <form> element, the user will be redirected to that page upon a successful request.
On the new page, you can use the skapi.getFormResponse() method to retrieve the resolved data from the previous page.
Example below shows how users can submit a form in index.html, then fetch the resolved data from a new redirected page welcome.html.
For this example, create two HTML files in the same directory.
.
├─ index.html
└─ welcome.html<!DOCTYPE html>
<script src="https://cdn.jsdelivr.net/npm/skapi-js@latest/dist/skapi.js"></script>
<script>
// Replace 'service_id' and 'owner_id' with the appropriate values from your Skapi dashboard.
const skapi = new Skapi('service_id', 'owner_id');
</script>
<form onsubmit="skapi.mock(event)" action="welcome.html">
<input name="name">
<input name="msg">
<input type="submit">
</form><!DOCTYPE html>
<script src="https://cdn.jsdelivr.net/npm/skapi-js@latest/dist/skapi.js"></script>
<h1>Welcome <span id='your_name'></span></h1>
<p id='message'></p>
<script>
// Replace 'service_id' and 'owner_id' with the appropriate values from your Skapi dashboard.
const skapi = new Skapi('service_id', 'owner_id');
skapi.getFormResponse()
.then((r) => {
// Resolved data from skapi.mock()
your_name.innerText = r.name;
message.innerText = r.msg;
});
</script>TIP
When building a static website, you can use the action attribute to redirect users to a new page after a successful request.
Each of the pages should have the Skapi library imported and initialized.
Wheras in a single-page application, It may not be necessary to redirect users to a new page. :::
# Authentication
Authentication is the process of verifying the identity of a user.
It is a fundamental part of any application, as it allows users to control access to your application and its resources.
Authenticated users can have access to post data to your database, and also can have access to your custom APIs.
Skapi provides a full featured authentication system out of the box without the need for any additional configuration.
In this section, you will learn how to let users create an account, login, and logout from your service, or recover their account if they have forgotten their password.
Creating an Account
To let users create a new account in your service, you can use the signup() method.
Example: Creating an Account
<form action='login.html' onsubmit="skapi.signup(event).catch(err=>alert(err.message))">
    <h2>Sign-Up</h2>
    <hr>
    <label>
        Email<br>
        <input type="email" name="email" placeholder="user@email.com" required>
    </label><br><br>
    <label>
        Password<br>
        <input type="password" name="password" placeholder="Your password" required>
    </label><br><br>
    <label>
        Name<br>
        <input name="name" placeholder="Your name">
    </label><br><br>
    <input type="submit" value="Sign-Up">
</form>let parameters = {
email: "user@email.com",
password: "password", // Password must be between 6 and 60 characters.
name: "User's name"
};
skapi.signup(parameters)
.then(res => window.href = 'login.html')
.catch(err => window.alert(err.message));The example above shows how to let users create their account in your service. Once the user signup is successful, the user will be redirected to the login page. The first argument takes the user's input (email, password, name) that will be used for signup.
WARNING
If the user have not logged in to your service after account creation, they will NOT appear on your user list in Skapi's admin page.
If 7 days have passed since the account creation, and the user still have not logged in to your service, user's signup will be automatically invalidated.
Login after Signup
The second argument takes additional options when creating an account. You can also automatically login the user right after successful signup by setting options.login to true in options argument.
<form onsubmit="skapi.signup(event, { login: true }).then(u=>alert('Hello ' + u.name))">
    <input type="email" name="email" placeholder="E-Mail" required><br>
    <input type="password" name="password" placeholder="Password" required><br>
    <input name="name" placeholder="Your name"><br>
    <input type="submit" value="Create Account">
</form>let parameters = {
email: "user@email.com",
password: "password", // Password must be between 6 and 60 characters.
name: "User's name"
};
let options = {
login: true // If set to true, users will be automatically logged in after signup.
};
skapi.signup(parameters, options)
.then(res => u=>alert('Hello ' + u.name));When the options.login is set to true, the method will return the UserProfile object.
For more detailed information on all the parameters and options available with the signup() method, please refer to the API Reference below:
signup(params, options?): Promise<UserProfile | string>
Signup Confirmation
When an account is created with options.signup_confirmation set to true or URL string, users will receive an email with the signup confirmation link.
The user must click on the confirmation link before logging into your service. If the options.signup_confirmation value is a valid URL string, the user will be redirected to that url after successful signup confirmation.
The URL string will work either with a full URL or relative path of your website.
<form onsubmit="skapi.signup(event, { signup_confirmation: '/path/to/your/success/page' })
    .then(r=> {
        // SUCCESS: The account has been created. User's signup confirmation is required.
        console.log(r);
    })">
    <input type="email" name="email" placeholder="E-Mail" required><br>
    <input type="password" name="password" placeholder="Password" required><br>
    <input name="name" placeholder="Your name"><br>
    <input type="submit" value="Create Account">
</form>let parameters = {
email: "user@email.com",
password: "password",
name: "User's name"
};
let options = {
/**
* If set to true, the user will get a signup confirmation email with a confirmation link.
* If set to a valid URL string, the user will be redirected to the url when the confirmation is successful.
*/
signup_confirmation: '/path/to/your/success/page'
};
skapi.signup(parameters, options).then(res => {
// "SUCCESS: The account has been created. User's signup confirmation is required."
console.log(res);
});The example above shows how you can create a user account with the signup confirmation.
When the signup is successful, the user will get an email containing the confirmation link. Once clicked, the user will be confirmed by your service and be redirected to the given URL.
If the signup_confirmation value was true, the user will see 'Your signup has been successfully confirmed.' message in their blank web browser tab.
DANGER
When setting the signup_confirmation value to a relative URL path (e.g. /relative/path.html), it will not work if the website is not hosted.
It's because on local file systems your actual file url would be something like: file:///C:/Users/username/Desktop/website/index.html. And skapi does not collect folder informations of the user's local computer.
Set your redirect URL of signup_confirmation to be the full URL (e.g. https://your.website.com/path/to/your/success/page).
You can also customize the email template for the signup confirmation email.
For more info on email templates, see Automated E-Mail.
Resending Signup Confirmation Email
If you need to resend the confirmation email, use the resendSignupConfirmation() method.
<form onsubmit="skapi.login(event)
    .then(u=>console.log('Successfully logged in.'))
    .catch(err => {
        if(err.code === 'SIGNUP_CONFIRMATION_NEEDED') {
          if(confirm('Your signup confirmation is required. Resend confirmation email?')) {
            skapi.resendSignupConfirmation().then(res=>{
              console.log(res); // 'SUCCESS: Signup confirmation E-Mail has been sent.'
            });
          }
        }
        else throw err;
      }
    })">
    <input type="email" name="email" placeholder="E-Mail" required><br>
    <input id="password" type="password" name="password" placeholder="Password" required><br>
    <input type="submit" value="Login">
</form>skapi.login({email: 'user@email.com', password: 'password'})
.then(u=>console.log('Successfully logged in.'))
.catch(err=>{
/**
* {
* code: 'SIGNUP_CONFIRMATION_NEEDED',
* message: "User's signup confirmation is required.",
* name: 'SkapiError'
* }
*/
if(err.code === 'SIGNUP_CONFIRMATION_NEEDED') {
let sendConfirmation = window.confirm('Your signup confirmation is required. Resend confirmation email?');
if(sendConfirmation) {
// now you can resend signup confirmation E-Mail to user@email.com.
skapi.resendSignupConfirmation().then(res=>{
console.log(res); // 'SUCCESS: Signup confirmation E-Mail has been sent.'
});
}
}
else throw err;
});In this example, the user tries to login and receives a SIGNUP_CONFIRMATION_NEEDED error.
Then, if the user chooses to, you can use the resendSignupConfirmation() method to resend the confirmation email to the user's email address.
For more detailed information on all the parameters and options available with the resendSignupConfirmation() method, please refer to the API Reference below:
resendSignupConfirmation(): Promise<string>
WARNING
- To resend signup confirmation emails, the user must have at least one login attempt to your service.
- If the user fails to confirm within 7 days, their signup will be invalidated, and they will need to sign up again.
# Login / Logout
Once a user has signed up, they can log in to your service using their email and password.
Login
Use the login() method to log a user into your service.
If the login is not successful due to invalid password, or user may not have confirm their signup etc... the login() method will throw an error.
When successful, it will respond with the UserProfile object.
WARNING
If signup_confirmation option was set to true during signup(), users will not be able to log in until they have confirmed their account.
INFO
When the user has successfully confirmed their signup and logged in, they will be sent a welcome email. You can also customize the email template for the signup confirmation email.
For more info on email templates, see Automated E-Mail.
Below is an example of a login form that uses the login() method. When the user successfully logs in, they will be redirected to the welcome.html page.
<form action='welcome.html' onsubmit="skapi.login(event).catch(err=>alert(err.message))">
    <h2>Login</h2>
    <hr>
    <label>
        Email<br>
        <input type="email" name="email" placeholder="user@email.com" required>
    </label><br><br>
    <label>
        Password<br>
        <input id="password" type="password" name="password" placeholder="Your password" required>
    </label><br><br>
    <input type="submit" value="Login">
</form>let parameters = {
email: 'user@email.com',
password: 'password'
}
skapi.login(parameters)
.then(user => window.href = 'welcome.html');For more detailed information on all the parameters and options available with the login() method, please refer to the API Reference below:
login(params): Promise<UserProfile>
Getting User Information
When user is logged in to your service, you can retrieve their information from user property of the Skapi object. This property is getter-only, and will not be object reference.
It returns the UserProfile object.
console.log(skapi.user); // null when user is logged out, User's information object when logged in.Requesting User Information
The getProfile() method allows you to retrieve the user's information via promise method. It returns the UserProfile object.
If the user is not logged in, getProfile() returns null.
skapi.getProfile().then(profile=>{
  console.log(profile); // User's information

  if(profile === null) {
    // The user is not logged in
  }
})
You can also refresh the auth token and fetch the updated profile by passing options.refreshToken to true.
skapi.getProfile({ refreshToken: true }).then(profile=>{
  console.log(profile); // Updated user's information

  if(profile === null) {
    // The user is not logged in
  }
})
This can be useful when the user needs to get their updated profile when it's updated from another device, or admin might have made change to the users profile, or you just want your users to update their token for some other security reasons.
For more detailed information on all the parameters and options available with the getProfile() method, please refer to the API Reference below:
getProfile(options?): Promise<UserProfile | null>
Auto Login
By default, once user login to your website, their login session is maintained until they logout.
To ensure that users' sessions are destroyed when they leave your website, you can set options.autoLogin to false in the third argument when initializing Skapi.
const options = {
  autoLogin: false, // set to true to maintain the user's session
};

//Set the third argument as options
const skapi = new Skapi('service_id', 'owner_id', options);
Listening to Login Status
You can listen to the login status of the user by setting a callback function in the option.eventListener.onLogin option argument of the constructor argument in Skapi.
The onLogin callback function will be called when Skapi instance is ready with user's login status (either logged in or out), whenever the user logs in, logs out, or even when their profile is updated.
The callback function will receive the UserProfile object as an argument.
const options = {
  eventListener: {
    onLogin: (profile) => {
      console.log(profile); // null when user is logged out, User's information object when logged in.
    }
  }
};

const skapi = new Skapi('service_id', 'owner_id', options);
You can also add multiple event listeners to the onLogin event after the Skapi object has been initialized.
skapi.onLogin = (profile) => {
  console.log(profile); // null when user is logged out, User's information object when logged in.
}
This handler can be useful for updating the UI when the user logs in or logs out.
Logout
The logout() method logs the user out from the service.
<form onsubmit='skapi.logout(event)' action='page_to_show_after_logout.html'>
  <input type='submit' value='Logout'>
</form>skapi.logout().then(res=>{
console.log(res); // 'SUCCESS: The user has been logged out.'
window.location.replace("page_to_show_after_logout.html");
});Global Logout
You can let the users logout and invalidate all tokens across all the users devices by setting params.global to true.
<form onsubmit='skapi.logout(event)' action='page_to_show_after_logout.html'>
  <input type='checkbox' name='global' checked>
  <input type='submit' value='Logout'>
</form>skapi.logout({global: true}).then(res=>{
console.log(res); // 'SUCCESS: The user has been logged out.'
window.location.replace("page_to_show_after_logout.html");
});For more detailed information on all the parameters and options available with the logout() method, please refer to the API Reference below:
logout(params?): Promise<string>
Forgot password
When the user forgets their password, they can request a verification code to reset their password.
WARNING
If the user's email is not verified, they will not be able to receive a verification code and may lose access to their account permanently.
It is recommended to encourage users to verify their email addresses. For more info on email verification, see Email Verification.
Step 1: Request Verification Code
Use the forgotPassword() method to request a verification code.
In this example, the forgotPassword() method is called with the user's email as a parameter.
The user will receive an email containing a verification code that they can use to reset their password.
<form onsubmit="skapi.forgotPassword(event).then(res => {
    console.log(res) // SUCCESS: Verification code has been sent.
})">
    <input type="email" name="email" placeholder="E-Mail" required>
    <input type="submit" value="Request Verification Code">
</form>skapi.forgotPassword({email: 'someone@gmail.com'}).then(res=>{
// User receives an e-mail with a verification code.
// SUCCESS: Verification code has been sent.
console.log(res);
});For more detailed information on all the parameters and options available with the forgotPassword() method, please refer to the API Reference below:
forgotPassword(params): Promise<string>
INFO
Due to security reasons, forgotPassword() will not tell the user whether the email exists.
You can also customize the email template for the verification email.
For more info on email templates, see E-Mail Templates.
Step 2: Reset Password
The user will receive an email containing a verification code. After the user receives the verification code, they can use the resetPassword() method to reset their password.
The resetPassword() method is called with the user's email, the verification code received via email, and the new password.
Upon successful password reset, the user's account password will be set to the new password provided.
<form onsubmit="skapi.resetPassword(event).then(res => {
    console.log(res); // SUCCESS: New password has been set.
})">
    <input type="email" name="email" placeholder="E-Mail" required><br>
    <input type="text" name="code" placeholder="Verification Code" required><br>
    <input type="password" name="new_password" placeholder="New Password" required><br>
    <input type="submit" value="Change Password">
</form>skapi.resetPassword({
email: 'someone@gmail.com',
code: '123456', // code sent to user's registered email address
new_password: 'new_password' // The password should be at least 6 characters and 60 characters maximum.
}).then(res => {
console.log(res);
// SUCCESS: New password has been set.
});For more detailed information on all the parameters and options available with the resetPassword() method, please refer to the API Reference below:
resetPassword(params): Promise<string>
# Open ID Login
Skapi provides logger for OpenID profiles.
What is OpenID?
OpenID is an open standard and decentralized authentication protocol that allows users to be authenticated by relying on a third-party service, called an OpenID provider, without needing to have a separate identity and password for each service. This simplifies the login process for users and enhances security by reducing the number of passwords that need to be managed.
With OpenID, users can log in to multiple websites using a single set of credentials from an OpenID provider such as Google, Facebook, or other identity providers. This process involves redirecting the user to the OpenID provider's login page, where they authenticate themselves, and then returning to the original website with a token that confirms their identity.
Login with OpenID profile
If you have access to OpenID providers API, you can register your open ID logger from your Skapi's service page.
Although all OpenID providers have different ways to authenticate their users, generally it follows such process:
- Register open ID logger in Skapi
- Redirect user to OpenID provider's login page
- Redirect authenticated user's back to your webpage
- Retrive access token to call
openidLogin() - User will get logged in to your Skapi application.
Google OAuth Example
In this example, we will show implementing Google OAuth as an example.
1. Setup Google OAuth Service
Go to your Google Cloud Console and create your OAuth service.
Follow their Instructions. Make sure to setup correct redirect URL that points to your web application.
2. Register Your OpenID logger in Skapi
- Login to skapi.com.
- Click on the service you wish to register your OpenID Logger.
- From the side menu, click on OpenID Logger
- Click Register Logger
- Setup the Logger ID. This is an identifier when using
openidLogin(). It can be anything you want. But for this example set it to google - Setup request URL to Google API where you can retrieve user's profile. Set it to
https://www.googleapis.com/oauth2/v3/userinfo - Setup the Username Key. It should be an OpenID attribute name that hold unique identifier. For this example set it to email.
- Setup request headers as below:
{ "Authorization": "Bearer $TOKEN" } - Click Save
3. Register Client Secret Key
When retriving token for Google OAuth authentication, Google API requires client secret key.
Since client secret key should not be exposed, register the client secret key of your OAuth service in Skapi.
- In the service page, click on Client Secret Key menu.
- Click on Register Client Secret Key.
- Give a name to your secret key. It can be anything you want. But for this example, lets set it to ggltoken
- Enter the client secret key you obtained from your new google OAuth service.
- Click on the check to save.
4. Setup Link To Google Login
Create a link url and the button to google OAuth login page.
<button onclick='googleLogin()'>Google Login</button>
<script>
    const GOOGLE_CLIENT_ID = "1234567890123-your.google.client.id"; // Replace this to your actual client id
    const REDIRECT_URL = window.location.href.split('?')[0]; // current URL to redirect back from google login page.

    function googleLogin() {
        let rnd = Math.random().toString(36).substring(2); // Generate a random string

        // Bulid link to login page
        let url = 'https://accounts.google.com/o/oauth2/v2/auth';
        url += '?client_id=' + GOOGLE_CLIENT_ID;
        url += '&redirect_uri=' + encodeURIComponent(REDIRECT_URL);
        url += '&response_type=code';
        url += '&scope=' + encodeURIComponent('https://www.googleapis.com/auth/userinfo.profile https://www.googleapis.com/auth/userinfo.email');
        url += '&prompt=consent';
        url += '&state=' + encodeURIComponent(rnd);
        url += '&access_type=offline';

        // Redirect user to the url
        window.location.href = url;
    }
</script>
5. Setup to Retrieve Access Token
When user is authenticated and redirected back to your web application, Use clientSecretRequest() to retrieve the access token. You need to add code that runs when the user is redirected back from the google login page.
Once the access token is fetched, you can call openidLogin(event?:SubmitEvent | params): Promise<string> to actually log your users to your web application.
<button onclick='googleLogin()'>Google Login</button>
<script>
    const GOOGLE_CLIENT_ID = "1234567890123-your.google.client.id"; // Replace this to your actual client id
    const REDIRECT_URL = window.location.href.split('?')[0]; // current URL to redirect back from google login page.

    function googleLogin() {
        let rnd = Math.random().toString(36).substring(2); // Generate a random string

        // Bulid link to login page
        let url = 'https://accounts.google.com/o/oauth2/v2/auth';
        url += '?client_id=' + GOOGLE_CLIENT_ID;
        url += '&redirect_uri=' + encodeURIComponent(REDIRECT_URL);
        url += '&response_type=code';
        url += '&scope=' + encodeURIComponent('https://www.googleapis.com/auth/userinfo.profile https://www.googleapis.com/auth/userinfo.email');
        url += '&prompt=consent';
        url += '&state=' + encodeURIComponent(rnd);
        url += '&access_type=offline';

        // Redirect user to the url
        window.location.href = url;
    }

    const urlParams = new URLSearchParams(window.location.search);

    if (urlParams.get('code')) { // When the webpage is loaded, check if it's redirected from the google login page.
        (async ()=>{
            // Safely retrieve access token using clientSecretRequest
            const data = await skapi.clientSecretRequest({
                clientSecretName: "ggltoken",
                url: 'https://oauth2.googleapis.com/token',
                method: "POST",
                headers: {
                    "Content-Type": "application/json",
                },
                data: {
                    code: code,
                    client_id: GOOGLE_CLIENT_ID,
                    client_secret: "$CLIENT_SECRET",
                    redirect_uri: REDIRECT_URL,
                    grant_type: 'authorization_code'
                }
            });

            if (data.error) {
                console.error(data);
                throw data
            }

            // use openIdLogin to login
            await skapi.openIdLogin({ id: 'google', token: data.access_token });
            window.location.href = '/';
        })()
    }
</script>
openidLogin(event?:SubmitEvent | params): Promise<string>
# User's Account
When a user creates an account in your service, user's can access and manage their account information.
In this section, you will learn how to let users verify their email, change their password, update their profile, and remove their account from your service.
# E-Mail Verification
WARNING
User must be logged in to call this method
User with verified E-Mail can:
- Reset their password if they've forgotten it.
- Receive newsletter from the service owner if they choose to.
- Recover their disabled account.
- Allow their email address to be public to other users if they choose.
You can verify your user's email address with verifyEmail().
TIP
The user's email is automatically verified if signup confirmation was requested in signup().
The example below shows how you can verify your users email address.
- The first method call, without any arguments, sends a verification email to the user.
- The second call completes the verification process by passing the verification code that user retrieved from their email.
  // Send verification code to user's E-Mail
  skapi.verifyEmail().then(res=>{
     // 'SUCCESS: Verification code has been sent.'
    console.log(res);

    // Prompt user to enter the verification code
    let code = prompt('Enter the verification code sent to your E-Mail');

    // Verify E-Mail with the code
    skapi.verifyEmail({ code }).then(res=>{
      // SUCCESS: "email" is verified.
      window.alert('Your email is verified');
    });
  });
For more detailed information on all the parameters and options available with the verifyEmail() method, please refer to the API Reference below:
verifyEmail(params?): Promise(string)
WARNING
The user's email verified state will be lost if the user had changed their email address.
Updating User Profile
WARNING
User must be logged in to call this method
User's profile can be updated using updateProfile(). If the update is successful, the updated UserProfile object is returned if the request was successful.
DANGER
- When the user change their email, they will be also changing their login email as well.
- When user's email is changed, the email will be unverified.
In this example, the user's name is updated by providing a new name value. If the update is successful, the updated user profile is returned.
<form onsubmit="skapi.updateProfile(event).then(user=>console.log(user))">
    <input type="text" name="name" placeholder="Name" required>
    <br>
    <input type="submit" value="Update Profile">
</form>let params = {
name: 'New name',
// email, // The user's login email address. The email will be unverified if it is changed.
// address, // The user's address.
// gender, // The user's gender. Can be "female" or "male", or other values if neither of these are applicable.
// birthdate, // The user's birthdate in the format "YYYY-MM-DD".
// phone_number, // The user's phone number.
// email_public, // The user's email is public if this is set to true. The email should be verified.
// phone_number_public, // The user's phone number is public if this is set to true. The phone number should be verified.
// address_public, // The user's address is public if this is set to true.
// gender_public, // The user's gender is public if this is set to true.
// birthdate_public, // The user's birthdate is public if this is set to true.
};
skapi.updateProfile(params)
.then(user => {
console.log({user}); // User's name is updated.
});For more detailed information on all the parameters and options available with the updateProfile() method, please refer to the API Reference below:
updateProfile(params, options?): Promise<UserProfile>
Public Attributes
Certain user profile attributes can be configured as public or private. When the profile is public, the user's profile information can be searched by other users. When the profile is private, the user's profile information cannot be searched by other users.
The following attributes can be set to public or private:
emailphone_numberaddressgenderbirthdate
By default, these attributes are set to private.
Here is an example of setting the user's email to public:
<form onsubmit="skapi.updateProfile(event).then(user=>console.log(user))">
    <input type="checkbox" name="email_public" value="true"> Make email public
    <br>
    <input type="submit" value="Update Profile">
</form>let params = {
email_public: true
}
skapi.updateProfile(params)
.then(user => {
console.log({user}); // User's email is now public.
});For more detailed information on all the parameters and options available with the updateProfile() method, please refer to the API Reference below:
updateProfile(params, options?): Promise<UserProfile>
# Changing Password
WARNING
User must be logged in to call this method.
The changePassword() method allows users who are logged-in to change their password. This method requires the user's current password and the new password as parameters. If the password change is successful, the method will return a success message.
Password should be at least 6 characters and no more than 60 characters.
<form onsubmit="skapi.changePassword(event).then(res => alert(res))">
    <input type="password" name="current_password" placeholder="Current Password" required><br>
    <input type="password" name="new_password" placeholder="New Password" required><br>
    <input type="submit" value="Change Password">
</form>let params = {
current_password: 'current password',
new_password: 'new password'
}
skapi.changePassword(params)
.then(res => {
alert(res); // SUCCESS: Password has been changed.
});For more detailed information on all the parameters and options available with the changePassword() method, please refer to the API Reference below:
changePassword(params): Promise<string>
# Disable / Recover Account
Disabling account
WARNING
User must be logged in to call this method
WARNING
If your service does not allow users to signup, the users will not be able to disable their account.
For more information on how to allow/disallow users to signup from your service settings page, please refer to the Service Settings page.
If user choose to leave your service, they can disable their account. User's can disable their account by calling the disableAccount() method. All data related to the account will be deleted after 90 days. User will be automatically logged out once their account has been disabled.
skapi.disableAccount().then(()=>{
  // Account is disabled and user is logged out.
});
For more detailed information on all the parameters and options available with the disableAccount() method, please refer to the API Reference below:
disableAccount(): Promise(string)
Recovering a Disabled Account
Disabled accounts can be reactivated within 90 days using the recoverAccount() method. This method allows users to reactivate their disabled accounts under the following conditions:
- The account email must be verified.
- The
recoverAccount()method must be called from thecatchblock of a failedlogin()attempt using the disabled account.
The recoverAccount() method sends an email to the account owner, containing a confirmation link (The same signup confirmation email) for account recovery.
Additionally, you can provide an optional string argument to the recoverAccount() method, which will redirect the user to the specified URL or relative path of your website upon successful account recovery.
<form onsubmit="skapi.login(event)
    .then(u=>console.log('Login success.'))
    .catch(err=>{
        console.log(err.code); // USER_IS_DISABLED
        if(err.code === 'USER_IS_DISABLED') {
          // Send a recovery email to the user with a link.
          // When the user click on the link, the user will be redirected when account recovery is successful.

          let recover = confirm('Do you want to recover your account?')
          if(recover) {
            skapi.recoverAccount('/welcome/back/page').then(res=>{
              console.log(res); // SUCCESS: Recovery e-mail has been sent.
            });
          }
        }
    })">
    <input type="email" name="email" placeholder="E-Mail" required><br>
    <input id="password" type="password" name="password" placeholder="Password" required><br>
    <input type="submit" value="Login">
</form>// user attempt to login
skapi.login({email: 'user@email.com', password: 'password'})
.then(u=>console.log('Login success.'))
.catch(err=>{
console.log(err.code); // USER_IS_DISABLED
if(err.code === 'USER_IS_DISABLED') {
// Send a recovery email to the user with a link.
// When the user click on the link, the user will be redirected when account recovery is successful.
let recover = window.confirm('Do you want to recover your account?')
if(recover) {
skapi.recoverAccount("/welcome/back/page").then(res=>{
console.log(res); // SUCCESS: Recovery e-mail has been sent.
});
}
}
});In the example above, the recoverAccount() method is called from the catch block of a failed login attempt using a disabled account.
If the login attempt fails with the error code "USER_IS_DISABLED", user can choose to recover their account.
The recoverAccount() method is called to send a recovery email to the user. The recovery email contains a link, and when the user clicks on the link, they will be redirected to the relative path of the website URL: /welcome/back/page upon successful account recovery.
For more detailed information on all the parameters and options available with the recoverAccount() method, please refer to the API Reference below:
recoverAccount(redirect: boolean | string): Promise<string>
DANGER
User should know their password, and have their account email verified. Otherwise user's account cannot be recovered.
# Search Users
WARNING
User must be logged in to call this method
Users can search, retrieve information of other users in your service using the getUsers() method. By default, getUsers() will return all users chronologically from the most recent sign-up.
User information retrieved from the database is returned as a list of UserPublic objects.
INFO
Any attribute that is not set to public will not be retrieved.
skapi.getUsers().then(u=>{
  console.log(u.list); // List of all users in your service, sorted by most recent sign-up date.
});
In the example above, the getUsers() method is called without any parameters. This retrieves a list of all user profiles in your service.
For more detailed information on all the parameters and options available with the getUsers() method, please refer to the API Reference below:
getUsers(params?, fetchOptions?): Promise<DatabaseResponse<UserPublic>>
Searching users with conditions
Following examples shows how you can search users based on attributes such as name, timestamp (account created timestamp), birthdate... etc
Search for users whose name starts with 'Baksa'
let params = {
  searchFor: 'name',
  condition: '>=', // >= means greater or equal to given value. But on string value, it works as 'starts with' condition.
  value: 'Baksa'
}

skapi.getUsers(params).then(u=>{
  console.log(u.list); // List of users whose name starts with 'Baksa'
});
Search for users who joined before 2023 Jan 1
let timestampParams = {
  searchFor: 'timestamp',
  condition: '<', // Less than given value
  value: 1672498800000 //2023 Jan 1
}

skapi.getUsers(timestampParams).then(u=>{
  console.log(u.list); // List of users who joined before 2023 jan 1
});
Search for users whose birthday is between 1985 ~ 1990
let birthdateParams = {
  searchFor: 'birthdate',
  value: '1985-01-01',
  range: '1990-12-31' // Queries range of value from given value to given range value.
}

skapi.getUsers(birthdateParams).then(u=>{
  console.log(u.list); // List of users whose birthday is between 1985 ~ 1990
});
The searchFor parameter specifies the attribute to search for, and the value parameter specifies the search value.
The following attributes can be used in searchFor to search for users:
user_id: unique user identifier, stringemail: user's email address, stringphone_number: user's phone number, stringname: user's profile name, stringaddress: user's physical address, stringgender: user's gender, stringbirthdate: user's birthdate in "YYYY-MM-DD" format, stringlocale: the user's locale, a string representing the country code (e.g "US" for United States).subscribers: number of subscribers the user has, numbertimestamp: timestamp of user's sign-up, number(13 digit unix time)approved: search by account approval status, object:{ by: 'admin' | 'skapi' | 'master'; approved?: boolean }
The condition parameter allows you to set the search condition.
>: Greater than the given value.>=: Greater or equal to the given value. When the value isstring, it works as 'starts with' condition.=: Equal to the given value. (default)<: Lesser than the given value.<=: Lesser or equal to the given value.
When searching for a string attribute, > and < will search for strings that are higher or lower in the lexicographical order, respectively. And >= operator works as 'start with' condition.
INFO
- Conditional query does not work on
user_id,email,phone_number,approved. It must be searched with the '=' condition. - Users cannot search for attributes that are not set to public.
The range parameter enables searching for users based on a specific attribute value within a given range. For example, if searching by timestamp with a range of 1651748526 to 1651143726, only users created between the two timestamps will be returned.
WARNING
The range parameter cannot be used with the condition parameter. :::
# Skapi HTML Authentication Template
This is a plain HTML template for Skapi's authentication features.
This template packs all the authentication features you can use in your HTML application:
- Signup
- Signup email verification
- Login
- Forgot password
- Change password
- Update account profile
- Remove account
- Recover account
Download
Download the full project Here
Or visit our Github page
How To Run
Download the project, unzip, and open the index.html.
Remote Server
For hosting on remote server, install package:
npm iThen run:
npm run devThe application will be hosted on port 3300
Important!
Replace the SERVICE_ID and OWNER_ID value to your own service in service.js
Currently the service is running on Trial Mode.
All the user data will be deleted every 14 days.
You can get your own service ID from Skapi
# Database
Skapi provides fast, simple, secure, yet flexible way to store, retrieve data from your database.
You can start storing any data from small json data to large binary files up to 5tb per file while Skapi handles the security, indexing, and file storage for you.
Files will be served through the CDN, and will have restricted access based on the access group the uploader has set.
Mind you, Skapi database has completely different approach to database management compared to traditional databases.
We designed the database to be User-Centric, meaning that the end-users(frontend) are the one configuring the database schema and security for you.
By this approach, the database does not require any complex setup, or schema definition that cost time and money just to get things started.
In this section, you will learn how to store and retrieve data from your database, and learn how Skapi's powerful indexing system can help you search your data.
# Creating a Record
WARNING
User must be logged in to call this method
Users can create postRecord() method to create a new record or update existing records in the database.
It takes two arguments:
data: The data to be saved in key-value pairs. It can be an object literal,null,undefinedor a formSubmitEvent.config(required): Configuration for the record to be uploaded. This is where you specify the table name, access group, index values, etc.
<form onsubmit="skapi.postRecord(event, { table: 'my_collection'}).then(record => console.log(record))">
    <input name="something" placeholder="Say something"/>
    <input type="submit" value="Submit" />
</form>// Data to be saved in key:value pairs
let data = {
something: "Hello World"
}
// Configuration for the record to be uploaded
let config = {
table: 'my_collection'
}
skapi.postRecord(data, config).then(record=>{
console.log(record);
/*
Returns:
{
data: { something: "Hello World" },
table: { name: 'my_collection', access_group: 'public' },
...
}
*/
});This example demonstrates using the postRecord() method to create a record in the database. When the request is successful, the RecordData is returned.
In this example, the first argument takes the actual data to be uploaded to the database. The data is a Javascript object that has string value in the key 'something'. And in the second argument we have set table name to be my_collection.
Table name is a required field in the configuration object and the table name should not contain any special characters.
For more detailed information on all the parameters and options available with the postRecord() method, please refer to the API Reference below:
postRecord(data, config):Promise<RecordData>
Note
Skapi database does not require you to pre-setup your database schema.
If the specified table does not exist, it will be automatically created when you create the record. Conversely, if a table has no records, it will be automatically deleted. :::
# Fetching Records
The getRecords() method allows you to fetch records from the database. It retrieves records based on the specified query parameters and returns a promise that resolves to the DatabaseResponse containing the RecordData object.
It takes two arguments:
query: Specifies the query parameters for fetching records.fetchOptions: (optional) Specifies additional configuration options for fetching database records For more information, see Database Fetch Options.
Fetching Records from a Table
let query = {
    table: 'my_collection'
}

skapi.getRecords(query).then(response=>{
    // response
    /**
     * endOfList: true,
     * list: [
     *  ...
     * ],
     * startKey: 'end',
     * ...
     */
});
The example above retrieve records from a table named 'my_collection'. The table parameter in the query argument sets the table name you want to fetch records from. The retrieved records are accessed through the response.list property.
For more detailed information on all the parameters and options available with the getRecords() method, please refer to the API Reference below:
getRecords(query, fetchOptions?): Promise<DatabaseResponse<RecordData>>
Fetching Record by ID
You can fetch a record by its unique ID using the getRecords() method. When fetching a record by ID, you don't need to provide any additional configuration parameters.
let query = {
    record_id: 'record_id_to_fetch'
};

skapi.getRecords(query).then(response => {
    // response
    /**
     * endOfList: true,
     * list: [{
     *  ... // only 1 result
     * }],
     * startKey: null // startKey is null as no more records can be retrieved
     */
});
In this example, the query object includes the record_id property set to the ID of the record you want to fetch. record_id is a unique identifier for each record in the database.
The response.list will contain the record data if the record exists.
Database Fetch Options
FetchOptions can control the number of the record per fetch, fetching the next batch of records, fetching the records by ascending/descending order... etc.
This is used globally for all database related methods that allows optional FetchOptions argument.
See full list of parameters: FetchOptions
Limit Results with fetchOptions.limit
By default, 50 sets of the data will be fetched per call. You can adjust the limit to your preference, allowing up to 1000 sets of data, by using the limit key.
Fetch More Results with fetchOptions.fetchMore
To fetch the next batch of results, you can set the fetchOption.fetchMore to true. When set to false(default), database will always return the first batch of the data.
This allows you to retrieve results in batches until the end of the list is reached.
Order results with fetchOptions.ascending
By default, the database fetch the data in ascending order. If set to false, list of data can be fetched in descending order
For example, let's say there is millions of record in the database table 'my_collection'. We can fetch the first 100 data, then paginate to the next 100 data by setting fetchOptions.fetchMore to true.
let query = {
    table: 'my_collection'
}

let fetchOptions = {
  limit: 100, // Limit each fetch to 100 data.
  fetchMore: false, // When false, database always gives you the first batch of data.
  ascending: false // Fetch in decending order.
}

skapi.getRecords(query, fetchOptions).then(res=>{
  console.log(res.list); // List of up to 100 data in the database.

  if(!res.endOfList) {
    // If there is more data to fetch, and if user chooses to, they can retrieve the next batch of 100.

    fetchOptions.fetchMore = true;
    if(confirm('Fetch more records?')) {
        skapi.getUsers(query, fetchOptions)
            .then(res=>{
                console.log(res.list); // List of the next 100 data from the database.
            }
        );
    }
  }
});
In this example, after the first call to the database, we see the endOfList value is not true. This means there are more data left to fetch in the database.
To fetch more data in the database, we set fetchOptions.fetchMore to true and call the method again. This allows to fetch the next batch of 100 data on each execution until the end of the list is reached.
TIP
When using the fetchMore parameter, you must check if the response's endOfList value is true before making the next call. The database will always return an empty list if the fetchOptions.fetchMore is set to true and it had reached the end of list and.
You can however, initialize your fetch and refetch from start by toggling fetchOptions.fetchMore back to false.
TIP
You can fetch all the data at once by recursively calling the method until the endOfList value is true. However for efficiency, avoid trying to fetch all the data at once. Fetch only data the user needs and paginate when necessary. :::
# Unique ID
When uploading a record with postRecord(), you can set a unique ID for the record. This unique ID can be used to fetch the record later. Unique ID must be a string and must be unique across all records in the table.
This feature is useful when you want to create a record with a unique identifier, such as a order ID, or any other unique identifier.
Unique ID can be used to fetch the record using the getRecords() method.
Unique ID can be also used when fetching references of a record. More on referencing can be found here.
Creating a Record with Unique ID
let data = {
    myData: "This is a record with a unique ID"
};

let config = {
    table: 'my_table',
    unique_id: 'My Unique ID %$#@'
};

skapi.postRecord(data, config).then(record => {
    console.log(record);
    /*
    Returns:
    {
        data: { myData: "This is a record with a unique ID" },
        table: { name: 'my_table', access_group: 'public' },
        unique_id: 'My Unique ID %$#@',
        ...
    }
    */
});
The example above demonstrates uploading a record with a unique ID. When the request is successful, the RecordData is returned.
Fetching a Record with Unique ID
After uploading the record, you can fetch the record using the unique ID with getRecords() method.
let params = {
    unique_id: 'My Unique ID %$#@'
};

skapi.getRecords(params).then(response => {
    console.log(response.list);  // record with the unique ID
});
Fetching Unique ID List
By using getUniqueId() method, you can fetch list of unique ID's that are registered in your database.
Below is an example where you can fetch list of unique ID that starts with "guitar_"
let params = {
    unique_id: 'guitar_',
    condition: '>='
};

skapi.getUniqueId(params).then(response => {
    console.log(response.list);  // [{unique_id: "...", record_id: "..."}, ...]
});
```<br><br>
# Access Restrictions

Skapi database allows you to set access restrictions to records. This allows you to control who can access your records.

You can add additional settings to your `table` parameter using an `object` instead of a `string` in your `config.table`.
This allows you to set access restrictions to records using the `access_group` parameter.

The following values can be set for `table.access_group`:

- `private`: Only the uploader of the record will have access.
- `public`: The record will be accessible to everyone.
- `authorized`: The record will only be accessible to users who are logged into your service.
- `admin`: Only admin can use this group. The record will only be accessible to the admin of your service.

If `access_group` is not set, the default value is `public`.

::: tip
Unless the user is referencing a private access granted record, the user cannot upload a record with `access_group` set to higher level than their own access level.

You can read more about referencing records [here](/database/referencing.md).
Creating Record With Access Restrictions
Here's an example that demonstrates uploading record with authorized level access:
let data = {
    myData: "Only for authorized users"
};

let config = {
    table: {
        name: 'ForAuthorizedUsers',
        access_group: 'authorized'
    }
};

skapi.postRecord(data, config).then(record => {
    console.log(record); // Only the logged users will have access this record.
});
Fetching Records with Access Restrictions
In order to fetch records with access_group that is not public, you need to specify the access_group you are trying to fetch from. In this example, we are trying to fetch records from the "ForAuthorizedUsers" table with authorized access.
let config = {
    table: {
        name: 'ForAuthorizedUsers',
        access_group: 'authorized'
    }
};

skapi.getRecords(config)
    .then(response => {
        // response
        /**
         * endOfList: true,
         * list: [
         *  {
         *      data: { myData: "Only for authorized users" },
         *      table: { name: 'ForAuthorizedUsers', access_group: 'authorized' },
         *      ...
         *  }, ...
         * ],
         * startKey: 'end',
         * ...
         */
    });
Private Records
Private records are only accessible to the uploader of the record.
Even the admin of the service will not have access to view the user's private data.
The example below demonstrates uploading a private record:
let data = {
    myData: "My private data"
};

let config = {
    table: {
        name: 'PrivateCollection',
        access_group: 'private'
    }
};

skapi.postRecord(data, config).then(record => {
    console.log(record); // Only the uploader will be able to access this record.
});
Then, if someone else tries to fetch the record, they will get an error:
let config = {
    record_id: 'record_id_of_the_private_record'
};

skapi.getRecords(config)
    .catch(err=>alert(err.message)); // User has no access to private record.
Grant Private Access
Users can grant private access of their record to other users by using the grantPrivateRecordAccess(params) method.
skapi.grantPrivateRecordAccess({
    record_id: 'record_id_of_the_private_record',
    user_id: 'user_id_to_grant_access'
})
When the user is granted access to the record, they will be able to fetch the record either if it's private or even if it has higher access group than the user.
Access granted users can also see all the records that is referencing this record at all access groups including private records.
You can read more about referencing records here.
Remove Private Access
Users can remove access of their private record from other users by using the removePrivateRecordAccess(params) method.
skapi.removePrivateRecordAccess({
    record_id: 'record_id_of_the_private_record',
    user_id: 'user_id_to_remove_access'
})
Allowing Others to Grant Private Access to Others
By default, The owner of the record has access to grant private access of the uploaded record to others.
The owner of the record can also allow other granted users to grant private access of the uploaded record to others.
When uploading a record, if the uploader set source.allow_granted_to_grant_others to true users with private access to the record can grant access to other users as well.
skapi.postRecord(null, {
    table: {
        name: 'record_can_be_granted',
        access_group: 'private'
    },
    source: {
        allow_granted_to_grant_others: true
    }
}).then(r=>{
    // now other users with an private access can also grant private access to the record (r) to others.
})
Updating a Record
The postRecord() method can also be used to update an existing record. You can specify the record_id in the config object in order to do so.
postRecord() will overwrite the user's record data to a new data.
For record config parameters, you only need to include the parameters you want to update along with the record_id parameter. All other fields in the record will remain unchanged unless explicitly included in the method call.
let updatedData = {
  newData: "Overwritten with new data."
};

let config = {
  record_id: 'record_id_to_update',
  table: {
    name: 'new_table_name',
    access_group: 'private' // change access group to private
  }
};

skapi.postRecord(updatedData, config).then(record => {
  console.log(record);
});
Example above overwrites record data to a new data and updated to a new table name.
TIP
To update only the config of the record with data untouched, you can leave the first argument data to undefined. Then, only the config will be updated with the previous data untouched.
let new_config = {
  record_id: 'record_id_to_update',
  table: {
    name: 'new_table_name',
    access_group: 'private' // change access group to private
  }
};

skapi.postRecord(undefined, new_config).then(record => {
  console.log(record);
});
INFO
Only the owner of the record can update a record.
Readonly Record
You can let user upload a readonly record that is immutable once it is created. To create a readonly record, you can set the readonly parameter in the config object to true.
let data = {
  myData: "Hello World"
};

let config = {
  table: 'my_collection',
  readonly: true
};

let read_only_record_id;
skapi.postRecord(data, config).then(record => {
  console.log(record);
  read_only_record_id = record.record_id;
});
When the record is created with readonly set to true, the user will not be able edit or delete the record anymore.
skapi.postRecord({ myData: "Can this be updated?" }, { record_id: read_only_record_id }).catch(err=>{
    alert(err.message); // Record is readonly.
})
```<br><br># Handling Files

Skapi database is integrated with Skapi's cloud storage and CDN.
This allows you to upload any size of binary files to the database without any additional setup.

## Uploading Files

To upload files, you can use the HTML form `SubmitEvent` or `FormData` that includes `FileList` object when calling the [`postRecord()`](/api-reference/database/README.md#postrecord) method.

Additionally, We can log the progress of the upload by passing a [ProgressCallback](/api-reference/data-types/README.md#progresscallback) in the `progress` parameter in the second argument of [`postRecord()`](/api-reference/database/README.md#postrecord).
This can be useful if the user is uploading huge files, you can show a progress bar.

Here's an example demonstrating how you can upload files using Skapi:

```html
<form onsubmit="skapi.postRecord(event, { table: 'my_photos', progress: (p)=>console.log(p) })
    .then(rec=>console.log(rec))">
    <input name="description" />
    <input name="picture" multiple type="file" />
    <input type="submit" value="Submit" />
</form>
The name attribute of the FormData will serve as the key name of the file data. The file(s) will be uploaded under the key name picture in the bin key of the RecordData as shown below:
// record data
{
    record_id: '...',
    ...,
    bin: {
        picture: [
            {
                access_group: 'authorized',
                filename: '...',
                url: 'https://...',
                path: '.../...',
                size: 1234,
                uploaded: 1234
                getFile: () => {...};
            },
            ...
        ]
    }
}
The bin data will contain lists of BinaryFile objects. This process is handled seamlessly without any complicated file handling required.
Once the files are uploaded, Skapi serves the files using a CDN with no additional setup required.
Downloading Files
To download files from the record, you can use the getFile() method on the BinaryFile object in the record.
Below is an example of how you can download a file from a record:
skapi.getRecords({ record_id: 'record_id_with_file' }).then(rec => {
    let record = rec.list[0]; // record with files attached.

    /*
    // record
    {
        table: {
            name: 'my_photos',
            access_group: 'authorized'
        },
        record_id: '...',
        ...,
        bin: {
            picture: [
                {
                    access_group: 'authorized',
                    filename: '...',
                    url: 'https://...',
                    path: '.../...',
                    size: 1234,
                    uploaded: 1234
                    getFile: () => {...};
                },
                ...
            ]
        }
    }
    */

    let fileToDownload = record.bin.picture[0]; // get the file object from the record

    fileToDownload.getFile(); // browser will download the file.
});
INFO
Uploaded files follow the access restrictions of the record. User must have access to the record in order to download the file.
getFile() allows you to download the file in various ways:
blob: Downloads the file as a Blob object.base64: Downloads the file as a base64 string.endpoint: If the file access requires authentication or needs token update, you can request the a updated endpoint of the file.
If no argument is passed, the file will be downloaded from the web browser.
getFile(dataType?: string, progress?: () => void ) method have two arguments:
dataType: Type of ways for file to be downloaded. Can be"blob"or"base64"or"endpoint"url. By default, it will trigger download from the web browser.progress: Progress callback function. Can be useful when downloading large file as a blob and you want to show progress bar. (Will not work when download type isendpointor web browser download.)
If the file has private access restriction, you must use the endpoint type to get the file endpoint URL. The endpoint URL will be a signed URL that can expire after a certain amount of time.
If the file is an image or a video, you can use the url on img tag or video tag to display the file.
Below is an example of how you can get the endpoint URL of the access restricted private file (The user must have private access granted.):
fileToDownload.getFile('endpoint').then(url => {
    console.log(url); // endpoint of the file. https://...
});
Below is an example of how you can download a file as a blob, base64 with progress callback:
let progressInfo = p => {
    console.log(p); // Download progress information
};

fileToDownload.getFile('blob', progressInfo).then(b => {
    console.log(b); // Blob object of the file.
});

fileToDownload.getFile('base64', progressInfo).then(b => {
    console.log(b); // base64 string
});
Removing Files
To remove files, use the remove_bin parameter in the config argument of the postRecord() method. When updating a record, you can remove files by passing the remove_bin parameter as an array of BinaryFile objects or the endpoint url of the file that need to be removed from the record.
Here's an example demonstrating how you can remove files from a record:
...
let fileToDelete = record.bin.picture[0]; // file object retrieved from the record.
skapi.postRecord(undefined, { record_id: 'record_id_with_file', remove_bin: [fileToDelete] });
If you have the endpoint URL of the file, you can also just pass the URL as a string in the remove_bin parameter:
skapi.postRecord(undefined, { record_id: 'record_id_with_file', remove_bin: ['https://...'] });If you want to remove all files from the record, you can pass the remove_bin parameter as null:
skapi.postRecord(undefined, { record_id: 'record_id_with_file', remove_bin: null }); // removes all files from the record.Get File Information
You can use getFile() method to get the file information just from the endpoint URL of the file.
Below is an example of how you can get the file information from the endpoint URL:
let fileUrl = 'https://...';
skapi.getFile(fileUrl, { dataType: 'info' }).then(fileInfo => {
    console.log(fileInfo);
    /*
    {
        url: string,
        filename: string,
        access_group: number | 'private' | 'public' | 'authorized',
        filesize: number,
        record_id: string,
        uploader: string,
        uploaded: number,
        fileKey: string
    }
    */
});
```<br><br>
# Deleting Records

:::warning
User must be logged in to call this method
:::

The [`deleteRecords()`](/api-reference/database/README.md#deleterecords) method allows users to delete records that they own.
When the record is deleted, all the files that were uploaded to the record will be deleted as well.

The `params` object accepts similar parameters as the [`getRecords()`](/api-reference/database/README.md#getrecords) method.

If the `record_id` is provided, it will delete the record with the given `record_id`.


## Deleting Records by Record IDs

Here's an example that demonstrates how to delete multiple records using an array of record IDs:
```js
let query = {
    record_id: ['record_a_record_id','record_b_record_id']
};

skapi.deleteRecords(query).then(response => {
    // 'SUCCESS: records are being deleted. please give some time to finish the process.'
    console.log(response);
});
WARNING
You can only delete up to 100 record ID at a time.
Deleteing Records by Unique IDs
Here's an example that demonstrates how to delete multiple records using an array of unique IDs:
let query = {
    unique_id: ['unique id of the record 1','unique id of the record 2']
};

skapi.deleteRecords(query).then(response => {
    // 'SUCCESS: records are being deleted. please give some time to finish the process.'
    console.log(response);
});
WARNING
You can only delete up to 100 unique ID at a time.
Deleting User's Records with Database Query
Here's an example of deleting all user's records uploaded in the "A" table with a public access group.
let query = {
    table: {
        name: 'A',
        access_group: 'public'
    }
};

skapi.deleteRecords(query).then(response => {
    // 'SUCCESS: records are being deleted. please give some time to finish the process.'
    console.log(response);
});
You can use the database query however you like to let users delete bulk of records that they uploaded. (e.g. by access group, by table name, index, tag, reference, etc.)
TIP
When deleting multiple records, the promise will return success immediately, but it may take some time for the deleted records to be reflected in the database.
WARNING
When deleting records by database query, user will not delete records that they do not own, or records that are uploaded as read-only.
However, if the user is an admin, they can delete any records in the database. So be cafeful when admin is using this method.
Read more about admin access here.
For more detailed information on all the parameters and options available with the deleteRecords() method, please refer to the API Reference below:
deleteRecords(params): Promise<string>
# Table Information
Skapi keeps track of all the tables in your database. You can fetch a list of table names and number of records in each tables and total database size consumed in the table using the getTables() method.
You can fetch a list of table using the getTables() method.
skapi.getTables().then(response=>{
    console.log(response); // List of all tables in the database
})
Querying tables
You can query table names that meets the condition.
skapi.getTables({
    table: 'C',
    condition: '>'
}).then(response => {
    console.log(response); // Table names starting from 'C'
})
In this example, the condition property is set to >, and table is set to C. This query will return the table names that come after table 'C' in lexographic order, such as 'Cc', 'D', 'E', 'F', 'G'... and so on.
To fetch the table names that starts with 'C', you can set the condition to >= instead.
For more detailed information on all the parameters and options available with the getTables() method, please refer to the API Reference below:
getTables(query, fetchOptions?): Promise<DatabaseResponse<Table>>
Indexing
When uploading records, you can set additional configurations in the index property. Indexing allows you to categorize and search for records based on specific criteria. The index object consists of the index's name, used for indexing, and its corresponding value, which is searchable.
Configuring Indexing for Records
For example, let's consider a table of music albums. You can create an index for the name "year" and its corresponding value as the release year. This can be set when uploading/updating a record.
This enables searching for music albums by release year when quering records.
let album = {
    title: "Getz/Gilberto",
    artist: "Stan Getz, João Gilberto",
    tracks: 10
};

let config = {
    table: "Albums",
    index: {
        name: "year",
        value: 1964
    }
};

skapi.postRecord(album, config);
Querying with Index
Once indexed record is uploaded, you can fetch records based on the "year" in the "Albums" table.
skapi.getRecords({
    table: "Albums",
    index: {
        name: "year",
        value: 1964
    }
}).then(response => {
    console.log(response.list); // List of albums released on year 1964.
});
Querying Index with Conditions
You can broaden your search by using the condition parameter within the index parameter.
skapi.getRecords({
    table: "Albums",
    index: {
        name: "year",
        value: 1960,
        condition: '>' // Greater than given value
    }
}).then(response => {
    console.log(response.list); // List of albums released after the year 1960.
});
The index value can be of type number, string, or boolean.
When the index value type is number or boolean, conditions work as they do with numbers.
When the index value type is string, > and < will search for strings that are higher or lower in the lexicographical order, respectively. >= (more than or equal to) acts as a 'starts with' operation when searching for string values.
The condition parameter takes the following string values:
>: Greater than the given value.>=: Greater or equal to the given value. When the value isstring, it works as 'starts with' condition.=: Equal to the given value. (default)<: Lesser than the given value.<=: Lesser or equal to the given value.
WARNING
When querying an index with conditions, it will only return records with the same value type.
ex) '2' and 2 are different values.
Query Index with Range
In addition to conditions, you can also retrieve records based on a range of values in the index. To do so, specify the range parameter in the index object within the getRecords() method.
For example, consider the following scenario:
skapi.getRecords({
    table: "Albums",
    index: {
        name: "year",
        value: 1960,
        range: 1970
    }
}).then(response => {
    console.log(response.list); // List of albums released from 1960 to 1970.
});
In the example above, the getRecords() method will retrieve all records in the "Albums" table that have a "year" index value between 1960 and 1970 (inclusive).
WARNING
- When using the
rangeparameter, thevalueandrangeparameter values should be same type of data. - The
rangeandconditionparameter cannot be used simultaneously.
Query Index with Reserved Keywords
Skapi has reserved a few keywords to help with querying your records. The reserved keywords are:
$uploaded: Fetches the timestamp(13 digits millisecond format) at which the record was created.$updated: Fetches the timestamp(13 digits millisecond format) at which the record was last updated.$referenced_count: Fetch by the number of records that are referencing the record. This can be useful if you need a query like: 'Post that has the most comments'$user_id: Fetches list of record uploaded by given user ID.
With the exception of $user_id, all of these reserved keywords can be queried with condition and range just like any other index values. $user_id cannot be queried with condition or range.
Querying Index with Reserved Keywords
For example, let's query records created after 2021:
skapi.getRecords({
    table: "Albums",
    index: {
        name: '$uploaded',
        value: 1609459200000, // this timestamp is 2021 January 1,
        condition: '>'
    }
}).then(response => {
    console.log(response.list); // List of albums uploaded after 2021.
});
Compound Index Names
When posting records, you can use compound index names to have more control over querying the records. This makes it more flexible to search and retrieve records.
Uploading a Record with a compound index name
In the example below, we are uploading a record with a compound index name:
let album_data = {
    title: "Dukkha",
    tracks: 7
};

skapi.postRecord(album_data, {
    table: 'Album',
    index: {
        name: 'Band.AsianSpiceHouse.year',
        value: 2023
    }
})
In this example, we have created a compound index name by joining the artist type, artist name, and "year" with a period. The value of this index can only be searched when using the full index name (Band.AsianSpiceHouse.year).
Querying child level compound index names
When compound index name is used, you can also query records by artist type(Band), artist name(AsianSpiceHouse), or release year(2023).
For example, you can query all albums performed by a 'Band' using the following code:
skapi.getRecords({
    table: 'Album',
    index: {
        name: 'Band.',
        value: '',
        condition: '>' // More than
    }
}).then(response=>{
    console.log(response.list); // All albums by "Band" type artists.
})
Notice index.name value includes a period at the end: 'Band.'.
This allows you to query the child index name of the compound index name as a string value. Since the index.value is an empty string and the condition is set to "more than", this will retrieve all records where the index name begins with 'Band.'.
The next example shows how you can query albums by artist name.
skapi.getRecords({
    table: 'Album',
    index: {
        name: 'Band.',
        value: 'Asian',
        condition: '>=' // Starts with
    }
}).then(response=>{
    console.log(response.list); // All albums by "Band" with band name starting with 'Asian'
})
In this example, the value of the index is set to "Asian" and the condition is set to "more than or equal". This allows you to query all artist names starting with "Asian" where the index name begins with "Band."
Querying with full compound index name
Finally, you can query the band Asian Spice House albums by release year as follows:
skapi.getRecords({
    table: 'Album',
    index: {
        name: 'Band.AsianSpiceHouse.year',
        value: 2010,
        condition: '>'
    }
}).then(response=>{
    console.log(response.list); // All albums by Asian Spice House released after 2010.
})
WARNING
When querying the child index names from the compound index, you need to specify the index respecting the hierarchy of the compound index name.
From the example above, you cannot simply use 'Band.year' as an index name to query by the year values. You must provide the full 'Band.AsianSpiceHouse.year' as an index name if you want to query the actual value of the index.
Fetching Index Information
Skapi tracks the index information in each table. You can fetch the index information using the getIndexes() method.
Index information is useful when you want to list all index names used in a table or find out the total number of the records indexed to that index name or average/total value of the index values.
The index information includes:
average_number: The average of the number type values.total_number: The total sum of the number values.number_count: The total number of records with number as the index value.average_bool: The rate of true values for booleans.total_bool: The total number of true values for booleans.bool_count: The total number of records with boolean as the index value.string_count: The total number of records with string as the index value.index_name: The name of the index.
For example, let say we have a table called "VoteBoard" that lets user upload records with a compound index name such as "Vote.Beer". The index value will be boolean.
skapi.postRecord(null, {
    table: 'VoteBoard',
    index: {
        name: 'Vote.Beer',
        value: true // or false
    }
})
Then you can fetch information about the "Vote.Beer" index in the "VoteBoard" table to find out the rating of "Vote.Beer".
skapi.getIndexes({
    table: 'VoteBoard', // Table name is required
    index: 'Vote.Beer' // index name
}).then(response => {
    console.log(response.list[0]); // index information of "Vote.Beer"
});
For more detailed information on all the parameters and options available with the getIndexes() method, please refer to the API Reference below:
getIndexes(query, fetchOptions?): Promise<DatabaseResponse<Index>>
Querying index value
Suppose you want to list all the indexes in a table and order them in a specific order. Maybe there is multiple indexes such as "Vote.Beer", "Vote.Wine", "Vote.Coffee" and so on. And you may want to know the rating of each index and order them by the rating. In that case, you can use the order.by parameter in the query.
Example below lists all indexes under the compound index Vote. in the "VoteBoard" table ordered by average_bool from highest value:
WARNING
order.by only works on the values under the index name. If your index name is a compound index name, You should declare the parent index of your child compound index name.
For example, if you expect to get the index Vote.Beer from ordering average_bool, you should declare the parent index Vote. in the index parameter.
let config = {
    ascending: false
};

let query = {
    table: 'VoteBoard',
    index: 'Vote.',
    order: {
        by: 'average_bool'
    }
};

skapi.getIndexes(query, config).then(response => {
    console.log(response.list); // List of indexes ordered from high votes.
});
Note that in the config object, the ascending value is set to false.
So the list will be ordered in descending order from highest votes to lower votes.
For example, to list all indexes under "Vote." that has higher votes then 50% and order them by average_bool, you can do the following:
let config = {
    ascending: false
};

let query = {
    table: 'VoteBoard',
    index: 'Vote.',
    order: {
        by: 'average_bool',
        value: 0.5,
        condition: '>'
    }
};

skapi.getIndexes(query, config).then(response => {
    console.log(response.list); // List of votes that rates higher then 50%, ordered from high votes.
});
Tags
Tags are additional information that can be associated with a record. They provide additional search criteria to perform more detailed queries, either on their own or in combination with indexes. Unlike indexes, tags cannot be queried with conditional operators.
To add tags to a record, you can use the config.tags parameter in the postRecord() method. This parameter accepts a string or an array of strings or string with comma separated values, allowing you to add multiple tags to a single record.
Adding Tags to a Record
Here's an example of how to add tags to a record:
let record = {
    title: "Dukkha",
    artist: "Asian Spice House",
    tracks: 7
};

let config = {
    table: "Albums",
    index: {
        name: "year",
        value: 2023
    },
    tags: ['Indie', 'Experimental']
}

skapi.postRecord(record, config);
Querying Records by Tag
You can also utilize tags in your queries.
Example below lists albums released after 2020, that have the tag 'Experimental'.
skapi.getRecords({
    table: "Albums",
    index: {
        name: "year",
        value: 2020,
        condition: '>'
    },
    tag: 'Experimental'
}).then(response=>{
    // List of albums released after 2020, that have the tag 'Experimental'.
    console.log(response.list);
});
TIP
To query multiple tags simultaneously, you can make multiple API calls and await them all at once in Javascript Promise.all(). Then you may sort the data as you wish.
Following Example below shows fetching albums with the tag 'Experimental' OR 'Indie'
let experimental = skapi.getRecords({
    table: "Albums",
    tag: 'Experimental'
})

let indie = skapi.getRecords({
    table: "Albums",
    tag: 'Indie'
});

Promise.all([experimental, indie]).then(res=>{
    let experimental = res[0].list;
    let indie = res[1].list;

    let or_list = {};
    for(let r of experimental) or_list[r.record_id] = r;
    for(let r of indie) or_list[r.record_id] = r;

    // 'Experimental' OR 'Indie' in { [record_id]: record } format.
    console.log(or_list);
})
Fetching Tag Information
You can fetch all tags used in a table with getTags().
skapi.getTags({
    table: 'MyTable'
}).then(response=>{
    console.log(response); // List of all tags in table named 'MyTable'
})
For more detailed information on all the parameters and options available with the getTags() method, please refer to the API Reference below:
getTags(query, fetchOptions?): Promise<DatabaseResponse<Tag>>
Querying tags
You can also query tags that meets the condition.
skapi.getTags({
    table: 'MyTable',
    tag: 'A',
    condition: '>'
}).then(response=>{
    console.log(response); // List of all tags starting from 'A' in table named 'MyTable'
})
In this example, the condition property is set to >, and table is set to A. This query will return the table names that come after table 'A' in lexographic order, such as 'Ab', 'B', 'C', 'D' and so on.
# Referencing
Users can reference another record when uploading a new record.
When records are referenced, users can retrieve records based on the one being referenced.
This feature is useful for building a discussion board similar to Reddit, comment section, rating board, tracking purchased items, like buttons etc.
To reference a record, you'll need to specify the record_id or unique_id of the record you want to reference in the reference parameter in the config object.
Uploading a Record to be Referenced
First lets upload a record to be referenced.
let data = {
    post: "What do you think of this post?"
};

let config = {
    unique_id: 'unique id of the post',
    table: 'Posts'
};

let referenced_record_id;

skapi.postRecord(data, config).then(response => {
    // The original post has been uploaded. Now, users can upload another record that references it.
    referenced_record_id = response.record_id;  // Record ID of the record to be referenced.
});
Creating a Referencing Record
Note that we have uploaded a record to be referenced, we can use the uploaded record's ID in reference when uploading a comment record.
let commentRecord = {
    comment: "I like it!"
};

let commentConfig = {
    table: 'Comments',
    reference: referenced_record_id
};

skapi.postRecord(commentRecord, commentConfig);
Fetching References
Now you can query all the records that references the original record by passing the record ID in the reference parameter in getRecords() method.:
skapi.getRecords({
    table: 'Comments',
    reference: referenced_record_id,
}).then(response => {
    console.log(response.list);  // Array of comments of the reference record.
});
TIP
A user cannot reference a record with a higher access group or 'private' access. However, if the uploader has granted the private access of the record to the user, the user will be able to reference it.
DANGER
Users who have private access granted to a record will also have access to all other private/higher access group records that is referenced. To avoid unintended sharing of private records, do not permit users to upload a private record that references another record.
Creating a Referencing Record with Unique ID
When uploading a record, you can also reference the record using the unique ID.
skapi.postRecord({
    comment: "I like it!"
}, {
    table: 'Comments',
    reference: 'unique id of the post'
});
Fetching References with Unique ID
If the reference record has a unique ID setup, you can also fetch records based on the unique ID of the record being referenced.
skapi.getRecords({
    table: 'Comments',
    reference: 'unique id of the post'
}).then(response => {
    console.log(response.list);  // Array of records in 'Comments' table referencing the record with the unique ID.
});
More on unique ID can be found here.
Using reference to fetch certain user's post
You can also query all the records posted by certain user giving a user_id as a value of reference parameter.
skapi.getRecords({
    table: 'Comments',
    reference: 'user-id-whose-post-you-want'
}).then(response => {
    console.log(response.list);  // Array of records in 'Comments' table posted by a certain user
});
Removing a reference
To remove a reference, set the the reference parameter to null when updating the record.
skapi.postRecord(undefined, {
    record_id: 'record_id_of_the_comment_to_remove',
    reference: null
}).then(record => {
    console.log(record);  // The reference has been removed.
});
Reference source settings in postRecord()
When uploading record via postRecord(), you can set restrictions on referencing from other records using additional parameters in source.
source.referencing_limit: Allowed maximum number of times that other records can reference the uploading record. This is useful if you are building ticketing system where only a certain number of people purchase a ticket. If this parameter is set tonull, the number of references is unlimited. The default value isnull. Setreferencing_limitto0to prevent others to reference the uploading record.source.prevent_multiple_referencing: If set totrue, single user will be allowed to reference this record only once. This is useful for building a voting system where each users are allowed to vote only once.source.can_remove_referencing_records: If set totrue, the owner of the record has an authority to remove the referencing records. When the owner removes the record, all the referenceing records will be removed. This can be useful when you want to build a discussion board where the owner can remove the comments. The default value isfalse.source.only_granted_can_reference: When set totrue, only the user who has granted private access to the record can reference this record.source.referencing_index_restrictions: You can set list of restrictions on the index values of the referencing record. This is useful when you want to restrict the referencing record to have certain index names and values. This only affects referencing records that has an index.
Referencing Index Restrictions
You can set restrictions on the index values of the referencing record. This is useful when you want to restrict the referencing record to have certain index values. This only affects referencing records that has an index.
For example, you can set the index value range so the total rating value does not exceed a certain value.
Example below shows how you can build a review board where only 10 people are allowed to rate 1 to 5 and each user can only rate once.
It is important to set restrictions on index values for cases like rating systems where you want to prevent users from posting malicious data to mess up your index informations.
let pollPost = skapi.postRecord({
    title: `How would you rate Stan Getz, João Gilberto's album "Getz/Gilberto"?`,
    description: "Only 10 people are allowed to vote"
}, {
    unique_id: 'Review board of GetzGilberto',
    table: 'ReviewBoard',
    source: {
        prevent_multiple_referencing: true,
        referencing_limit: 10,
        referencing_index_restrictions: [
            {
                name: 'Review.Album.GetzGilberto',
                value: 1,
                range: 5
            }
        ]
    }
})
As shown in the example above, the referencing_index_restrictions parameter is an array of objects that contains the following properties:
name: The name of the index value. (required)value: The value of the index. (optional)range: The range of the index value. (optional)condition: The condition of the index value. (optional)
You can set many index restrictions by adding more objects to the array.
When the index restriction is set, the referencing record must have the same index name with same typed value and within the specified range.
If all optional parameters not set, the referencing record must have the same index name.
If value is set, the referencing record must have the same index name with the same value.
If range is set, the referencing record must have the same index name with the value within the specified range.
If condition is set, the referencing record must have the same index name with the index value that satisfies the condition to the value. For example, if you want your referencing record's index value to be less than 5, you can set the parameter as shown below:
let pollPost = skapi.postRecord({
    title: `How would you rate Stan Getz, João Gilberto's album "Getz/Gilberto"?`,
    description: "Only 10 people are allowed to vote"
}, {
    unique_id: 'Review board of GetzGilberto',
    table: 'ReviewBoard',
    source: {
        prevent_multiple_referencing: true,
        referencing_limit: 10,
        referencing_index_restrictions: [
            {
                name: 'Review.Album.GetzGilberto',
                value: 5,
                condition: '<'
            }
        ]
    }
})
condition can be one of the following: =, !=, >, <, >=, <=.
condition cannot be used with range.
Creating a Poll with Restricted Referencing
Now people can post a review by referencing the pollPost:
// Now only 10 people can post references for this record
skapi.postRecord({
    comment: "This rocks! I'd give 4.5 out of 5!"
}, {
    table: 'ReviewBoard',
    reference: 'Review board of GetzGilberto',
    index: {
        name: 'Review.Album.GetzGilberto',
        value: 4.5
    }
});
Note that the "Review.Album.GetzGilberto" index uses a value of type number so you can later retrieve the average rating and total sum of the values.
Powerful Ways to Use Reference Records
Discussion board
The owner of the reference record has all access to the referencing records.
Meaning, the user who uploaded the source of the reference record can have authority to delete the referencing records owned by other users, have access to all access levels referencing records including private records.
This is useful when you want to build a discussion board where the owner can remove the comments, let users post private comments to reference owner.
Rating/voting system
You can set restrictions on the number of times a record can be referenced, prevent multiple referencing for each users, and restrict the index values of the referencing record.
While Skapi database works as schema-less in nature, you can use this characteristic to have more control over how your users can post data to your service.
Sharing private data between limited users
If the reference record has a private access group, only the users who have access to the reference record can access the referencing records.
Subscription
Skapi database provides subscription feature.
Records uploaded with subscription group requires users to subscribe to the uploader to have access to the records.
You can let users upload records to the subscription table number by setting table.subscription.is_subscription_record to true.
When user uploads a record to the subscription table, other users must subscribe to the uploader to have access to the records.
Subscription feature can useful when you are building a social media platform, blog, etc.
With the subscription feature, user can also block certain users from accessing their subscription group records.
It can be used to track the number of subscribers of the user, feed, notify mass users, etc.
Lets assume user 'A' uploads a record in table 'Posts' with subscription group 1.
// User 'A' uploads record in subscription table.
skapi.postRecord(null, {
  table: {
    name:'Posts',
    access_group: 'authorized',
    subscription: {
      is_subscription_record: true
    }
}})
To allow other users to access the records that requires subscription, they must first subscribe to the uploader using the subscribe() method:
subscribe(option): Promise<string>
WARNING
User must be logged in to call this method
Lets assume user 'B' wants to access **user 'A'**s subscription record, user 'B' will need to subscribe to user 'A'.
// User 'B' subscribes to user 'A'.
skapi.subscribe({
  user_id: 'user_id_of_user_A',
  get_feed: true // Required to enable the get_feed method
});
TIP
To use the getFeed() method later, be sure to include the parameter get_feed: true shown in subscribe(option): Promise<string>
Once the user 'B' has subscribed to user 'A', user 'B' can now have access to the records in that subscription table.
// User 'B' now can get records that requires subscription of user 'A'
skapi.getRecords({
  table: {
    name: 'Posts',
    access_group: 'authorized',
    subscription: 'user_id_of_user_A'
  }
}).then(response => {
    console.log(response.list); // All posts user 'A' uploaded to table 'Posts' in subscription group 1.
});
TIP
Number of subscribers of the user will be tracked in UserPublic object that can be retrieved using the getUsers() method.
Unsubscribing
WARNING
User must be logged in to call this method
Users can unsubscribe from the subscription group 1 they have subscribed to using the unsubscribe() method.
// User 'B'
skapi.unsubscribe({
    user_id: 'user_id_of_user_A',
})
For more detailed information on all the parameters and options available with the unsubscribe() method, please refer to the API Reference below:
unsubscribe(option): Promise<User | string>
WARNING
When unsubscribed, subscription information may need some time to be updated. (Usually almost immediate)
Blocking and Unblocking Subscribers
WARNING
User must be logged in to call this method
One of the benifit of subscription feature is that users can block certain users from accessing their subscription level records. But as metioned above, subscription is not meant to be used as a security restriction.
Even when user has blocked certain users, they still have access to the files attached to the records since the file access level is not restricted to the subscription access unless it's private or higher access group than the accessing user.
Other than files, blocked users will not have access to any of the record data in the subscription access level.
To block a subscriber, user can call the blockSubscriber() method:
Blocking a Subscriber
// User 'A' blocks user 'B' from accessing all subscription group 1.
skapi.blockSubscriber({
    user_id: 'user_id_of_user_B',
}).then(res=>{
    // User 'B' no longer have access to user A's subscription group 1.
})
For more detailed information on all the parameters and options available with the blockSubscriber() method, please refer to the API Reference below:
blockSubscriber(option): Promise<string>
Unblocking a Subscriber
// User 'A' unblocks user 'B' from subscription group 1.
skapi.unblockSubscriber({
    user_id: 'user_id_of_user_B',
}).then(res=>{
    // User 'B' now has access to user A's subscription group 1.
})
For more detailed information on all the parameters and options available with the unblockSubscriber() method, please refer to the API Reference below:
unblockSubscriber(option): Promise<string>
Listing subscriptions
The getSubscriptions() method retrieves subscription information from the database.
params:
subscriber: The user ID of the subscriber.subscription: The user ID of the uploader and the subscription group.blocked: Set totrueto only retrieve blocked subscriptions.
Either the params.subscriber or params.subscription value must be provided.
Examples
/**
 * Retrieve all subscription information where userB is the subscriber
 */
skapi.getSubscriptions({
  subscriber: "userB_user_id"
}).then((response) => {
  console.log(response.list);
});

/**
 * Retrieve all subscription information where userA is being subscribed to
 */
skapi.getSubscriptions({
  subscription: "userA_user_id"
}).then((response) => {
  console.log(response.list);
});

/**
 * Check if userB is subscribed to userA
 */
skapi.getSubscriptions({
  subscriber: "userB_user_id",
  subscription: "userA_user_id"
}).then((response) => {
  console.log(response.list?.[0]);
});
For more detailed information on all the parameters and options available with the getSubscriptions() method, please refer to the API Reference below:
getSubscriptions(params, fetchOptions?): Promise<DatabaseResponse<RecordData>>
Getting Feed
The getFeed() method retrieves the feed of the user.
This method retrieves all the records that the user has ever subscribed to.
You can use this method to build a feed page for the user.
Examples
/**
 * Retrieve all feed of userB that are records of access_group is 1
 */
skapi.getFeed({access_group: 1}).then((response) => {
  console.log(response.list); // all records that is access_group 1 that userB has ever subscribed to.
});
getFeed(fetchOptions?): Promise<DatabaseResponse<RecordData>>
# Skapi HTML Database Full Example
This is a HTML example for building photo uploading application using Skapi's database features.
This example features complex database examples such as:
- Posting an image file and description
- Post as a private data
- Posting comments
- Like button
- List post in order of most liked, most recent
- Seach post via hashtag
- Fetching more data (Pagination)
...All in a single HTML file - welcome.html
Users must login to post and fetch uploaded photos.
Recommended VSCode Extention
For HTML projects we often tend to use element.innerHTML.
So we recommend installing innerHTML string highlighting extention like one below:
Download
Download the full project Here
Or visit our Github page
How To Run
Download the project, unzip, and open the index.html.
Remote Server
For hosting on remote server, install package:
npm iThen run:
npm run devThe application will be hosted on port 3300
Important!
Replace the SERVICE_ID and OWNER_ID value to your own service in service.js
Currently the service is running on Trial Mode.
All the user data will be deleted every 14 days.
You can get your own service ID from Skapi
# Realtime Connection Skapi's realtime connection let's you transfer JSON data between users in realtime. This is useful for creating chat applications, notifications, etc.
Creating Connection
WARNING
User must be logged in to call this method
Before you start sending realtime data, you must create a realtime connection. You can create a realtime connection by calling connectRealtime() method.
For more detailed information on all the parameters and options available with the connectRealtime() method, please refer to the API Reference below:
connectRealtime(RealtimeCallback): Promise<WebSocket>
Once the connection is established, you can start receiving realtime data from the RealtimeCallback.
let RealtimeCallback = (rt) => {
    // Callback executed when there is data transfer between the users.
    /**
    rt = {
      type: 'message' | 'error' | 'success' | 'close' | 'notice' | 'private' | 'reconnect' | 'rtc:incoming' | 'rtc:closed';
      message?: any;
      connectRTC?: (params: RTCReceiverParams, callback: RTCEvent) => Promise<RTCResolved>; // Incoming RTC
      hangup?: () => void; // Reject incoming RTC connection.
      sender?: string; // user_id of the sender
      sender_cid?: string; // scid of the sender
      sender_rid?: string; // group of the sender
      code?: 'USER_LEFT' | 'USER_DISCONNECTED' | 'USER_JOINED' | null; // code for notice messeges
    }
    */
    console.log(rt);
}

skapi.connectRealtime(RealtimeCallback);
In the example above, the RealtimeCallback function will be executed when there is data transfer between the users.
When the callback is executed, message will be passed as an object with type and message properties.
typeShows the type of the received message as below:"message": When there is data transfer between the users.
"error": When there is an error. Usually websocket connection has an error and will be disconnected.
"success": When the connection is established. This may fire on initial connection, or when the reconnection attempt is successful.
"close": When the connection is intentionally closed by the user.
"notice": When there is a notice. Usually notice users when the user in a room has joined, left, or being disconnected.
"private": When there is private data transfer between the users.
"reconnect": When there is reconnection attempt. This happens after user leaves the browser tab or device screen is lock for certain amount of time, and the user comes back to the application. The websocket can disconnect when the application is left unfocus for some period of time.
messageis the data passed from the server. It can be any JSON data.senderis the user ID of the message sender. It is only available whentypeis "message" or "private".sender_cidis the connection ID of the message sender. It can be used to track the sender's connected device.
Closing Connection
You can close the realtime connection by calling closeRealtime() method.
skapi.closeRealtime();When the connection is successfully closed, RealtimeCallback will trigger with following callback data:
{
  type: 'close',
  message: 'WebSocket connection closed.'
}
For more detailed information on all the parameters and options available with the closeRealtime() method, please refer to the API Reference below:
closeRealtime(): Promise<void>
TIP
When the user closes the tab or refresh the browser, the connection will be closed automatically. And when the connection is closed user will be removed from the group. :::
# Sending Realtime Data
Once the realtime connection is established, users can start sending realtime data to another user.
Sending Data to a User
User can send any JSON data over to any users by using postRealtime() method.
For more detailed information on all the parameters and options available with the postRealtime() method, please refer to the API Reference below:
postRealtime(message, recipient, notification): Promise<{ type: 'success', message: string }>
WARNING
The receiver must also be connected to the realtime connection to receive the data.
<form onsubmit="skapi.postRealtime(event, 'recipient_user_id').then(u=>console.log(u))">
    <input name="msg" required><input type="submit" value="Send">
</form>skapi.postRealtime({ msg: "Hello World!" }, 'recipient_user_id').then(res => console.log(res));Example above shows how to send realtime data to a user with an id: 'recipient_user_id' (Should be the user_id of user's profile).
postRealtime() method can be used directly from the form element as shown in the example above. postRealtime() takes two arguments:
message: The data to be sent to the recipient. It can be any JSON parsable data, or a SubmitEvent object.recipient: The user ID of the recipient or the name of the group the user have joined.notification: Notification to send with the realtime message, or notification to use when user is not connected to realtime. SeeSending Notifications
When the message is sent successfully, the method will return the following object:
{
  type: 'success',
  message: 'Message sent.'
}
On the receiver's side, the message will be received as an argument as an object with type and message properties through the RealtimeCallback that has been set when creating the realtime connection via connectRealtime() method.
# Realtime Groups
Realtime groups are used to send realtime data to multiple users at once. This can be used to create group chats, group notifications, etc.
Joining a Group
Users can join a group by calling joinRealtime() method.
params argument takes the following parameters:
group: The name of the group to join.
Group name can be anything you want. If the group does not exist, it will be created automatically, otherwise the user will be joined to the existing group.
skapi.joinRealtime({ group: 'HelloWorld' }).then(res => {
    console.log(res.message) // Joined realtime message group: "HelloWorld".
});
When the user is joined to the group successfully, the method will return the following object:
{
  type: 'success',
  message: 'Joined realtime message group: "HelloWorld"'.
}
For more detailed information on all the parameters and options available with the joinRealtime() method, please refer to the API Reference below:
joinRealtime(params): Promise<{ type: 'success', message: string }>
TIP
Even if the user has joined the group, they can still receive realtime data sent individually to them.
Sending Data to a Group
Once the user have joined the group, user can send any JSON data over to a group by using postRealtime() method. Any users in the group will receive the data.
The example below shows how to send realtime data to a group named "HelloWorld":
<form onsubmit="skapi.postRealtime(event, 'HelloWorld').then(u=>console.log(u))">
    <input name="msg" required><input type="submit" value="Send">
</form>skapi.postRealtime({ msg: "Hello World!" }, 'HelloWorld').then(res => console.log(res));For more detailed information on all the parameters and options available with the postRealtime() method, please refer to the API Reference below:
postRealtime(message, recipient): Promise<{ type: 'success', message: string }>
WARNING
The user must be joined to the group to send data to the group.
Leaving, Changing Groups
Users can join only one group at a time. If you want your user to change groups, you can call joinRealtime() method with a different params.group value.
Also, if you want to leave the group, you can call joinRealtime() method with a params.group value as empty string or null.
Listing Groups
Users can get a list of realtime groups by calling getRealtimeGroups() method.
Example below shows listing all groups existing in your service:
skapi.getRealtimeGroups().then(res => {
    console.log(res.list) // [{ group: 'HelloWorld', number_of_users: 1 }, ...]
});
You can search groups by the name. Below example shows how to search group names that start with "Hello":
skapi.getRealtimeGroups({ searchFor: 'group', value: 'Hello', condition: '>=' }).then(res => {
    console.log(res.list) // [{ group: 'HelloWorld', number_of_users: 1 }, ...]
});
You can also list groups that have more than 10 users:
skapi.getRealtimeGroups({ searchFor: 'number_of_users', value: 10, condition: '>=' }).then(res => {
    console.log(res.list) // [{ group: 'HelloUniverse', number_of_users: 11 }, ...]
});
For more detailed information on all the parameters and options available with the getRealtimeGroups() method, please refer to the API Reference below:
getRealtimeGroups(params?, fetchOptions?): Promise<DatabaseResponse<{ group: string; number_of_users: number; }>>
Listing Users in a Group
Users can get a list of users in a group by calling getRealtimeUsers() method.
Example below shows listing all users in the "HelloWorld" group:
skapi.getRealtimeUsers({ group: 'HelloWorld' }).then(res => {
    console.log(res.list) // [{user_id: 'user_a', connection_id: 'user_cid'}, ...]
});
You can also search users in the group by their user ID. This is useful if you want to check if the user is in the group.
skapi.getRealtimeUsers({ group: 'HelloWorld', user_id: 'user_a' }).then(res => {
    console.log(res.list) // [{user_id: 'user_a', connection_id: 'user_cid'}]
});
For more detailed information on all the parameters and options available with the getRealtimeUsers() method, please refer to the API Reference below:
getRealtimeUsers(params, fetchOptions?): Promise<DatabaseResponse<{ user_id:string; connection_id:string; }[]>>
# Notifications
Skapi provides methods to manage push notifications, including subscribing, unsubscribing, and sending notifications. This guide explains how to implement push notifications using Skapi from the client side.
Subscribing to Notifications
To receive push notifications, users must first subscribe. This requires obtaining a VAPID key and registering a service worker. It is possible to get the VAPID key by calling the method vapidPublicKey() and after subscribe by using the method subscribeNotification().
Steps:
- Retrieve the VAPID key using
vapidPublicKey(). - Request notification permission from the device user.
- Add the service worker
sw.jsfile to your environment. - Register a service worker and request notification permissions.
- Subscribe to push notifications using
navigator.serviceWorker.pushManager.subscribe(). - Send the subscription details to Skapi using
subscribeNotification().
Code Example:
/**
 * Converts a Base64 string into a Uint8Array, required for push subscriptions.
 * This function ensures correct padding and decoding.
 */
function urlBase64ToUint8Array(base64String) {
    // Ensure the Base64 string has the correct padding
    const padding = "=".repeat((4 - (base64String.length % 4)) % 4);
    const base64 = (base64String + padding)
        .replace(/-/g, "+") // Convert URL-safe characters back
        .replace(/_/g, "/");

    // Decode Base64 to binary
    const rawData = window.atob(base64);
    const outputArray = new Uint8Array(rawData.length);

    // Convert binary data into a Uint8Array
    for (let i = 0; i < rawData.length; ++i) {
        outputArray[i] = rawData.charCodeAt(i);
    }

    return outputArray;
}

// Retrieve the VAPID public key from Skapi
const vapidResponse = await skapi.vapidPublicKey();
const vapid = vapidResponse.VAPIDPublicKey;

// Check if the browser supports service workers
if (!("serviceWorker" in navigator)) {
    alert("Service workers are not supported in this browser.");
    return;
}

// Request notification permission from the user
const permission = await Notification.requestPermission();
if (permission !== "granted") {
    alert("Permission not granted for notifications");
    return;
}

// Register the service worker (sw.js should handle push events)
const registration = await navigator.serviceWorker.register("/sw.js");

// Ensure the service worker is ready
await navigator.serviceWorker.ready;

// Subscribe to push notifications using the VAPID public key
const subscription = await registration.pushManager.subscribe({
    userVisibleOnly: true, // Ensures notifications are always visible to the user
    applicationServerKey: urlBase64ToUint8Array(vapid), // Convert VAPID key to Uint8Array
}).then(sub => sub.toJSON()); // Convert subscription object to JSON format

// Log the subscription object for debugging
console.log("Subscription object:", subscription);

// Send the subscription details to Skapi to store the user's push subscription
await skapi.subscribeNotification(subscription.endpoint, subscription.keys);
Unsubscribing to Notifications
To stop receiving notifications, users need to unsubscribe by calling the method unsubscribenotification() and passing the endpoint and keys as parameters.
Steps:
- Retrieve the current push subscription from
navigator.serviceWorker.ready.pushManager.getSubscription(). - If a subscription exists, call
unsubscribe()on it. - Notify Skapi by calling
unsubscribeNotification().
Code Example:
// Ensure the service worker is ready before interacting with push notifications
const registration = await navigator.serviceWorker.ready;

// Retrieve the current push subscription (if it exists)
const subscription = await registration.pushManager.getSubscription();

// Check if there is an active subscription
if (!subscription) {
    console.error("No subscription found"); // Log an error if the user is not subscribed
    return;
}

// Convert the subscription object to a plain JSON format
const subscriptionJSON = subscription.toJSON();

// Unsubscribe the user from push notifications
await subscription.unsubscribe();

// Inform Skapi to remove this subscription from its records
const response = await skapi.unsubscribeNotification(subscription.endpoint, subscriptionJSON.keys);
Service Worker (sw.js)
A service worker file (sw.js) is required to handle incoming push notifications and user interactions. It runs in the background, allowing notifications to be received even when the site is closed. This file must be present in your project and correctly registered; otherwise, push notifications won’t work.
Code Example:
self.addEventListener('push', function(event) {
    const data = event.data.json();
    const title = data.title || "Default Title";
    const options = {
        body: data.body || "Default Body",
        icon: 'icon-192x192.png',
        badge: 'icon-192x192.png'
    };

    event.waitUntil(
        self.registration.showNotification(title, options)
    );
});

self.addEventListener('notificationclick', function(event) {
    event.notification.close();
    let url = event.target.location.origin;
    event.waitUntil(
        clients.openWindow(url)
    );
});
Sending Notifications
You can let users use postRealtime() to send notification to each other. In case the recipient is not connected to realtime, you can set the notification argument to notify user with notification message.
skapi.postRealtime(
    { msg: "Hello World!" },
    'recipient_user_id',
    {
        title: "New Message",
        body: "Someone sent you a message!"
    }
).then(res => console.log(res));
If the receiver has subscribed to push notification API, they will receive the notification message that is set in notification argument.
Below example shows how to send notification regardless user is connected to realtime connection. By setting always options to true, notification will always be triggered or the receiver.
skapi.postRealtime(
    { msg: "Hello World!" },
    'recipient_user_id',
    {
        title: "New Message",
        body: "Someone sent you a message!",
        config: { always: true }
    }
).then(res => console.log(res));
Sending Notifications (For Admins)
Admins can use the pushNotification() method to send notifications to users. Only admins can use this method to send notifications to all users. You can also target a specific user or multiple users by providing their IDs. If no user IDs are specified, the notification will be sent to all users who have subscribed to notifications in your system.
Steps:
- Call
pushNotification()with the title and body. - Optionally, provide user IDs to send notifications to specific users.
- If no user IDs are provided, the notification will be sent to all subscribers.
Code Examples:
skapi.pushNotification(
    {
        title: "Hello",
        body: "Hi there!"
    }
); // Sends to all subscribersskapi.pushNotification(
{
title: "Admin Alert",
body: "Only for selected users"
},
["user1", "user2"]
);
# WebRTC
Skapi provides easy integration of WebRTC, allowing developers to quickly set up real-time communication features in their applications.
WebRTC (Web Real-Time Communication) is a technology that enables peer-to-peer media and data streaming between two parties. This can be used for video calls, voice calls, and data exchange, making it a versatile tool for various real-time communication needs.
HTTPS REQUIRED.
WebRTC only works on HTTPS environment. You need to setup a HTTPS environment when developing a WebRTC feature for your web application.
You can host your application in skapi.com or host from your personal servers.
Creating RTC Connection
To create RTC connection, both party needs to be online and need to utilize realtime connection.
Both party should create realtime connection by using
connectRealtime()method.Once both parties are connected to realtime, both parties should join same realtime group by using
joinRealtime()Now both parties can see each other's
connection ID(cid)either by callinggetRealtimeUsers()method or from the RealtimeCallback.One of the party can request RTC connection by using the opponent's
cidwithconnectRTC()method.If media streaming is used, users should give permission to allow their device to be used.
Below is an example code of the process:
1. Basic UI Interface
Here we will add video element to display users and simple dialog to display incomming calls.
<!-- skapi should be previously initialized... -->

<style>
    video {
        width: 320px;
        height: 240px;
        border: 1px solid black;
    }
</style>

<!-- Below are the video elements which it will display incoming / outgoing media streams -->
<video id="localVideo" autoplay muted></video>
<video id="remoteVideo" autoplay></video>

<!-- This will be a dialog for outgoing, incomming calls -->
<dialog id="call_dialog"></dialog>
2. Setting Up Realtime and RTC
Below is an simple example of setting up RTC video call.
let call = null; // This will later be defined to resolved RTC connection object.

// RTC event listener
// This callback is used on connectRTC() on both calling and receiving side.
function RTCEvent(e) {
    if (e.type === 'track') {
        // Incoming Media Stream...
        document.getElementById('remoteVideo').srcObject = e.streams[0];
        call_dialog.close();
    }
}
// Realtime event listener
// This callback will listen to user joining the room.
function RealtimeCallback(rt) {
    if(rt.type === 'notice') {
        if(rt.code === 'USER_JOINED') {
            if(call) return;

            // When opponent joins a room, and it's not the user itself, user can make a RTC call
            if(skapi.user.user_id !== rt.sender) {
                call = await skapi.connectRTC({cid: rt.sender_cid, media: { audio: true, video: true}}, RTCEvent);

                call_dialog.innerHTML = /*html*/`
                    <p>Outgoing call</p>
                    <button onclick="call.hangup(); call_dialog.close();">Reject</button>
                `;

                call_dialog.showModal(); // Display outgoing call dialog

                rtcConnection = await call.connection; // Save resolved RTC connection object
                document.getElementById('localVideo').srcObject = rtcConnection.media; // Show outgoing local media stream
            }
        }
    }

    if (rt.type === 'rtc:incoming') {
        // incomming rtc call
        call = rt;

        call_dialog.innerHTML = /*html*/`
            <p>Incoming call</p>
            <button onclick='
                call.connectRTC({ media: {audio: true, video: true} }, RTCEvent)
                    .then(rtc => {
                        rtcConnection = rtc; // Save resolved RTC connection object
                        document.getElementById("localVideo").srcObject = rtcConnection.media; // Show outgoing local media stream
                        call_dialog.close();
                    })
            '>Accept</button>
            <button onclick="call.hangup(); call_dialog.close();">Reject</button>
        `;

        call_dialog.showModal(); // Display incoming call dialog
    }

    else if (rt.type === 'rtc:closed') {
        // rtc connection is closed
        call = null;
    }
}

skapi.connectRealtime(RealtimeCallback); // Connect to realtime
skapi.joinRealtime({ group: 'RTCCall' }); // Join a realtime group
```<br><br># Skapi HTML Chat Full Example

This is a HTML example for building basic chat application using Skapi's realtime features.

Users must login to post and fetch realtime messages.

This example features:

- Creating, joining, and leaving chat rooms
- Sending and receiving websocket messages
- Fetching messengers info
- Sending private messeges to user

All the main code is in **welcome.html**

## Recommended VSCode Extention

For HTML projects we often tend to use element.innerHTML.

So we recommend installing innerHTML string highlighting extention like one below:

[es6-string-html](https://marketplace.visualstudio.com/items/?itemName=Tobermory.es6-string-html)


## Download

Download the full project [Here](https://github.com/broadwayinc/skapi-chat-html-template/archive/refs/heads/main.zip)

Or visit our [Github page](https://github.com/broadwayinc/skapi-chat-html-template)


## How To Run

Download the project, unzip, and open the `index.html`.

### Remote Server

For hosting on remote server, install package:
npm i
Then run:npm run dev
The application will be hosted on port `3300`

## Important!

Replace the `SERVICE_ID` and `OWNER_ID` value to your own service in `service.js`

Currently the service is running on **Trial Mode**.

**All the user data will be deleted every 14 days.**

You can get your own service ID from [Skapi](https://www.skapi.com)<br><br># Skapi HTML Video Call Example

This is a HTML example for building basic video call application using Skapi's webrtc features.

Users must login to request or receive video calls.

This example features:

- List available receivers
- Requesting video call
- Receive incomming video call
- Hangup incomming, outgoing calls

All the main code is in **welcome.html**

## Recommended VSCode Extention

For HTML projects we often tend to use element.innerHTML.

So we recommend installing innerHTML string highlighting extention like one below:

[es6-string-html](https://marketplace.visualstudio.com/items/?itemName=Tobermory.es6-string-html)


## Download

Download the full project [Here](https://github.com/broadwayinc/skapi-webrtc-html-template/archive/refs/heads/main.zip)

Or visit our [Github page](https://github.com/broadwayinc/skapi-webrtc-html-template)


## How To Run

Download the project, unzip, and open the `index.html`.

### Remote Server

For hosting on remote server, install package:
npm i
Then run:npm run dev
The application will be hosted on port `3333`

:::danger HTTPS REQUIRED.
WebRTC only works on HTTPS environment.
You need to setup a HTTPS environment when developing a WebRTC feature for your web application.

You can host your application in skapi.com or host from your personal servers.
:::

## Important!

Replace the `SERVICE_ID` and `OWNER_ID` value to your own service in `service.js`

Currently the service is running on **Trial Mode**.

**All the user data will be deleted every 14 days.**

You can get your own service ID from [Skapi](https://www.skapi.com)<br><br># Service Settings

Go to your service page, and click on the **Service Settings** tab.

Here, you can see the information of your service data usage, subscription model for your service.

Below are some toggle settings you can configure for your service.

## Disable/Enable

You can disable your service temporarily from the service dashboard.

This is useful when you need to go under maintainance while temporarily blocking the access to your service without losing the data.
When you disable your service, all the requests to your service will be blocked, and the service will be shown as disabled in the **My Services** page.

:::warning
Disabling your service will not pause your subscription. You will still be charged for the service even when it is disabled.
:::


## Allow Signup

You can prevent user signup by turning off this option.
This setting will prevent anyone to signup or prevent anyone from removing their account in your service.

If this option is turned off, only the admin can create, disable user accounts from the **Users** page.
This is useful when you want to create a private service for a specific group of users.


## Prevent Inquiry

You can prevent users from sending inquiries to your service by turning off this option.

This is useful when you are not planning to use the [`sendInquiry()`](/api-reference/email/README.md#sendinquiry) method, and want to prevent spam.


## Freeze Database

You can freeze your database to prevent any write operations.

When you freeze your database, all your user's write operations will be blocked, and only the read operations will be allowed.
When this in enabled only the service owner can write to the database.<br><br># Additional Settings

Go to your service page, and click on the **Service Settings** tab.

Below the toggle settings, you can see the additional settings you can configure for your service.

## Service Name

You can set the service name in your service settings.

The service name can be used to identify your service in the **My Services** page, and also can be used to replace [`Automated Email's placeholders`](/email/email-templates.md#template-placeholders).


## CORS

In your service settings, you can set the CORS setting to allow the request from the specific domain.

When left empty, the CORS setting will be set to `*` by default. Otherwise, you can set the CORS setting to the specific domain, for example, `https://example.com`.
You can also set multiple domains by separating them with a comma, for example, `https://example.com,https://example2.com`.

When the CORS setting is configured, requests from other domains will be blocked.

In production, it is recommended to set the CORS setting to the specific domain to prevent unauthorized access to your service.


## Secret Key

Skapi provides API bridge to your custom APIs.

For example, you might have your own external server that you want your users to connect to.

You can set your own secret key to protect your own APIs from unauthorized access.

For more information, refer [secure post request](/api-bridge/secure-post-request.html#secure-post-request) to your custom APIs.<br><br># Delete Service

:::tip
The delete service button will only be shown if your subscription has been expired, or you are in the trial plan.
:::

You can delete your service from the service settings page.

The delete service button is located at the bottom of the service settings page.

When you click the delete service button, you will be asked to confirm the deletion of your service.

:::danger
When you delete your service, all the data related to your service will be deleted permanently, and cannot be recovered.
:::<br><br># API Bridge

Skapi's API Bridge allows your service to connect external API's.

API Bridge provides [`secureRequest()`](/api-reference/api-bridge/README.md#securerequest) and [`clientSecretRequest()`](/api-reference/api-bridge/README.md#clientsecretrequest) methods to make secure requests to your custom API's.

[`secureRequest()`](/api-reference/api-bridge/README.md#securerequest) is used to make a secure request to your custom API's.
[`clientSecretRequest()`](/api-reference/api-bridge/README.md#clientsecretrequest) is used to make a request to your 3rd party API with a client secret key.<br><br># Secure Post Request

You can use [`secureRequest()`](/api-reference/api-bridge/README.md#securerequest) method to make a secure `POST` request to your custom API's.

:::warning
User must be logged in to call this method.
:::

:::warning
The [`secureRequest()`](/api-reference/api-bridge/README.md#securerequest) method does not support HTML Forms.
:::

The `params` object accepts the following properties:
 - `url`: A string representing the URL of your custom API.
 - `data`: An object representing the data to be sent to your custom API.

For more detailed information on all the parameters and options available with the [`secureRequest()`](/api-reference/api-bridge/README.md#securerequest) method,
please refer to the API Reference below:

### [`secureRequest(params): Promise<any>`](/api-reference/api-bridge/README.md#securerequest)

## Example: Making a secure request to your custom API

Below is an example of a user making a secure request to your custom API that are hosted in `http://your.custom.api.com:3000/myapi`

```js
skapi.secureRequest({
    url: 'http://your.custom.api.com:3000/myapi',
    data: {
        some_data: 'Hello'
    }
}).then(response => {
    // response from your custom API
    console.log(response);
});
Skapi will mirror your request to your custom API. From your API, it receives user information along with the request data. If you have set the secret key in your service settings page, the request will contain your secret key.
You can have your custom API's to check the secret key in the request data. If the secret key is not matched, you can return the error response.
Below is an example of handling the request from your custom API:
Node.js Example
const http = require('http');

http.createServer(function (request, response) {
    if (request.method === 'POST') {
        if (request.url === '/myapi') {
            let body = '';

            request.on('data', function (data) {
                body += data;
            });

            request.on('end', function () {
                body = JSON.parse(body);
                console.log(body);

                // {
                //     "user": {
                //         "user_id": "...",
                //         "group": 1,
                //         "locale": "KR",
                //         "request_locale": "KR",
                //         ...
                //     },
                //     "data": {"some_data": "Hello"},
                //     "api_key": 'your api secret key',
                // }

                if (body.api_key === 'your api secret key') {
                    response.writeHead(200, {'Content-Type': 'text/html'});
                    // do something
                    response.end('success');
                } else {
                    response.writeHead(401, {'Content-Type': 'text/html'});
                    response.end("api key mismatch");
                }
            });
        }
    }
}).listen(3000);
Python Example
from http.server import BaseHTTPRequestHandler, HTTPServer
import json

class MyServer(BaseHTTPRequestHandler):
    def do_OPTION(self):
        self.send_response(200)
        self.end_headers()

    def do_POST(self):
        print("POST")
        content_length = int(self.headers["Content-Length"])
        body = json.loads(self.rfile.read(content_length).decode("utf-8"))
        print(body)

        # {
        #     "user": {
        #         "user_id": "...",
        #         "group": 1,
        #         "locale": "KR",
        #         "request_locale": "KR",
        #         ...
        #     },
        #     "data": {"some_data": "Hello"},
        #     "api_key": 'your api secret key',
        # }

        if self.path == "/myapi":
            if body.get("api_key") == "your api secret key":
                self.send_response(200)
                self.end_headers()
                self.wfile.write("success".encode("utf-8"))
            else:
                self.send_response(401)
                self.end_headers()
                self.wfile.write("api key mismatch".encode("utf-8"))

myServer = HTTPServer(("", 3000), MyServer)

try:
    myServer.serve_forever()
except KeyboardInterrupt:
    myServer.server_close()
# Client Secret Request
If you are using 3rd party API's that requires a client secret, you can use clientSecretRequest() to make a secure POST or GET request to your 3rd party API's.
First you need to save your client secret key in your Client Secret page.
Navigate to the Client Secret Key page from your service page.
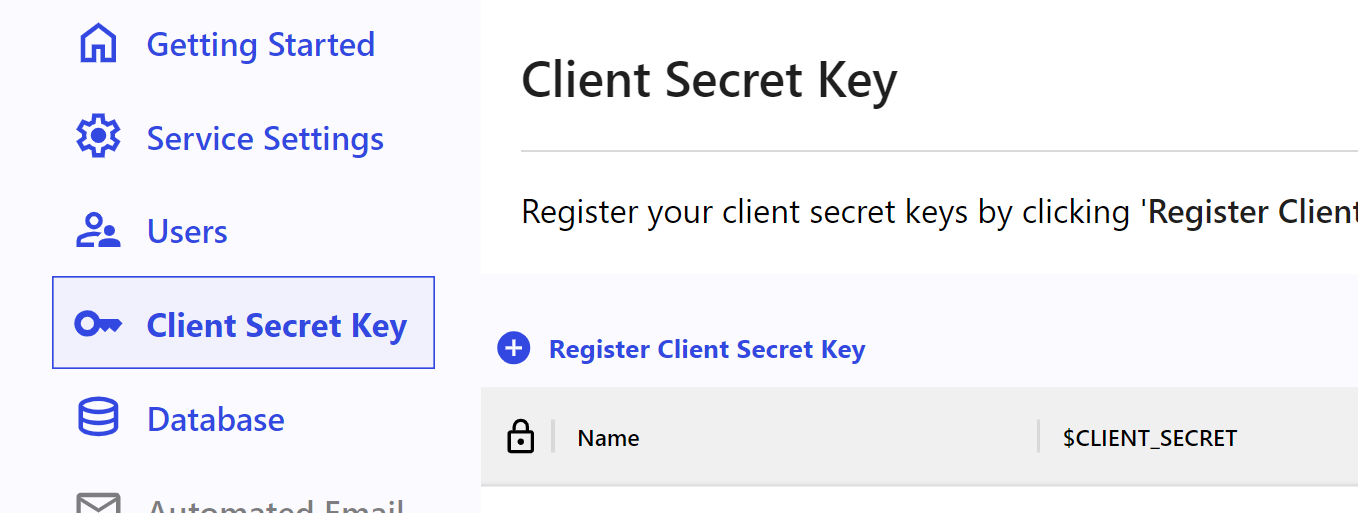
Click on the Register Client Secret Key button to add a new client secret key.
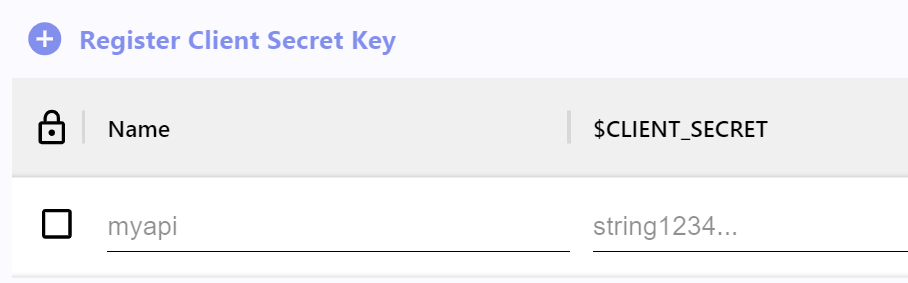
You can add a new client secret key by providing a name for the key and the client secret key value.
The checkbox indicates whether the key is public or private. The Name field is the name of the key that you will use when defining the clientSecretName parameter in the clientSecretRequest() method. The $CLIENT_SECRET field is the value that you will use as a placeholder in the data, params, or headers or url parameter of the clientSecretRequest() method.
From the list of client secret keys, you can see the security settings, the name, and the masked client secret of your keys.
TIP
The access setting of the client secret key can be set to either public or private.
private means that only the users that are logged in can have access to your 3rd party api, while public means anybody can have access to your 3rd party api. private keys are indicated with a check mark in the column with the lock icon.
Once the client secret key is saved, you can use the clientSecretRequest() method below to make secure requests to your 3rd party API's.
The list parameters of params of the method is shown as below:
url: A string representing the URL of your 3rd party API.clientSecretName: A string representing the key name of the client secret key you may have saved in your service dashboard.method: A string representing the method of the request. It can be either "GET" or "POST".headers: An object representing the headers of the request.data: An object representing the data to be sent to your 3rd party API. It is only used whenmethodis "POST".params: An object representing the query string parameters of the request. It is only used whenmethodis "GET".
For more detailed information on all the parameters and options available with the clientSecretRequest() method, please refer to the API Reference below:
clientSecretRequest(params): Promise<any>
WARNING
When using clientSecretRequest(), you must include the $CLIENT_SECRET placeholder string in the data or params or headers or url parameter value.
Example: Making a secure request to OpenAI API image generator.
As an example, we will be using the OpenAI API image generator from Skapi.
We will referencing the OpenAI API documentation to understand how to make secure requests to the API.
Prerequisites
- Create an OpenAI account and get your API secret key from here.
- Save your OpenAI API secret key in your service dashboard. For more information on how to save the client secret key, see Client Secret Key. For this example save your OpenAI API key in the key name
openai. We will use this key name when making the secure request to the OpenAI API.
Understanding the API call
In the API documentation, we can see that the API call is made as follows:
POST https://api.openai.com/v1/images/generationsThis means the API call should be made using the POST method to the https://api.openai.com/v1/images/generations URL.
Next, you will see curl example of the API call:
curl https://api.openai.com/v1/images/generations \
  -H "Content-Type: application/json" \
  -H "Authorization: Bearer $OPENAI_API_KEY" \
  -d '{
    "model": "dall-e-3",
    "prompt": "A cute baby sea otter",
    "n": 1,
    "size": "1024x1024"
  }'
This means the API call to https://api.openai.com/v1/images/generations should be made with a header with Content-Type to application/json and Authorization to Bearer $OPENAI_API_KEY. And the post data should contain properties like model, prompt, n, and size.
The $OPENAI_API_KEY is the API secret key that you have obtained from the OpenAI website. And it is meant to be replaced with your API secret key.
Since we cannot expose the API secret key in the frontend, we will be using the clientSecretRequest() method to make a secure request to the OpenAI API:
<form onsubmit="skapi.clientSecretRequest(event).then(r=>console.log(r))">
  <input name="clientSecretName" hidden value="openai">
  <input name="url" hidden value="https://api.openai.com/v1/images/generations">
  <input name="method" hidden value="POST">
  <input name="headers[Content-Type]" hidden value='application/json'>
  <input name="headers[Authorization]" hidden value="Bearer $CLIENT_SECRET">
  <input name="data[model]" hidden value="dall-e-3">
  <input name="data[n]" hidden type='number' value="1">
  <input name="data[size]" hidden value="1024x1024">
  <textarea name='data[prompt]' placeholder="Describe an image" required></textarea>
  <input type="submit" value="Generate">
</form>skapi.clientSecretRequest({
clientSecretName: 'openai',
url: 'https://api.openai.com/v1/images/generations',
method: 'POST',
headers: {
'Content-Type': 'application/json',
Authorization: 'Bearer $CLIENT_SECRET'
},
data: {
model: "dall-e-3",
"prompt": "A cute baby sea otter",
n: 1,
size: "1024x1024"
}
})The example above shows how we can compose the request headers and data to make a secure request to the OpenAI API. Note that we have used the $CLIENT_SECRET placeholder string in the Authorization header value, and we have set clientSecretName to openai which is the key name that you may have saved your OpenAI API key in the service dashboard.
When the request is made, Skapi will replace the placeholder string with the client secret key that you have saved in your service dashboard, and return the response from the OpenAI API.
# E-Mail Service
Skapi provides three very convenient email services:
Automated Emails: Send automated emails to your users.
When user signs up, or when user forgets their password, gets invited to your service, or needs a welcome email to be sent, you can use Skapi's automated email service to setup your email templates and send emails to your users.
Bulk Email Service: Send bulk emails to your users.
Skapi provides a built-in E-Mail service that allows you to send bulk emails to your users. You can immediately collect email addresses from your users, and send newsletters using Skapi's E-Mail service.
Receiving Inquiries: Receive inquiries from your users.
Skapi provides a built-in E-Mail service that allows you to receive inquiries from your users. You can immediately receive inquiries from your visitors, using Skapi's E-Mail service.
In this section, you will learn how to setup automated emails for your service, and how to send bulk emails to your users.
# Automated E-Mail
When the user signup, reset password, or change email, subscribes to public newsletters, get invited to your service, the system will send an automated email to the user. You can customize the email template of the automated emails by sending your templates to the email endpoints.
E-Mail endpoints can be found in your Automated Email page in your Skapi admin page.
In the Automated Email page, select an email type you want to set the template.
Signup Confirmation
Endpoint for signup confirmation email template. The user receives this email when they are requested for confirmation on signup.
Welcome Email
Endpoint for welcome email template. The user receives this email when they signup, and have successfully verified their email, and logged in for the first time.
Verification Email
Endpoint for verification email template. The user receives this email when verifes their email or when they request the
forgotPassword().Invitation Email
Endpoint for invitation email template. The user receives this email when they are invited to the service. You can send invitation to users from the
Userspage in your admin page in Skapi website.
Once you select the email type, the page will show the email endpoint address to set the template. Following example shows the format for email endpoints:
xxxxxxxxxxxxxxxxxxxx-xxxxxxxxxxxxxxxxxxxxxxxxxxxxxxxxxx@mail.skapi.comTo customize the email template, just send your customized template via your e-mail to the endpoint address.
DANGER
- DO NOT share your email endpoint address with anyone. This endpoint is unique to your service and should be kept private.
- You must use the same email address that you used to signup to Skapi.
Template Placeholders
E-Mail templates takes custom placeholders that can be used to customize the email template. If there is a placeholder character in your email content, it will be replaced with the corresponding value.
${service_name}: Name of your service.${name}: User's name from the profile. If the user has not set their name, it will be replaced with empty string.${email}: User's email address.
Required Placeholders for signup confirmation email
When sending signup confirmation email, you must include set a link with https://link.skapi as a url in your email content. The dummy url https://link.skapi will be replaced with the actual link that confirms the user's signup.
Example below shows how to set the link with https://link.skapi url in gmail. Any other email service should have similar way to set the link.
Below shows an example of signup confirmation template. In this example we included ${service_name} in the subject, and ${name} with link in the content.
Required Placeholders for verification email
When sending verification email, you must include ${code} placeholders in your email content. The ${code} placeholder will be replaced with the verification code that the user can use to verify their email.
Example:
Your verification code is: ${code}Required Placeholders for invitation email
Below are the required placeholders for invitation email.
https://link.skapi: Link to accept the invitation.${email}: Invited person's login email.${password}: Temporary password for the invited person.
When user clicks on the link, they will be able to login with the temporary password.
You can invite users to your service from the user page in your service page in Skapi website.
TIP
To make the invitation email more personal, it would be good idea to include ${name} placeholder in the template.
# Bulk Email
You can send newsletters or service mail to your users by sending your email to the endpoint email address. The following example shows the format for email endpoints for sending newsletters:
xxxxxxxxxxxxxxxxxxxx-xxxxxxxxxxxxxxxxxxxxxxxxxxxxxxxxxx@mail.skapi.comGo to Bulk Email page, select the email type, and the page will show the email endpoint address to send the newsletter.
Sending Public Newsletters
You can send public newsletters to your users by sending your email to the endpoint email.
First, the users must subscribe to the public newsletter to receive your public newsletters:
<form onsubmit="skapi.subscribeNewsletter(event).then(res => alert(res))">
    <input type="email" name="email" placeholder='your@email.com'/>
    <input hidden name="redirect" value="https://your.domain.com/successpage"/>
    <input hidden name="group" value="public"/>
    <input type="submit" value="Subscribe"/>
</form>skapi.subscribeNewsletter({
email: 'users@email.com',
redirect: 'https://your.domain.com/successpage',
group: 'public'
}).then(res => alert(res));The example above shows how to let your visitors subscribe to the public newsletter by calling subscribeNewsletter().
When the request is successful, user will receive a confirmation email to verify their email address. User can confirm their email address by clicking the link in the email. If the confirmation is successful, the user will be redirected to the redirect url provided in the subscribeNewsletter() parameter.
All the public newsletters will have unsubscribe link at the bottom of the email. When the user clicks the unsubscribe link, they will no longer receive your public newsletters.
For more detailed information on all the parameters and options available with the subscribeNewsletter() method, please refer to the API Reference below:
subscribeNewsletter(params, callbacks):Promise<string>
WARNING
If the user is logged in, they will not be asked to confirm their email address. Instead, they must have their email verifed.
Sending Service Mail
You can send service mail to your users with an account. To subscribe to service mails the user must be logged in. Service mail can be useful to send information, notifications, and other service-related emails.
First, user must subscribe to the service newsletter to receive the email.
WARNING
- User must be logged in to subscribe to your service newsletters.
- User must have their email verified to subscribe to your service newsletters.
<form onsubmit="skapi.subscribeNewsletter(event).then(res => alert(res))">
    <input hidden name="group" value="authorized"/>
    <input type="submit" value="Subscribe"/>
</form>skapi.subscribeNewsletter({
group: 'authorized'
}).then(res => alert(res));The example above shows how to let your visitors subscribe to the service mail by calling subscribeNewsletter().
Requesting Newsletter Endpoint for Admins
The adminNewsletterRequest() method allows administrators to request a personalized email endpoint for sending newsletters. Only users with administrator privileges (access group 99) can request this endpoint.
To send newsletters, an admin must first request a personalized endpoint using adminNewsletterRequest(). This method verifies admin privileges and returns a unique URL for sending emails.
skapi.adminNewsletterRequest().then(response => {
    console.log("Your newsletter endpoint:", response)});
WARNING
This endpoint is specific to the requesting admin and can only receive emails from the admin’s registered email address.
Checking if the user is subscribed to the service mail
You can let the user check if they have subscribed to the service mail by calling getNewsletterSubscription().
skapi.getNewsletterSubscription({
    group: 'authorized'
}).then(subs => {
    if (subs.length) {
        // user is subscribed to the service newsletter
    }
    else {
        // no subscription
    }
})
Unsubscribing from the service mail
You can let the user unsubscribe from the service newsletter by calling unsubscribeNewsletter().
skapi.unsubscribeNewsletter({
    group: 'authorized'
}).then(res => {
    // user is unsubscribed from the service newsletter
})
Fetching Sent Emails
You can fetch sent emails from the database by calling getNewsletters(). By default, it fetches all the public newsletters from the database in descending timestamp.
In the newsletter object, the url is the URL of the html file of the newsletter. You can use the URL to fetch the newsletter content.
skapi.getNewsletters().then(newsletters => {
    // newsletters.list is an array of newsletters
    /*
    {
        message_id: string; // Message ID of the newsletter
        timestamp: number; // Timestamp of the newsletter
        complaint: number; // Number of complaints
        read: number; // Number of reads
        subject: string; // Subject of the newsletter
        bounced: string; // Number of bounces
        url: string; // URL of the newsletter
    }
    */
})
For more detailed information on all the parameters and options available with the getNewsletters() method, please refer to the API Reference below:
getNewsletters(params, options?): Promise<DatabaseResponse<Newsletter>>
Fetching Sent Emails with Conditions
You can fetch sent emails from the database with conditions by calling getNewsletters().
Below is an example of fetching service mails that are sent to the service users before 24 hours ago in descending order.
For full parameters and options, see getNewsletters(params, options?).
skapi.getNewsletters({
    searchFor: 'timestamp',
    value: Date.now() - 86400000, // 24 hours ago
    condition: '<',
    group: 'authorized',
}, { ascending: false }).then(newsletters => {
    // newsletters.list is an array of newsletters
    /*
    {
        message_id: string; // Message ID of the newsletter
        timestamp: number; // Timestamp of the newsletter
        complaint: number; // Number of complaints
        read: number; // Number of reads
        subject: string; // Subject of the newsletter
        bounced: string; // Number of bounces
        url: string; // URL of the newsletter
    }
    */
})
```<br><br># Receiving Inquiries

Skapi provides a built-in E-Mail service that allows you to receive inquiries from your users.

You can use [`sendInquiry()`](/api-reference/email/README.md#sendinquiry) to let your visitors send inquiries to your e-mail.

## Sending Inquiry

:::code-group
```html [Form]
<form id="inquiry-form" onsubmit="skapi.sendInquiry(event).then(res => {
    alert(res) // 'SUCCESS: Inquiry has been sent.'
})">
    <label for="name">Name:</label>
    <input type="text" id="name" name="name" required>
    <label for="email">Email:</label>
    <input type="email" id="email" name="email" required>
    <label for="subject">Subject:</label>
    <input type="text" id="subject" name="subject" required>
    <label for="message">Message:</label>
    <textarea id="message" name="message" required></textarea>
    <button type="submit">Send Inquiry</button>
</form>let params = {
name: 'John Doe',
email: 'john@doe.com',
subject: 'Inquiry',
message: 'Hello, I have a question.'
}
skapi.sendInquiry(params).then(inquiry => {
console.log(inquiry); // 'SUCCESS: Inquiry has been sent.'
});WARNING
Inquires do not require the user to be logged in.
If you are not planning to use the sendInquiry() method, Be sure to turn on the Prevent Inquiry option in the Service Settings page to prevent spam. :::
# Admin Features
Skapi provides a set of methods to manage your service.
These methods are only available to users with the admin role.
First you should create an admin user from your Skapi service user page and use that account to access the admin methods or even grant admin access to other users.
What Admins Can Do
Admins have high access group level (99) and can perform the following actions:
- Read database data of any access group.
- Delete user's account.
- Update user's account profile.
- Invite users to the service.
- Create users in the service.
- Assign higher access group to users.
- Remove private record access from users.
- Block, unblock users from the service.
- Delete any record, including private and read-only records.
- Send newsletters to newsletter subscribers.
- Send notification to users.
What Admins Cannot Do
Admins cannot perform the following actions:
- View private data of other users.
- Edit database item uploaded by other users.
- Change service settings.
These above are only available to the service owner from the Skapi service pages.
Admin methods can be useful when you are building a service that requires admin access to manage users and data.
DANGER
Admin methods are powerful and should be used with caution. Admins have the ability to delete user accounts and data which can cause irreversible damage to your application.
What Both Admins and Service Owners Cannot Do
- Change or view user account's password.
- View private database data of other users.
# Inviting Users
Admins can invite users to the service by using the inviteUser() method.
When a user is invited, an invitation email is sent to the user with a link to accept the invitation.
In the invitation email, the user will see the login email and randomly generated password, and a link to accept the invitation.
User should click on the link to accept the invitation within 7 days and they will be able to login to the service using the email and password provided in the invitation email.
This example demonstrates using the inviteUser() method to invite a user to the service. When the request is successful, the string "SUCCESS: Invitation has been sent." is returned.
<form onsubmit="skapi.inviteUser(event).then(user => console.log(user))">
    <input name="email" placeholder="Email" required/>
    <input type="submit" value="Invite" />
</form>skapi.inviteUser(
{
email: 'user@email'
},
).then(user => {
console.log(user);
/*
Returns:
"SUCCESS: Invitation has been sent. (User ID: xxx...)"
*/
});TIP
The user will be able to login to the service using the email and password provided in the invitation email. It is recommended to change the password after the first login.
For more detailed information on all the parameters and options available with the inviteUser() method,
Resending Invitations
Admins can resend invitations to users who have not accepted the invitation by using the resendInvitation() method.
This example demonstrates using the resendInvitation() method to resend an invitation to a user. When the request is successful, the string "SUCCESS: Invitation has been re-sent." is returned.
<form onsubmit="skapi.resendInvitation(event).then(user => console.log(user))">
    <input name="email" placeholder="Email" required/>
    <input type="submit" value="Resend Invitation" />
</form>skapi.resendInvitation(
{
email: 'user@email'
},
).then(user => {
console.log(user);
/*
Returns:
"SUCCESS: Invitation has been re-sent. (User ID: xxx...)"
*/
});Getting Sent Invitations
Admins can get a list of invitations that have been sent by using the getInvitations() method.
This example demonstrates using the getInvitations() method to get a list of invitations that have been sent. When the request is successful, the DatabaseResponse containing the list of invitations is returned.
The email parameter can be used to filter the invitations by email. When the email parameter is set, only invitations with the email starting with the given string will be returned.
<form onsubmit="skapi.getInvitations(event).then(invitations => console.log(invitations))">
    <input name="email" placeholder="Search for email"/>
    <input type="submit" value="Get Invitations" />
</form>skapi.getInvitations(
{
email: 'user@email'
},
).then(invitations => {
console.log(invitations);
/*
Returns:
{
list: [
{
email: 'user@email',
...
},
...
],
...
}
*/
});For more detailed information on all the parameters and options available with the getInvitations() method,
Cancelling Invitations
Admins can cancel invitations that have been sent by using the cancelInvitation() method.
This example demonstrates using the cancelInvitation() method to cancel an invitation that has been sent. When the request is successful, the string "SUCCESS: Invitation has been cancelled." is returned.
<form onsubmit="skapi.cancelInvitation(event).then(response => console.log(response))">
    <input name="email" placeholder="Email" required/>
    <input type="submit" value="Cancel Invitation" />
</form>skapi.cancelInvitation(
{
email: 'user@email'
},
).then(response => {
console.log(response);
/*
Returns:
"SUCCESS: Invitation has been cancelled."
*/
});
# Managing Users
Admins can manage user accounts by creating, deleting, blocking, and unblocking accounts. Admins can also grant access to users and cancel invitations.
Assigning Access Group to Users
Users that have admin access can grant access to other users by using the grantAccess() method.
This example demonstrates using the grantAccess() method to grant access to a user.
When the request is successful, the string "SUCCESS: Access has been granted to the user." is returned.
You can grant user access group levels from 1 to 99.
99 is the admin group.
<form onsubmit="skapi.grantAccess(event).then(response => console.log(response))">
    <input name="user_id" placeholder="User ID" required/>
    <input name="access_group" placeholder="Access Group" required/>
    <input type="submit" value="Grant Access" />
</form>skapi.grantAccess(
{
user_id: 'user_id',
access_group: 1
},
).then(response => {
console.log(response);
/*
Returns:
"SUCCESS: Access has been granted to the user."
*/
});Creating User Accounts
Admins can create user accounts by using the createAccount() method.
This example demonstrates using the createAccount() method to create a user account.
You should provide the user's email and password. Other user attributes are optional.
<form onsubmit="skapi.createAccount(event).then(response => console.log(response))">
    <input name="email" placeholder="Email" required/>
    <input name="password" placeholder="Password" required/>
    <input name="name" placeholder="Name"/>
    <input type="submit" value="Create Account" />
</form>skapi.createAccount(
{
email: 'user@email',
password: 'password',
name: 'User Name'
},
).then(response => {
console.log(response);
/*
Returns:
"SUCCESS: Account has been created."
*/
});When the request is successful, the string "SUCCESS: Account has been created." is returned.
And the user will be able to log in with the created email and password right away.
createAccount() method does not require any confirmation from the user.
For more detailed information on all the parameters and options available with the createAccount() method.
Deleting User Accounts
Admins can delete user accounts by using the deleteAccount() method.
This example demonstrates using the deleteAccount() method to delete a user account.
When the request is successful, the string "SUCCESS: Account has been deleted." is returned.
skapi.deleteAccount(
    {
        user_id: 'xxx...' // User ID to delete.
    },
).then(response => {
    console.log(response);
    /*
    Returns:
    "SUCCESS: Account has been deleted."
    */
});
WARNING
This action is irreversible. Once an account is deleted, it cannot be recovered. All the user's data will be deleted from the database.
Blocking User Accounts
Admins can block user accounts by using the blockAccount() method.
This example demonstrates using the blockAccount() method to block a user account.
When the request is successful, the string "SUCCESS: Account has been blocked." is returned.
skapi.blockAccount(
    {
        user_id: 'xxx...' // User ID to block.
    },
).then(response => {
    console.log(response);
    /*
    Returns:
    "SUCCESS: Account has been blocked."
    */
});
Once an account is blocked, the user will not be able to log in to the service.
Unblocking User Accounts
Admins can unblock user accounts by using the unblockAccount() method.
This example demonstrates using the unblockAccount() method to unblock a user account.
When the request is successful, the string "SUCCESS: Account has been unblocked." is returned.
skapi.unblockAccount(
    {
        user_id: 'xxx...' // User ID to unblock.
    },
).then(response => {
    console.log(response);
    /*
    Returns:
    "SUCCESS: Account has been unblocked."
    */
});
# Hosting your website
Skapi provides a straight forward hosting service for your website. You can host your website with Skapi by simply uploading your website files in your File Hosting page.
Registering Your Subdomain
Before you upload your website files, you must register a subdomain for your website. Go to File Hosting page. If the service does not have a subdomain, it will ask you to make one.
Uploading Your Website Files
Once you have registered your subdomain, you can upload your website files by drag and dropping your files in the file section which is at the bottom section of your File Hosting page.
When the files are uploaded, all the files will be hosted in your subdomain. For example, if you registered mywebsite as your subdomain, and have uploaded a file named yourfile.ext, the file will be hosted publicly in https://mywebsite.skapi.com/yourfile.ext.
INFO
- When you overwrite a file with the same name, the file will be replaced with the new file.
- When overwriting or deleting a file, please allow couple of minutes for CDN to update it's cache.
DANGER
Since the files are hosted publicly, DO NOT upload any sensitive files in your hosting page.
index.html
If you have an index.html file in your root level, it will be hosted in your subdomain's root directory.
For example, if index.html file is hosted in the root directory of the subdomain. The index.html will also be served when the user visits https://mywebsite.skapi.com/.
Setting the 404 Page
You can set the 404 page for your website by clicking [UPLOAD] at 404 Page, which is in the upper section form on your File Hosting page. This HTML file will be served when the user visits a page that does not exist in your website.
DANGER
If you are using SPA framework such as Vue, React, or Angular, YOU MUST set the 404 page to your index.html file.
# API Reference: Connection
getConnectionInfo
getConnectionInfo(): Promise<ConnectionInfo>See ConnectionInfo
Errors
{
    code: "NOT_EXISTS";
    message: "Service does not exists. Register your service at skapi.com"
}
mock
mock(
    data: SubmitEvent | { [key: string]: any } & { raise?: 'ERR_INVALID_REQUEST' | 'ERR_INVALID_PARAMETER' | 'SOMETHING_WENT_WRONG' | 'ERR_EXISTS' | 'ERR_NOT_EXISTS'; },
    options?: {
        auth?: boolean; // Requires authentication
        method?: string; // HTTP method. Default is 'POST'
        responseType?: 'blob' | 'json' | 'text' | 'arrayBuffer' | 'formData' | 'document'; // Response data type. Default is 'json'
        contentType?: string; // Content-Type header. Default is 'application/json'
        progress?: ProgressCallback;
    }
): Promise<{[key:string]: any}>
See ProgressCallback
getFormResponse
getFormResponse(): Promise<any>
```<br><br># API Reference: Authentication

## signup

```ts
signup(
    params: SubmitEvent | {
        email: string; // Must be in email format. ex) user@email.com
        password: string; // At least 6 characters and a maximum of 60 characters.
        name?: string;
        phone_number?: string; // Must be in "+0012341234" format.
        address?: string; // or you can use OpenID Standard Claims https://openid.net/specs/openid-connect-core-1_0.html#StandardClaims
        gender?: string;
        birthdate?: string; // Must be in YYYY-MM-DD format
        email_public?: boolean; // Default = false
        phone_number_public?: boolean; // Default = false
        address_public?: boolean; // Default = false
        gender_public?: boolean; // Default = false
        birthdate_public?: boolean; // Default = false
        picture?: string; // URL of the profile picture.
        profile?: string; // URL of the profile page.
        website?: string; // URL of the website.
        nickname?: string; // Nickname of the user.
        misc?: string; // Additional string value that can be used freely. This value is only visible to the account owner.
    },
    options?: {
        /**
         * When true, user is required to confirm their signup confirmation on first login. (Default = false).
         * When URL or relative path of the website is given, It will redirect the user after successful confirmation.
         * NOTE: Relative path will not work if the website is not hosted.
         */
        signup_confirmation?: boolean | string;

        /** When true, user can receive newsletter from the admin. (Default = false) */
        email_subscription?: boolean;

        /** When true, user is logged in soon as the signup process is sucessful.
         * Cannot use with 'signup_confirmation'. (Default = false)
         */
        login?: boolean;
    }
): Promise<
    UserProfile |
    "SUCCESS: The account has been created. User's signup confirmation is required." |
    "SUCCESS: The account has been created.">
See UserProfile
Errors
{
  code: 'EXISTS';
  message: "user already exists.";
}
resendSignupConfirmation
resendSignupConfirmation(): Promise<'SUCCESS: Signup confirmation E-Mail has been sent.'>Errors
{
  code: 'INVALID_REQUEST',
  message: 'Least one login attempt is required.'
}
login
login(
    params: SubmitEvent | {
        email: string;
        password: string;
    }
): Promise<UserProfile>
See UserProfile
Errors
{
  code: "SIGNUP_CONFIRMATION_NEEDED";
  message: "User's signup confirmation is required.";
}
|
{
  code: 'USER_IS_DISABLED';
  message: 'This account is disabled.';
}
|
{
  code: 'INCORRECT_USERNAME_OR_PASSWORD';
  message: 'Incorrect username or password.';
}
|
{
  code: 'REQUEST_EXCEED';
  message: 'Too many attempts. Please try again later.';
}
getProfile
getProfile(
    options?: {
        /** When true, JWT token is refreshed before fetching the user attributes. (Default = false) */
        refreshToken: boolean;
    }
): Promise<UserProfile>
See UserProfile
logout
logout(params?: { global: boolean; }): Promise<'SUCCESS: The user has been logged out.'>forgotPassword
forgotPassword(
    params: SubmitEvent | {
        email: string;
    }
): Promise<'SUCCESS: Verification code has been sent.'>
Errors
{
    code: "LimitExceededException";
    message: "Attempt limit exceeded, please try after some time."
}
resetPassword
resetPassword(
    params: SubmitEvent | {
        email: string;
        code: string | number;
        new_password: string; // At least 6 characters and a maximum of 60 characters.
    }
): Promise<'SUCCESS: New password has been set.'>
openidLogin
openidLogin(
    params: SubmitEvent | {
        token: string; // ID/Access token fetched from open id API service
        id: string; // OpenID Logger ID registered in the service page.
    }
): Promise<{
    userProfile: UserProfile;
    openid: { [attribute:string]: any };
}>
```<br><br># API Reference: User Account

## updateProfile

```ts
updateProfile(
    params: SubmitEvent | {
        name?: string; // Name of the user.
        email?: string; // Max 64 characters.
        phone_number?: string; // Must be in "+0012341234" format.
        address?: string; // or you can use OpenID Standard Claims https://openid.net/specs/openid-connect-core-1_0.html#StandardClaims
        gender?: string; // Can be any string
        birthdate?: string; // Must be in YYYY-MM-DD format
        email_public?: boolean; // When set to true, email attribute is visible to others.
        phone_number_public?: boolean; // When set to true, phone_number attribute is visible to others.
        address_public?: boolean; // When set to true, address attribute is visible to others.
        gender_public?: boolean; // When set to true, gender attribute is visible to others.
        birthdate_public?: boolean; // When set to true, birthdate attribute is visible to others.
        picture?: string; // URL of the profile picture.
        profile?: string; // URL of the profile page.
        website?: string; // URL of the website.
        nickname?: string; // Nickname of the user.
        misc?: string; // Additional string value that can be used freely. This value is only visible from skapi.getProfile()
    }
): Promise<UserProfile>
See UserProfile
changePassword
changePassword(params: SubmitEvent | {
    new_password: string; // At least 6 characters and a maximum of 60 characters.
    current_password: string;
}): Promise<`SUCCESS: Password has been changed.`>
verifyEmail
verifyEmail(params?: SubmitEvent | {
    /**
     * When code value is given, Skapi will try to verify the code.
     * When Called with out any argument, Skapi will issue a new verification.
     */
    code: string;
}): Promise<'SUCCESS: Verification code has been sent.' | 'SUCCESS: "email" is verified.'>
Errors
{
    code: "LimitExceededException";
    message: "Attempt limit exceeded, please try after some time.";
}
|
{
    code: "CodeMismatchException";
    message: "Invalid verification code provided, please try again.";
}
disableAccount
disableAccount(): Promise<'SUCCESS: account has been disabled.'>;getUsers
getUsers({
    params?: {
        searchFor:
            'user_id' |
            'name' |
            'email' |
            'phone_number' |
            'address' |
            'gender' |
            'birthdate' |
            'locale' |
            'subscribers' |
            'timestamp' |
            'approved';
        value: string | number | boolean | { by: 'admin' | 'skapi' | 'master'; approved?: boolean }; // Appropriate value type for searchFor, Object for 'approved'

        /**
         * Cannot be used with range. Default = '='.
         * '>' means more than. '<' means less than.
         * For strings, '>=' means 'starts with'.
         */
        condition?: '>' | '>=' | '=' | '<' | '<=' | 'gt' | 'gte' | 'eq' | 'lt' | 'lte';
        range?: string | number | boolean; // Cannot be used with condition.
    } | null;
    fetchOptions?: FetchOptions
}): Promise<DatabaseResponse<UserPublic>>;
See FetchOptions
See DatabaseResponse
See UserPublic
recoverAccount
recoverAccount(redirect: boolean | string): Promise<'SUCCESS: Recovery e-mail has been sent.'>;
# API Reference: Database
postRecord
postRecord(
    data: SubmitEvent | { [key: string] : any } | null,
    config: {
        record_id?: string; // Only used when updating records.
        unique_id?: string; // Unique ID to set to the record. If null is given, it will remove the previous unique ID when updating.
        // 'table' is optional when record ID is used.
        table: string | {
            name: string; // Other than space and period, special characters are not allowed.
            access_group?: number | 'private' | 'public' | 'authorized' | 'admin';  // Default: 'public'
            subscription?: {
                is_subscription_record?: boolean; // When true, record will be uploaded to subscription table.
                exclude_from_feed?: boolean; // When true, record will be excluded from the subscribers feed.
                notify_subscribers?: boolean; // When true, subscribers will receive notification when the record is uploaded.
                feed_referencing_records?: boolean; // When true, records referencing this record will be included to the subscribers feed.
                notify_referencing_records?: boolean; // When true, records referencing this record will be notified to subscribers.
            };
        };
        readonly?: boolean; // Default: false. When true, the record cannot be updated.
        index?: {
            name: string; // Only alphanumeric and period allowed.
            value: string | number | boolean; // Only alphanumeric and spaces allowed.
        };
        tags?: string | string[]; // Only alphanumeric and spaces allowed. It can also be an array of strings or a string with comma separated values.
        source?: {
            referencing_limit?: number; // Default: null (Infinite)
            prevent_multiple_referencing?: boolean; // If true, a single user can reference this record only once.
            only_granted_can_reference?: boolean; // When true, only the user who has granted private access to the record can reference this record.
            can_remove_referencing_records?: boolean; // When true, owner of the record can remove any record that are referencing this record. Also when this record is deleted, all the record referencing this record will be deleted.
            referencing_index_restrictions?: {
                /** Not allowed: White space, special characters. Allowed: Alphanumeric, Periods. */
                name: string; // Allowed index name
                /** Not allowed: Periods, special characters. Allowed: Alphanumeric, White space. */
                value?: string | number | boolean; // Allowed index value
                range?: string | number | boolean; // Allowed index range
                condition?: 'gt' | 'gte' | 'lt' | 'lte' | 'eq' | 'ne' | '>' | '>=' | '<' | '<=' | '=' | '!='; // Allowed index value condition
            }[];
            allow_granted_to_grant_others?: boolean; // When true, the user who has granted private access to the record can grant access to other users.
        };
        reference?: string; // Reference to another record. When value is given, it will reference the record with the given value. Can be record ID or unique ID.
        remove_bin?: BinaryFile[] | string[] | null; // If the BinaryFile object or the url of the file is given, it will remove the bin data(files) from the record. The file should be uploaded to this record. If null is given, it will remove all the bin data(files) from the record.
        progress: ProgressCallback; // Progress callback function. Usefull when uploading files.
    };
): Promise<RecordData>
See RecordData
See ProgressCallback
See BinaryFile
getRecords
getRecords(
    query: {
        record_id?: string; // When record ID is given, it will fetch the record with the given record ID. all other parameters are bypassed and will override unique ID.
        unique_id?: string; // Unique ID of the record. When unique ID is given, it will fetch the record with the given unique ID. All other parameters are bypassed.
        /** When the table is given as a string value, the value is the table name. */
        table: string | {
            name: string,
            access_group?: number | 'private' | 'public' | 'authorized' | 'admin'; // 0 to 99 if using number. Default: 'public'
            subscription?: string; // User ID that requester is subscribed to.
        };

        /**
         * When unique ID is given, it will fetch the records referencing the given unique ID.
         * When record ID is given, it will fetch the records referencing the given record ID.
         * When user ID is given, it will fetch the records uploaded by the given user ID.
         */
        reference?: string;

        index?: {
            /** '$updated' | '$uploaded' | '$referenced_count' | '$user_id' are the reserved index names. */
            name: string | '$updated' | '$uploaded' | '$referenced_count' | '$user_id';
            value: string | number | boolean;
            condition?: 'gt' | 'gte' | 'lt' | 'lte' | 'eq' | '>' | '>=' | '<' | '<=' | '='; // cannot be used with range. Default: '='
            range?: string | number | boolean; // cannot be used with condition
        };

        tag?: string; // Queries records with the given tag.
    },
    fetchOptions?: FetchOptions;
): Promise<DatabaseResponse<RecordData>>
See RecordData
See FetchOptions
See DatabaseResponse
grantPrivateAccess
grantPrivateRecordAccess(
    params: {
        record_id: string;
        user_id: string | string[];
    }
): Promise<'SUCCESS: granted x users private access to record: xxxx...'>
Errors
{
    code: "INVALID_REQUEST";
    message: "Private access cannot be granted to service owners.";
}
|
{
    code: "INVALID_REQUEST";
    message: "Record should be owned by the user.";
}
|
{
    code: "INVALID_REQUEST";
    message: "cannot process more than 100 users at once.";
}
|
{
    code: "INVALID_REQUEST";
    message: "At least 1 user id is required.";
}
removePrivateAccess
removePrivateRecordAccess(
    params: {
        record_id: string;
        user_id: string | string[];
    }
): Promise<'SUCCESS: granted x users private access to record: xxxx...'>
Errors
{
    code: "INVALID_REQUEST";
    message: "Private access cannot be granted to service owners.";
}
|
{
    code: "INVALID_REQUEST";
    message: "Record should be owned by the user.";
}
|
{
    code: "INVALID_REQUEST";
    message: "cannot process more than 100 users at once.";
}
|
{
    code: "INVALID_REQUEST";
    message: "At least 1 user id is required.";
}
deleteRecords
deleteRecords({
    record_id?: string | string[]; // Record ID or an array of record IDs to delete. When record ID is given, it will delete the record with the given record ID. It will bypass all other parameters and will override unique ID.
    unique_id?: string | string[]; // Unique ID or an array of unique IDs to delete. When unique ID is given, it will delete the record with the given unique ID. It will bypass all other parameters except record_id.

    /** Delete bulk records by query. Query will be bypassed when "record_id" is given. */
    /** When deleteing records by query, It will only delete the record that user owns. */
    table: string | {
        name: string,
        access_group?: number | 'private' | 'public' | 'authorized' | 'admin'; // 0 to 99 if using number. Default: 'public'
        subscription?: {
            user_id: string;
            /** Number range: 0 ~ 99 */
            group: number;
        };
    };

    /**
     * When unique ID is given, it will fetch the records referencing the given unique ID.
     * When record ID is given, it will fetch the records referencing the given record ID.
     * When user ID is given, it will fetch the records uploaded by the given user ID.
     * When fetching record by record_id or unique_id that user has restricted access, but the user has been granted access to reference, user can fetch the record if the record ID or the unique ID of the reference is set to reference parameter.
     */
    reference?: string;

    index?: {
        /** '$updated' | '$uploaded' | '$referenced_count' | '$user_id' are the reserved index names. */
        name: string | '$updated' | '$uploaded' | '$referenced_count' | '$user_id';
        value: string | number | boolean;
        condition?: 'gt' | 'gte' | 'lt' | 'lte' | 'eq' | 'ne' | '>' | '>=' | '<' | '<=' | '=' | '!='; // cannot be used with range. Default: '='
        range?: string | number | boolean; // cannot be used with condition
    };

    tag?: string; // Queries records with the given tag.
}): Promise<string | DatabaseResponse<string>>
getTables
getTables(
    query: {
        table: string;
        condition?: 'gt' | 'gte' | 'lt' | 'lte' | 'eq' | '>' | '>=' | '<' | '<=' | '=';
    },
    fetchOptions?: FetchOptions;
): Promise<DatabaseResponse<Table>>
See DatabaseResponse
See Table
getIndex
getIndexes(
    query: {
        table: string;
        index?: string;
        order?: {
            by: 'average_number' | 'total_number' | 'number_count' | 'average_bool' | 'total_bool' | 'bool_count' | 'string_count' | 'index_name';
            value?: number | boolean | string;
            condition?: 'gt' | 'gte' | 'lt' | 'lte' | 'eq' | '>' | '>=' | '<' | '<=' | '=';
        };
    },
    fetchOptions?: FetchOptions;
): Promise<DatabaseResponse<Index>>
See DatabaseResponse
See Index
getTags
getTags(
    query: {
        table: string;
        tag?: string;
        condition?: 'gt' | 'gte' | 'lt' | 'lte' | 'eq' | '>' | '>=' | '<' | '<=' | '=';
    },
    fetchOptions?: FetchOptions;
): Promise<DatabaseResponse<Tag>>
See DatabaseResponse
See Tag
getUniqueId
getUniqueId(
    query: {
        unique_id?: string;
        condition?: 'gt' | 'gte' | 'lt' | 'lte' | 'eq' | '>' | '>=' | '<' | '<=' | '=';
    },
    fetchOptions?: FetchOptions;
): Promise<DatabaseResponse<UniqueId>>
See DatabaseResponse
See UniqueId
subscribe
subscribe(
    { user_id: string; get_feed?: boolean; get_notified?: boolean; get_email?: boolean; }
): Promise<'SUCCESS: The user has subscribed.'>
unsubscribe
unsubscribe(
    {
        user_id: string;
    }
): Promise<'SUCCESS: The user has unsubscribed.'>
blockSubscriber
blockSubscriber(
    {
        user_id: string;
    }
): Promise<'SUCCESS: Blocked user id "xxxxxxxx-xxxx-xxxx-xxxx-xxxxxxxxxxxx".'>
unblockSubscriber
unblockSubscriber(
{
user_id: string;
}
): Promise<'SUCCESS: Unblocked user id "xxxxxxxx-xxxx-xxxx-xxxx-xxxxxxxxxxxx".'>getSubscriptions
getSubscriptions(
params: {
// Must have either subscriber and/or subscription value
subscriber?: string; // User ID of the subscriber (User who subscribed)
subscription?: string; // User ID of the subscription (User being subscribed to)
blocked?: boolean; // When true, fetches only blocked subscribers. Default = false
},
fetchOptions?: FetchOptions;
): Promise<DatabaseResponse<Subscription>>See DatabaseResponse
See Subscription
getFeed
getFeed(params?: { access_group?: number; }, fetchOptions?: FetchOptions): Promise<DatabaseResponse<RecordData>>getFile
getFile(
url: string,
config?: {
dataType: 'base64' | 'download' | 'endpoint' | 'blob' | 'text' | 'info';
},
progressCallback?: ProgressCallback
): Promise<Blob | string | FileInfo | void>See FileInfo
See ProgressCallback
# API Reference: Email
subscribeNewsletter
subscribeNewsletter({
params: SubmitEvent | <{
group: 'public' | 'authorized';
email?: string; // only for public newsletters
redirect?: string; // only for public newsletters. User will be redirected to this URL when confirmation link is clicked.
}>,
callbacks: {
response?(response: any): any;
onerror?(error: Error): any;
}
}): Promise<string>unsubscribeNewsletter
unsubscribeNewsletter(
params: {
group: 'authorized';
}
): Promise<string>adminNewsletterRequest
adminNewsletterRequest(): Promise<string>getNewsletterSubscription
getNewsletterSubscription(
params: {
group: 'authorized';
}
): Promise<any[]>getNewsletters
getNewsletters(
params?: {
/**
* Search points.
* 'message_id' and 'subject' value should be string.
* Others in numbers.
*/
searchFor: 'message_id' | 'timestamp' | 'read' | 'complaint' | 'subject';
value: string | number;
group: 'public' | 'authorized' | number;
range?: string | number;
/**
* Defaults to '='
*/
condition?: '>' | '>=' | '=' | '<' | '<=' | 'gt' | 'gte' | 'eq' | 'lt' | 'lte';
},
fetchOptions?: FetchOptions;
): Promise<DatabaseResponse<Newsletter>>See FetchOptions
See DatabaseResponse
See Newsletter
sendInquiry
sendInquiry(
params: {
name: string;
email: string;
subject: string;
message: string;
}
): Promise<'SUCCESS: Inquiry has been sent.'>
```<br><br># API Reference: Realtime Connection
## connectRealtime
```ts
connectRealtime(cb: RealtimeCallback): Promise<WebSocket>See RealtimeCallback
Errors
{
code: 'INVALID_REQUEST';
message: "Callback must be a function.";
}
|
{
code: 'ERROR';
message: "Skapi: WebSocket connection error.";
}postRealtime
postRealtime(
message: SubmitEvent | any,
recipient: string, // User's ID or a group name
notification?: {
title: string;
body: string;
config?: {
always: boolean; // When true, notification will always trigger the receiver's device regardless their connection state.
}
}
): Promise<{ type: 'success', message: 'Message sent.' }>Errors
{
code: 'INVALID_REQUEST';
message: "No realtime connection. Execute connectRealtime() before this method.";
}
|
{
code: 'INVALID_REQUEST';
message: "User has not joined to the recipient group. Run joinRealtime('...')";
}
|
{
code: 'INVALID_REQUEST';
message: "Realtime connection is not open. Try reconnecting with connectRealtime().";
}joinRealtime
joinRealtime(SubmitEvent | params: {
group: string, // Group name
}
): Promise<{ type: 'success', message: string }>Errors
{
code: 'INVALID_REQUEST';
message: "No realtime connection. Execute connectRealtime() before this method.";
}getRealtimeGroups
getRealtimeGroups(SubmitEvent | params?: {
searchFor: 'group' | 'number_of_users';
value?: string | number; // Group name or number of users
condition?: '>' | '>=' | '=' | '<' | '<=' | '!=' | 'gt' | 'gte' | 'eq' | 'lt' | 'lte' | 'ne';
range?: string | number | boolean; // Cannot be used with condition.
} | null,
fetchOptions?: FetchOptions
): Promise<DatabaseResponse<{ group: string; number_of_users: number; }>>getRealtimeUsers
getRealtimeUsers(SubmitEvent | params?: {
group: string; // Group name
user_id?: string; // User ID in the group
},
fetchOptions?: FetchOptions
): Promise<DatabaseResponse<{ user_id:string; cid:string; }[]>>See FetchOptions
See DatabaseResponse
closeRealtime
closeRealtime(): Promise<void>connectRTC
connectRTC({
cid: string; // Client id of the opponent
ice?: string; // stun:your.stun.server:3468 (optional)
media?: {
video: boolean; // When true, video will be streamed
audio: boolean; // When true, audio will be streamed
} | MediaStream; // MediaStream object can be used
channels?: Array<{
ordered: 'boolean',
maxPacketLifeTime: 'number',
maxRetransmits: 'number',
protocol: 'string'
} | "text-chat" | "file-transfer" | "video-chat" | "voice-chat" | "gaming">; // Can create data channels with optimal setting for given task
}): Promise<RTCConnector>See RTCConnector
Errors
{
code: 'DEVICE_NOT_FOUND';
message: "Requested media device not found.";
}
|
{
code: 'INVALID_REQUEST';
message: 'Data channel with the protocol "{protocol name}$" already exists.';
}vapidPublicKey
vapidPublicKey(): Promise<{ VAPIDPublicKey: string }>subscribeNotification
subscribeNotification({
params: {
endpoint: string; // The endpoint URL for the device to subscribe to notifications.
keys: {
p256dh: string; // The encryption key to secure the communication channel.
auth: string; // The authentication key to authenticate the subscription.
};
}
}): Promise<'SUCCESS: Subscribed to receive notifications.'>unsubscribeNotification
unsubscribeNotification({
params: {
endpoint: string; // The endpoint URL for the device to unsubscribe from notifications.
keys: {
p256dh: string; // The encryption key to secure the communication channel.
auth: string; // The authentication key to authenticate the unsubscription.
};
}
}): Promise<'SUCCESS: Unsubscribed from notifications.'>pushNotification
pushNotification({
params: {
{
title: string; // The title of the notification.
body: string; // The body content of the notification.
},
user_ids?: string | string[]; // Optional parameter to specify the user(s) for whom to send the notification.
}
}): Promise<"SUCCESS: Notification sent.">
```<br><br># API Reference: API Bridge
## secureRequest
```ts
secureRequest(
params: {
url: string;
data?: any;
}
): Promise<any>clientSecretRequest
clientSecretRequest(
params: {
url: string;
clientSecretName: string;
method: 'get' | 'post' | 'GET' | 'POST';
headers?: { [key: string]: string };
data?: { [key: string]: any };
params?: { [key: string]: string };
}
): Promise<any>
```<br><br># API Reference: Admin
## inviteUser
```ts
inviteUser(
userAttributes: {
email: string; // Required. Max 64 characters.
name?: string; // Name of the user.
access_group: number; // Access group level of the user. (1~99) 99 is admin level.
phone_number?: string; // Must be in "+0012341234" format.
address?: string; // or you can use OpenID Standard Claims https://openid.net/specs/openid-connect-core-1_0.html#StandardClaims
gender?: string; // Can be any string
birthdate?: string; // Must be in YYYY-MM-DD format
email_public?: boolean; // When set to true, email attribute is visible to others.
phone_number_public?: boolean; // When set to true, phone_number attribute is visible to others.
address_public?: boolean; // When set to true, address attribute is visible to others.
gender_public?: boolean; // When set to true, gender attribute is visible to others.
birthdate_public?: boolean; // When set to true, birthdate attribute is visible to others.
picture?: string; // URL of the profile picture.
profile?: string; // URL of the profile page.
website?: string; // URL of the website.
nickname?: string; // Nickname of the user.
misc?: string; // Additional string value that can be used freely. This value is only visible from skapi.getProfile()
},
options?: {
confirmation_url?: string; // URL to redirect the user after the invitation is accepted.
email_subscription: boolean; // When true, the user will receive service newsletters.
}
): Promise<'SUCCESS: Invitation has been sent. (User ID: xxx...)'>resendInvitation
resendInvitation(
userAttributes: {
email: string; // Required. Max 64 characters.
}
): Promise<'SUCCESS: Invitation has been re-sent. (User ID: xxx...)'>getInvitations
getInvitations(params: {
email?: string; // When set, only invitations with the email starting with the given string will be returned.
}, fetchOptions: FetchOptions): Promise<DatabaseResponse<UserProfile>>See DatabaseResponse.
See UserProfile.
See FetchOptions.
cancelInvitation
cancelInvitation(params: {
email: string; // email of the user to cancel the invitation.
}): Promise<"SUCCESS: Invitation has been canceled.">grantAccess
grantAccess(params: {
user_id: string; // User ID to grant access.
access_group: number; // Access group level of the user. (1~99) 99 is admin level.
}): Promise<'SUCCESS: Access has been granted to the user.'>createAccount
createAccount(
userAttributes: {
email: string; // Required. Max 64 characters.
password: string; // Required. At least 6 characters and a maximum of 60 characters.
name?: string; // Name of the user.
phone_number?: string; // Must be in "+0012341234" format.
address?: string; // or you can use OpenID Standard Claims https://openid.net/specs/openid-connect-core-1_0.html#StandardClaims
gender?: string; // Can be any string
birthdate?: string; // Must be in YYYY-MM-DD format
email_public?: boolean; // When set to true, email attribute is visible to others when the user confirms the email later.
phone_number_public?: boolean; // When set to true, phone_number attribute is visible to others when the user confirms the phone umber later.
address_public?: boolean; // When set to true, address attribute is visible to others.
gender_public?: boolean; // When set to true, gender attribute is visible to others.
birthdate_public?: boolean; // When set to true, birthdate attribute is visible to others.
picture?: string; // URL of the profile picture.
profile?: string; // URL of the profile page.
website?: string; // URL of the website.
nickname?: string; // Nickname of the user.
misc?: string; // Additional string value that can be used freely. This value is only visible from skapi.getProfile(). Not to others.
}
): Promise<UserProfile>See UserProfile.
deleteAccount
deleteAccount(params: {
user_id: string;
}): Promise<'SUCCESS: Account has been deleted.'>blockAccount
blockAccount(params: {
user_id: string;
}): Promise<'SUCCESS: The user has been blocked.'>unblockAccount
unblockAccount(params: {
user_id: string;
}): Promise<'SUCCESS: The user has been unblocked.'>
# API Reference: Data Types
ConnectionInfo
type ConnectionInfo = {
service_name: string; // Connected Service Name
user_ip: string; // Connected user's IP address
user_agent: string; // Connected user agent
user_locale: string; // Connected user's country code
version: string; // Skapi library version: 'xxx.xxx.xxx' (major.minor.patch)
}UserProfile
type UserProfile = {
service:string; // The service ID of the user's account.
owner:string; // The user ID of the service owner.
access_group:number; // The access level of the user's account.
user_id:string; // The user's ID.
locale:string; // The country code of the user's location when they signed up.
/**
Account approval info and timestamp.
Comes with string with the following format: "{approver}:{approved | suspended}:{approved_timestamp}"
{approver} is who approved the account:
[by_master] is when account approval is done manually from skapi admin panel,
[by_admin] is when approval is done by the admin account with api call within your service.
[by_skapi] is when account approval is automatically done.
Open ID logger ID will be the value if the user is logged with openIdLogin()
This timestamp is generated when the user confirms their signup, or recovers their disabled account.
{approved | suspended}
[approved] is when the account is approved.
[suspended] is when the account is blocked by the admin or the master.
{approved_timestamp} is the timestamp when the account is approved or suspended.
*/
approved: string;
log:number; // Last login timestamp(Seconds).
/**
The user's email address.
This should be a maximum of 64 characters and is only visible to others if the email_public option is set to true.
The email will be unverified if it is changed.
*/
email?:string;
email_verified?:boolean; // Set to true if the user has verified their email.
/**
The user's phone number.
This should be in the format "+0012341234" and is only visible to others if the phone_number_public option is set to true.
The phone number will be unverified if it is changed.
*/
phone_number?:string;
phone_number_verified?:boolean;// Set to true if the user has verified their phone number.
name?:string; // The user's name.
address?:string // The user's address.
gender?:string // The user's gender. Can be "female" or "male"; or other values if neither of these are applicable.
birthdate?:string; // The user's birthdate in the format "YYYY-MM-DD".
email_public?:boolean; // The user's email is public if this is set to true.
phone_number_public?:boolean; // The user's phone number is public if this is set to true.
address_public?:boolean; // The user's address is public if this is set to true.
gender_public?:boolean; // The user's gender is public if this is set to true.
birthdate_public?:boolean; // The user's birthdate is public if this is set to true.
picture?: string; // URL of the profile picture.
profile?: string; // URL of the profile page.
website?: string; // URL of the website.
nickname?: string; // Nickname of the user.
misc?: string; // Additional string value that can be used freely. This value is only visible from skapi.getProfile(). Not to others.
}UserPublic
type UserPublic = {
access_group:number; // The access level of the user's account.
user_id:string; // The user's ID.
locale:string; // The country code of the user's location when they signed up.
/**
Account approval timestamp.
This timestamp is generated when the user confirms their signup, or recovers their disabled account.
[by_skapi | by_admin | by_master] : [approved | suspended] : [timestamp]
[by_master | by_admin]: When the account is created by either master or admin.
[by_skapi]: When the user account is created by either signup confirmation or invitation.
[other]: When logged in by openidLogger, the approval indicating string will be the OpenID Logger's ID that the master has setup in the service.
*/
approved: string; //
timestamp:number; // Account created timestamp(milliseconds).
log:number; // Last login timestamp(milliseconds).
subscribers: number; // The number of accounts subscribed to the user.
subscribed: number; // The number of accounts the user is subscribed to.
records: number; // Total number of records user has produced in the database.
/**
The user's email address.
This should be a maximum of 64 characters and is only visible to others if the email_public option is set to true.
The email will be unverified if it is changed.
*/
email?:string;
/**
The user's phone number.
This should be in the format "+0012341234" and is only visible to others if the phone_number_public option is set to true.
The phone number will be unverified if it is changed.
*/
phone_number?:string;
name?:string; // The user's name.
address?:string // The user's address.
gender?:string // The user's gender. Can be "female" or "male"; or other values if neither of these are applicable.
birthdate?:string; // The user's birthdate in the format "YYYY-MM-DD".
picture?: string; // URL of the profile picture.
profile?: string; // URL of the profile page.
website?: string; // URL of the website.
nickname?: string; // Nickname of the user.
}DatabaseResponse
type DatabaseResponse<T> = {
list: T[]; // List of data from the database.
startKey: { [key: string]: any; }; // Use this start key to fetch more data on the next api call.
endOfList: boolean; // true, when the query has reached the end of data.
startKeyHistory: string[]; // List of stringified start keys.
};RecordData
type RecordData = {
record_id: string; // Record ID of this record
unique_id?: string; // Unique ID of this record
user_id: string; // Uploaders user ID.
updated: number; // Timestamp in milliseconds.
uploaded: number; // Timestamp in milliseconds.
ip: string; // IP address of uploader.
readonly: boolean; // Is true if this record is readonly.
bin: { [key: string]: BinaryFile[] }; // List of binary file info the record is holding.
referenced_count: number;
table: {
name: string; // Table name
access_group: number | 'private' | 'public' | 'authorized' | 'admin'; // Allowed access level of this record.
subscription?: {
is_subscription_record: boolean; // true if the record is posted in subscription table.
exclude_from_feed: boolean; // When true, record will be excluded from the subscribers feed.
notify_subscribers: boolean; // When true, subscribers will receive notification when the record is uploaded.
feed_referencing_records: boolean; // When true, records referencing this record will be included to the subscribers feed.
notify_referencing_records: boolean; // When true, records referencing this record will be notified to subscribers.
}
};
source: {
referencing_limit: null, // Number of reference this record is allowing. Infinite if null.
prevent_multiple_referencing: false, // Is true if this record prevents a single user to upload a record referencing this record multiple times.
can_remove_referencing_records: false, // Is true if the owner of the record can remove the referenced records.
only_granted_can_reference: false, // Is true if only the users who have been granted access to the record can reference this record.
referencing_index_restrictions?: {
/** Not allowed: White space, special characters. Allowed: Alphanumeric, Periods. */
name: string; // Allowed index name
/** Not allowed: Periods, special characters. Allowed: Alphanumeric, White space. */
value?: string | number | boolean; // Allowed index value
range?: string | number | boolean; // Allowed index range
condition?: 'gt' | 'gte' | 'lt' | 'lte' | 'eq' | 'ne' | '>' | '>=' | '<' | '<=' | '=' | '!='; // Allowed index value condition
}[],
allow_granted_to_grant_others?: boolean; // When true, the user who has granted private access to the record can grant access to other users.
},
reference?: string; // Reference ID of this record.
index?: {
name: string; // Index name.
value: string | number | boolean; // Value of the index.
};
tags?: string[]; // List of tags attached to the record.
data?: { [key: string]: any }; // Uploaded JSON data.
};BinaryFile
type BinaryFile = {
access_group: number | 'private' | 'public' | 'authorized' | 'admin'; // Allowed access level of this file.
filename: string; // Filename of the file.
url: string; // Full URL endpoint of the file including the token. Token can be expired and will require to be updated by calling getFile('endpoint')
path: string; // Path of the file.
size: number; // Size of the file in bytes.
uploaded: number; // Timestamp in milliseconds.
getFile: (dataType?: 'base64' | 'download' | 'endpoint' | 'blob' | 'text' | 'info'; progress?: ProgressCallback) => Promise<Blob | string | void | FileInfo>;
}ProgressCallback
type ProgressCallback = (p: {
status: 'download' | 'upload'; // Current status
progress: number; // Progress in percentage
loaded: number; // Loaded size of the data
total: number; // Total size of the data
currentFile?: File, // For files only
completed?: File[]; // For files only
failed?: File[]; // For files only
abort: () => void; // Aborts current data transfer. When abort is triggered during fileUpload(), it will continue to next file.
}) => void;FileInfo
type FileInfo = {
url: string;
filename: string;
access_group: number | 'private' | 'public' | 'authorized';
filesize: number;
record_id: string;
uploader: string;
uploaded: number;
fileKey: string;
}FetchOptions
type FetchOptions = {
limit?: number; // Max number of data to fetch per call. Max 1000. Default = 50.
fetchMore?: boolean; // Fetches next batch of data if true. Default = false.
ascending?: boolean; // Results in ascending order if true
startKey?: { [key: string]: any; }; // When start key is given, database query starts from the given key.
progress?: ProgressCallback // Callback executed when there is data transfer between the server. Can be useful when building progress bar.
}Table
type Table = {
table: string; // Table name in the database.
number_of_records: string; // Number of records in the table.
size: number; // Size in bytes currently consumed in the table. (This does not include cloud storage size which is consumed by binary files)
}Index
type Index = {
table: string; // Table name of the index
index: string; // Index name
number_of_records: number; // Number of records in the index
string_count: number; // Number of string type value in the index
number_count: number; // Number of number type value in the index
boolean_count: number; // Number of boolean type value in the index
total_number: number; // Sum of all number values in the index
total_bool: number; // Number of true(boolean) values in the index
average_number: number; // Average of all numbers in the index
average_bool: number; // Percentage of true(boolean) values in the index
}Tag
type Tag = {
table: string; // Table name of the tag
tag: string; // Tag name
number_of_records: string; // Number records tagged
}UniqueId
type UniqueId = {
unqiue_id: string; // Unique ID of the record
record_id: string; // Record ID of the unique ID
}Subscription
type Subscription = {
subscriber: string; // Subscriber ID
subscription: string; // Subscription ID
timestamp: number; // Subscribed UNIX timestamp
blocked: boolean; // True when subscriber is blocked by subscription
get_feed: boolean; // True when subscriber gets feed
get_notified: boolean; // True when subscriber gets notified
get_email: boolean; // True when subscriber gets email
}RealtimeCallback
type RealtimeCallback = (rt: {
type: 'message' | 'error' | 'success' | 'close' | 'notice' | 'private' | 'reconnect' | 'rtc:incoming' | 'rtc:closed';
message?: any;
connectRTC?: (params: RTCReceiverParams, callback: RTCEvent) => Promise<RTCResolved>; // Incoming RTC
hangup?: () => void; // Reject incoming RTC connection.
sender?: string; // user_id of the sender
sender_cid?: string; // scid of the sender
sender_rid?: string; // group of the sender
code?: 'USER_LEFT' | 'USER_DISCONNECTED' | 'USER_JOINED' | null; // code for notice messeges
}) => void;Newsletter
type Newsletter = {
message_id: string; // Message ID of the newsletter
timestamp: number; // Timestamp of the newsletter
complaint: number; // Number of complaints
read: number; // Number of reads
subject: string; // Subject of the newsletter
bounced: string; // Number of bounces
url: string; // URL of the html file of the newsletter
}RTCConnector
type RTCConnector = {
hangup: () => void; // When executed, user can hangup before the opponent accepts the call.
connection: Promise<RTCResolved>; // Resolves RTC object.
}RTCResolved
type RTCResolved = {
target: RTCPeerConnection;
channels: {
[protocol: string]: RTCDataChannel
};
hangup: () => void;
media: MediaStream;
}RTCEvent
type RTCEvent = (e: {
type: 'track' | 'connectionstatechange' | 'close' | 'message' | 'open' | 'bufferedamountlow' | 'error' | 'icecandidate' | 'icecandidateend' | 'icegatheringstatechange' | 'negotiationneeded' | 'signalingstatechange';
[key: string]: any;
}) => void
```<br><br>